
Trace: • First JVx Application (Step by Step)
The aim of this tutorial is to create an application with the Enterprise Application Framework. Moreover, a quick overview of the framework's possibilities will be given.
The application's task is to display the data from a database table and make them editable. The application requests authentication with username and password.
The following skills and tools are needed:
- Eclipse IDE (>= 3.4) with JDT (recommended: Eclipse IDE for Java EE developers)
- JDK 8.0 (1.8) or higher
- HSQLDB library (http://www.hsqldb.org)
- Database and SQL skills
This documentation covers the following areas:
-
- Client
- Server
Folder Structure
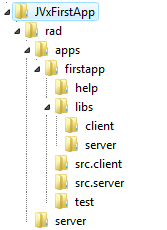
To develop an application with JVx, a special folder structure is recommended. This simplifies the build process and separates any dependencies between client and server. This structure is to be created as follows:
A conventional structure:
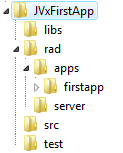
can also be used on request. However, the documentation refers to the recommended structure.
| Folder | Description |
|---|---|
| rad | Contains application- and server-specific files. |
| apps | Contains all available applications. Only one application is contained in this concrete example. |
| firstapp | Contains the application with project configuration, sources, libraries. |
| help | Contains the client for the online help and help pages. |
| libs | Contains all libraries that are necessary both on the client and the server. |
| libs/client | Contains all libraries that are only necessary for the client. |
| libs/server | Contains all libraries that are only necessary for the server. |
| src.client | Contains all the sources that are only necessary for the client. |
| src.server | Contains all the sources that are only necessary for the server. |
| test | Contains unit tests for the client and server or the libraries. |
Once the folder structure has been created, copy the library jvxclient.jar to the folder libs/client and the library jvx.jar to the folder libs/server. Both libraries are contained in the JVx binary package.
Project Configuration
Once the configuration steps have been performed, a new project can be created with Eclipse:
- File / New / Java Project
- Note that the project has to be set up in the application folder
firstapp
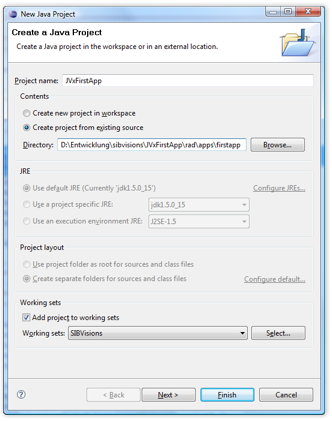
- Remove the
srcfolder from the Source Folders
Set the folderssrc.client,src.serverandtestas Source Folder
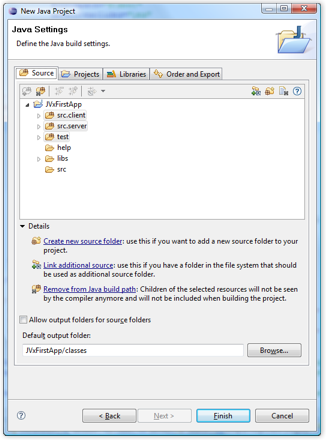
- Add the
jvx.jarlibrary, from the project directoryJVxFirstApp/libs/server
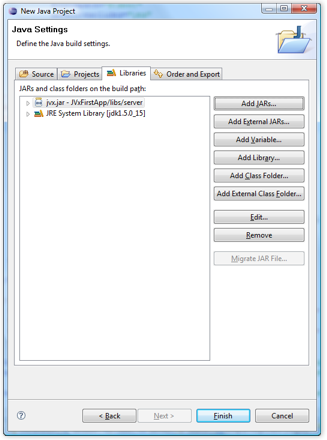
- The project can now be created
The project is shown in Eclipse as follows:
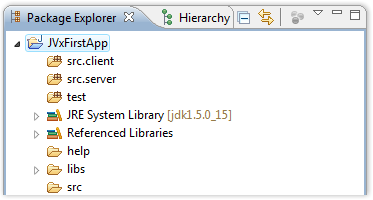
The src folder can be deleted for consistency as it is not needed in our application.
Application Development
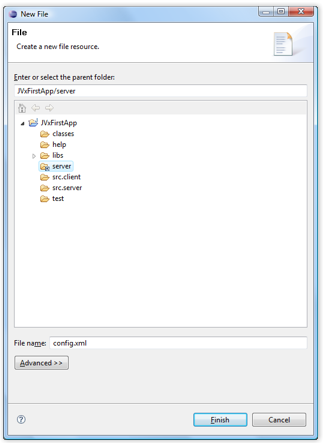
On the server side, the application needs a configuration file for the settings that only concern the application. For the configuration of the server, an extra configuration file is needed. First, we create the file for the application:
- File / New / File - config.xml
(created directly in the application folder JVxFirstApp)
The file is filled as follows:
- config.xml
<?xml version="1.0" encoding="UTF-8"?>

<application>
  <securitymanager>
    <class>com.sibvisions.rad.server.security.XmlSecurityManager</class>
    <userfile>users.xml</userfile>
  </securitymanager>

  <!-- predefined life-cycle object names -->
  <lifecycle>
    <mastersession>apps.firstapp.Session</mastersession>
    <application>apps.firstapp.Application</application>
  </lifecycle>
</application>
| Parameter | Description |
|---|---|
| securitymanager/class | The security manager for verification of the usernames/password when logging into the application. |
| securitymanager/usersfile | The file with the username/password combinations allowed. |
| lifecycle/mastersession | The class name of the server object that is instantiated when the client performs a login or starts a new MasterSession. |
| lifecycle/application | The class name of the server object that is instantiated when the application is first accessed. This object is reused every time the application is accessed. |
The server configuration file must be stored in the folder ../JVxFirstApp/rad/server.
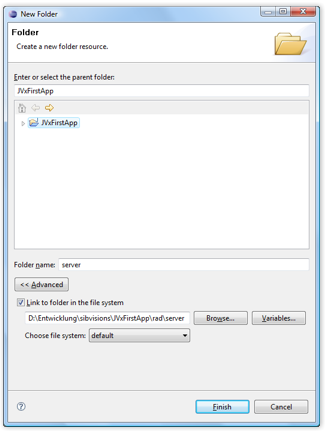
However, the folder does not appear in our Eclipse project because it is at a higher folder level. The configuration file could be created directly in the file system, or we can create a folder link in our project:
- File / New / Folder
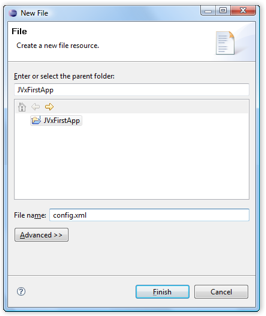
The configuration file can then be created:
- File / New / File - config.xml
The file is filled as follows:
- config.xml
<?xml version="1.0" encoding="UTF-8"?>

<server>
</server>
The server does not need any special parameters for our application.
For the client, we now need a class of type jvx.rad.application.IApplication. A standard implementation of JVx is implemented via com.sibvisions.rad.application.Application. We then derive our client from it and thereby create a class in the directory src.client with the following source code:
- FirstApplication.java
package apps.firstapp;

import jvx.rad.application.genui.UILauncher;
import jvx.rad.remote.IConnection;

import com.sibvisions.rad.application.Application;
import com.sibvisions.rad.server.DirectServerConnection;

/**
 * First application with JVx, Enterprise Application Framework.
 *
 * @author René Jahn
 */
public class FirstApplication extends Application
{
  //~~~~~~~~~~~~~~~~~~~~~~~~~~~~~~~~~~~~~~~~~~~~~~~~~~~~~~~~~~~~~~~~
  // Initialization
  //~~~~~~~~~~~~~~~~~~~~~~~~~~~~~~~~~~~~~~~~~~~~~~~~~~~~~~~~~~~~~~~~

  /**
   * Creates a new instance of <code>FirstApplication</code> with a technology
   * dependent launcher.
   *
   * @param pLauncher the technology dependent launcher
   * @throws Exception if initialization fails
   */
  public FirstApplication(UILauncher pLauncher) throws Exception
  {
    super(pLauncher);
  }

  //~~~~~~~~~~~~~~~~~~~~~~~~~~~~~~~~~~~~~~~~~~~~~~~~~~~~~~~~~~~~~~~~
  // Overwritten Methods
  //~~~~~~~~~~~~~~~~~~~~~~~~~~~~~~~~~~~~~~~~~~~~~~~~~~~~~~~~~~~~~~~~

  /**
   * {@inheritDoc}
   */
  @Override
  protected IConnection createConnection() throws Exception
  {
    return new DirectServerConnection();
  }

  /**
   * {@inheritDoc}
   */
  @Override
  protected String getApplicationName()
  {
    return "firstapp";
  }

}  // FirstApplication
| Method | Description |
|---|---|
| Constructor | The standard constructor cannot be used, as each application is started with a technology-dependent launcher. This launcher is already passed to the application in the constructor. |
| createConnection | The communication protocol is initialized. A DirectServerConnection is sufficient for our application because both the client and the server are started in the same VM. However, if an application server is in use, a HttpConnection could also be used. |
| getApplicationName | Sets the application name. This name is needed for the communication with the server, as the latter uses the appropriate application configuration depending on the application name. In our case, the application name must be firstapp, because the work directory is also called ../JVxFirstApp/rad/firstapp/. The application name MUST always match the directory name! |
It is now time for the first start of the application. To do so, we set up a Runtime configuration:
- Run / Run Configurations… / Application - New launch configuration - with the settings:
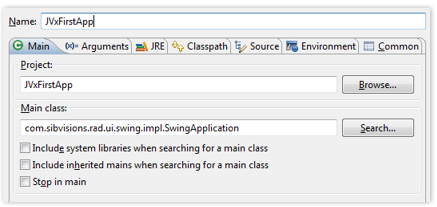
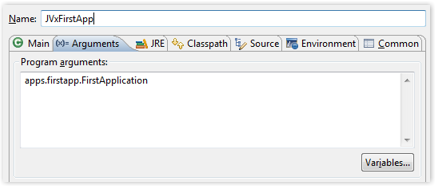
| Parameter | Description |
|---|---|
| Main class | The technology-dependent launcher is defined here. We use the Swing technology for our application and start a Swing application. |
| Program arguments | The launcher must be told which application to start. For our Swing application, we can use the mechanism of program arguments and pass the class name of our application. |
The application can now be started and looks as follows:
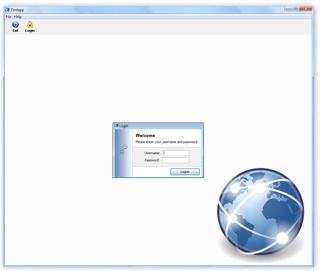
The first login attempt fails with the following message:
Userfile 'users.xml' does not exist!
This file was defined in the config.xml file of the application; however, it has not yet been created. We do so now here:
- File / New / File - users.xml
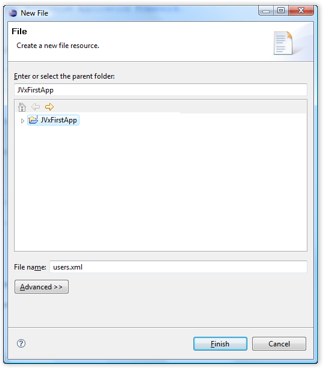
We fill the file with the following:
- users.xml
<?xml version="1.0" encoding="UTF-8"?>

<users>
  <user name="admin" password="admin"/>
</users>
Any number of user lines can be entered!
Now the login to the application works perfectly. However, to fulfill our task, we still need the possibility to display or edit a database table. We will now turn to this part of the task.
Create a Workscreen
Before we create a workscreen, we prepare the application to display the workscreen. To do so, we extend our FirstApplication class as follows:
- FirstApplication.java
package apps.firstapp;

import jvx.rad.application.genui.UILauncher;
import jvx.rad.genui.UIImage;
import jvx.rad.genui.component.UIButton;
import jvx.rad.genui.container.UIToolBar;
import jvx.rad.genui.menu.UIMenu;
import jvx.rad.genui.menu.UIMenuItem;
import jvx.rad.remote.IConnection;

import com.sibvisions.rad.application.Application;
import com.sibvisions.rad.server.DirectServerConnection;

/**
 * First application with JVx, Enterprise Application Framework.
 *
 * @author René Jahn
 */
public class FirstApplication extends Application
{
  //~~~~~~~~~~~~~~~~~~~~~~~~~~~~~~~~~~~~~~~~~~~~~~~~~~~~~~~~~~~~~~~~
  // Initialization
  //~~~~~~~~~~~~~~~~~~~~~~~~~~~~~~~~~~~~~~~~~~~~~~~~~~~~~~~~~~~~~~~~

  /**
   * Creates a new instance of <code>FirstApplication</code> with a technology
   * dependent launcher.
   *
   * @param pLauncher the technology dependent launcher
   */
  public FirstApplication(UILauncher pLauncher)
  {
    super(pLauncher);
  }

  //~~~~~~~~~~~~~~~~~~~~~~~~~~~~~~~~~~~~~~~~~~~~~~~~~~~~~~~~~~~~~~~~
  // Overwritten Methods
  //~~~~~~~~~~~~~~~~~~~~~~~~~~~~~~~~~~~~~~~~~~~~~~~~~~~~~~~~~~~~~~~~

  /**
   * {@inheritDoc}
   */
  @Override
  protected IConnection createConnection() throws Exception
  {
    return new DirectServerConnection();
  }

  /**
   * {@inheritDoc}
   */
  @Override
  protected String getApplicationName()
  {
    return "firstapp";
  }

  /**
  * {@inheritDoc}
  */
  @Override
  protected void afterLogin()
  {
    super.afterLogin();

    //configure MenuBar

    UIMenu menuMasterData = new UIMenu();
    menuMasterData.setText("Master data");

    UIMenuItem miDBEdit = createMenuItem
                          ("doOpenDBEdit", null, "DB Edit",
                           UIImage.getImage(UIImage.SEARCH_LARGE));

    menuMasterData.add(miDBEdit);

    //insert before Help
    getMenuBar().add(menuMasterData, 1);

    //configure ToolBar

    UIToolBar tbMasterData = new UIToolBar();

    UIButton butDBEdit = createToolBarButton
                         ("doOpenDBEdit", null, "DB Edit",
                          UIImage.getImage(UIImage.SEARCH_LARGE));

    tbMasterData.add(butDBEdit);

    getLauncher().addToolBar(tbMasterData);
  }

  //~~~~~~~~~~~~~~~~~~~~~~~~~~~~~~~~~~~~~~~~~~~~~~~~~~~~~~~~~~~~~~~~
  // Actions
  //~~~~~~~~~~~~~~~~~~~~~~~~~~~~~~~~~~~~~~~~~~~~~~~~~~~~~~~~~~~~~~~~

  /**
   * Opens the edit screen.
   */
  public void doOpenDBEdit()
  {
    //TODO open the workscreen
  }

}  // FirstApplication
| Method | Description |
|---|---|
| afterLogin | This method is invoked form the super class after a successful login. We use this method to extend our menu and our toolbar. It is not necessary to undo our changes after logout as this is done by the super class. |
| doOpenDBEdit | This method is called when the menu or the toolbar button is selected. |
| createMenuItem | Provided by the super class to create menu entries. The first parameter contains the name of the method that is to be called when the menu entry is selected. The second parameter contains the command (ActionCommand) which does not play any role in our case. The text of the menu entry is to be defined in the third parameter, and, lastly, the image for the entry is passed. |
| createToolBarButton | Similar to createMenuItem, except here a button is created which adjusts itself to the layout of the toolbar. |
| UIImage.getImage | Provides a predefined image from the image library of JVx. We use a predefined image for convenience. |
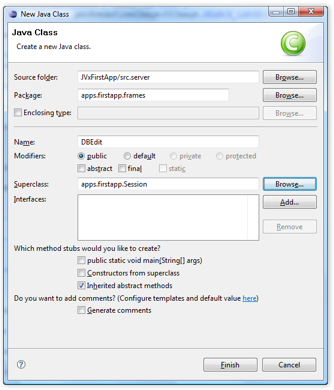
We now create the client class for our workscreen:
- File / New / Class
src.client,apps.firstapp.frames.DBEditFrame
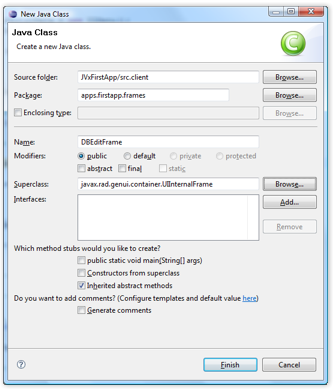
and use the following source code:
- DBEditFrame.java
package apps.firstapp.frames;

import jvx.rad.genui.container.UIGroupPanel;
import jvx.rad.genui.container.UIInternalFrame;
import jvx.rad.genui.control.UITable;
import jvx.rad.genui.layout.UIBorderLayout;
import jvx.rad.remote.AbstractConnection;
import jvx.rad.remote.MasterConnection;

import com.sibvisions.rad.application.Application;
import com.sibvisions.rad.model.remote.RemoteDataBook;
import com.sibvisions.rad.model.remote.RemoteDataSource;

/**
 * A simple database table editor.
 *
 * @author René Jahn
 */
public class DBEditFrame extends UIInternalFrame
{
  //~~~~~~~~~~~~~~~~~~~~~~~~~~~~~~~~~~~~~~~~~~~~~~~~~~~~~~~~~~~~~~~~
  // Class Members
  //~~~~~~~~~~~~~~~~~~~~~~~~~~~~~~~~~~~~~~~~~~~~~~~~~~~~~~~~~~~~~~~~

  /** the application. */
  private Application application;

  /** the communication connection to the server. */
  private AbstractConnection connection;

  /** the DataSource for fetching table data. */
  private RemoteDataSource dataSource = new RemoteDataSource();

  /** the contacts tabl. */
  private RemoteDataBook rdbContacts = new RemoteDataBook();

  //~~~~~~~~~~~~~~~~~~~~~~~~~~~~~~~~~~~~~~~~~~~~~~~~~~~~~~~~~~~~~~~~
  // Initialization
  //~~~~~~~~~~~~~~~~~~~~~~~~~~~~~~~~~~~~~~~~~~~~~~~~~~~~~~~~~~~~~~~~

  /**
   * Creates a new instance of DBEditFrame for a specific application.
   *
   * @param pApp the application
   * @throws Throwable if the remote access fails
   */
  public DBEditFrame(Application pApp) throws Throwable
  {
    super(pApp.getDesktopPane());

    application = pApp;

    initializeModel();
    initializeUI();
  }

  /**
   * Initializes the model.
   *
   * @throws Throwable if the initialization throws an error
   */
  private void initializeModel() throws Throwable
  {
    //we use a new "session" for the screen
    connection = ((MasterConnection)application.getConnection()).
    createSubConnection("apps.firstapp.frames.DBEdit");
    connection.open();

    //data connection
    dataSource.setConnection(connection);
    dataSource.open();

    //table
    rdbContacts.setDataSource(dataSource);
    rdbContacts.setName("contacts");
    rdbContacts.open();
  }

  /**
   * Initializes the UI.
   *
   * @throws Exception if the initialization throws an error
   */
  private void initializeUI() throws Exception
  {
    UIGroupPanel group = new UIGroupPanel();
    group.setText("Available Contacts");

    UITable table = new UITable();
    table.setDataBook(rdbContacts);

    group.setLayout(new UIBorderLayout());
    group.add(table);

    //same behaviour as centered component in BorderLayout
    setLayout(new UIBorderLayout());
    add(group);

    setTitle("Contacts");
    setSize(new UIDimension(400, 500));
  }

  //~~~~~~~~~~~~~~~~~~~~~~~~~~~~~~~~~~~~~~~~~~~~~~~~~~~~~~~~~~~~~~~~
  // Overwritten Methods
  //~~~~~~~~~~~~~~~~~~~~~~~~~~~~~~~~~~~~~~~~~~~~~~~~~~~~~~~~~~~~~~~~

  /**
   * Closes the communication connection and disposes the frame.
   */
  @Override
  public void dispose()
  {
    try
    {
      connection.close();
    }
    catch (Throwable th)
    {
      //nothing to be done
    }
    finally
    {
      super.dispose();
    }
  }

} // DBEditFrame
| Method | Description |
|---|---|
| initializeModel | Instantiates the objects for access to the server or data. |
| InitializeUI | Layout of the workscreen. |
| dispose | Ends the connection to the server for the workscreen and closes the frame. The connection must not be explicitly closed, as this takes place fully automatically by the GarbageCollector. This is, however, not a drawback in our first application. |
| createSubConnection | We create our own connection to the server. This has the advantage that a separate lifecycle object is used on the server. This object contains all objects which are needed by the workscreen. Once the workscreen is closed, the used memory is released. Moreover, each connection can have special parameters and timeouts. The requested lifecycle object is defined with the class name: apps.firstapp.frames.DBEdit. The class we will create later. |
| Member | Description |
|---|---|
| connection | The connection to the server, especially for the workscreen. A special communication protocol is used in the background. In our case, it is represented by the class DirectServerConnection. |
| dataSource | The data source is independent of the communication protocol and takes care of the data transfer between client and server. The connection defines under which name the server-side object is to be found in the lifecycle object. |
| rdbContacts | The model and the controller for data display. The name contacts defines under which name the server-side business object can be found. |
| table | The view for data display. |
The workscreen is now ready and can be integrated in the application. We now implement the missing call:
- FirstApplication.java
public class FirstApplication extends Application
{
  ...
  ...
  ...

  /**
   * Opens the edit screen.
   *
   * @throws Throwable if the edit frame can not be opened
   */
  public void doOpenDBEdit() throws Throwable
  {
    DBEditFrame frame = new DBEditFrame(this);

    configureFrame(frame);

    frame.setVisible(true);
  }

}  // FirstApplication
| Method | Description |
|---|---|
| doOpenDBEdit | The method can easily throw a Throwable. All application errors are caught by the application and shown in an information dialogue. |
| configureFrame | This method is provided by the super class and ensures that all frames have a similar look. This also includes the menu icon. |
The client implementation is now finished. Before we can use the application, we must create the missing server classes. We create the following classes:
- File / New / Class
src.server,apps.firstapp.Application
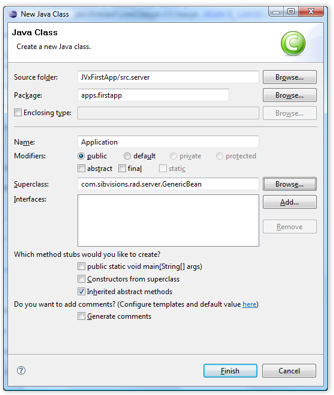
- Application.java
package apps.firstapp;

import com.sibvisions.rad.server.GenericBean;

/**
 * The LCO for the application.
 *
 * @author René Jahn
 */
public class Application extends GenericBean
{

}  // Application
| Description |
|---|
| The class represents the lifecycle object for an application. There is exactly one instance of this class for each application, thereby enabling the use of session-wide objects. |
- File / New / Class
src.server,apps.firstapp.Session
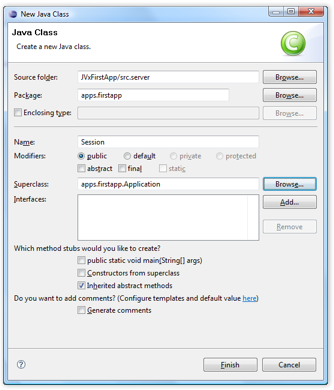
- Session.java
package apps.firstapp;

import com.sibvisions.rad.persist.jdbc.DBAccess;
import com.sibvisions.rad.persist.jdbc.IDBAccess

/**
 * The LCO for the session.
 *
 * @author René Jahn
 */
public class Session extends Application
{
  //~~~~~~~~~~~~~~~~~~~~~~~~~~~~~~~~~~~~~~~~~~~~~~~~~~~~~~~~~~~~~~~~
  // User-Defined Methods
  //~~~~~~~~~~~~~~~~~~~~~~~~~~~~~~~~~~~~~~~~~~~~~~~~~~~~~~~~~~~~~~~~

  /**
   * Returns access to the database.
   *
   * @return the database access
   * @throws Exception if a connection error occurs
   */
  public IDBAccess getDBAccess() throws Exception
  {
    DBAccess dba = (DBAccess)get("dBAccess");

    if (dba == null)
    {
      dba = new HSQLDBAccess();

      dba.setUrl("jdbc:hsqldb:hsql://localhost/firstappdb");
      dba.setUsername("sa");
      dba.setPassword("");
      dba.open();

      put("dBAccess", dba);
    }

    return dba;
  }

}  // Session
| Description |
|---|
| The class represents a lifecycle object for a session. In our case, a session begins with the login to the application and ends with the logout. There is exactly one instance of this object for each session. This allows objects to be used for the full duration of the login. Thanks to the inheritance of apps.firstapp.Application, it is very easy to use even application objects. |
| Method | Description |
|---|---|
| getDBAccess | Opens a new connection to a HyperSQL database if this has not already happened. The exception handling is taken over by the server. |
- File / New / Class
src.server,apps.firstapp.frames.DBEdit
- DBEdit.java
package apps.firstapp.frames;

import jvx.rad.persist.IStorage;

import com.sibvisions.rad.persist.jdbc.DBStorage;

import apps.firstapp.Session;

/**
 * The LCO for the DBEdit WorkScreen.
 *
 * @author René Jahn
 */
public class DBEdit extends Session
{
  //~~~~~~~~~~~~~~~~~~~~~~~~~~~~~~~~~~~~~~~~~~~~~~~~~~~~~~~~~~~~~~~~
  // User-Defined Methods
  //~~~~~~~~~~~~~~~~~~~~~~~~~~~~~~~~~~~~~~~~~~~~~~~~~~~~~~~~~~~~~~~~

  /**
   * Returns the contacts storage.
   *
   * @return the contacts storage
   * @throws Exception if the initialization throws an error
   */
  public IStorage getContacts() throws Exception
  {
    DBStorage dbsContacts = (DBStorage)get("contacts");

    if (dbsContacts == null)
    {
      dbsContacts = new DBStorage();
      dbsContacts.setDBAccess(getDBAccess());
      dbsContacts.setFromClause("CONTACTS");
      dbsContacts.setWritebackTable("CONTACTS");
      dbsContacts.open();

      put("contacts", dbsContacts);
    }

    return dbsContacts;
  }

}  // DBEdit
| Description |
|---|
The class represents the lifecycle object for the DBEditFrame workscreen. The objects can only be accessed via the SubConnection of the workscreen. Thanks to the inheritance of apps.firstapp.Session, it is very easy to access all Session and Application objects. |
| Method | Description |
|---|---|
| getContacts | Enables the access to the database table CONTACTS. The method name must match the object name of the RemoteDataBook: contacts ⇒ getContacts. The Exception Handling is taken over by the Server. |
The application is now fully implemented and ready to run. So as to be able to work with the application, we need a database with the CONTACTS table that we want to access. The configuration of HyperSQL DB is not described in detail in this document, as the examples on the project page are detailed and sufficient. In the next chapter, you will find a short summary of the necessary steps.
Create Database
The following steps should take place to create and start a HyperSQL DB.
- Copy the HyperSQL JDBC-Driver (
hsqldb.jar) to the directory../JVxFirstApp/libs/server/ - Add the JDBC-Driver to the CLASSPATH of the JVxFirstApp Project
- Create a database with the alias firstappdb and the following table:
CREATE TABLE CONTACTS
(
  ID            INTEGER IDENTITY,
  FIRSTNAME     VARCHAR(200) NOT NULL,
  LASTNAME      VARCHAR(200) NOT NULL,
  BIRTHDAY      DATE,
  STREET        VARCHAR(200),
  NR            VARCHAR(200),
  ZIP           VARCHAR(4),
  TOWN          VARCHAR(200)
)
- Start the database, e.g.:
java -cp ../libs/server/hsqldb.jar org.hsqldb.Server -database.0
     file:firstappdb -dbname.0 firstappdb
The First Application
Once the database has been started, the application can also be started. The final application should look as follows:

The source code and the Eclipse project can be found in the Download section.