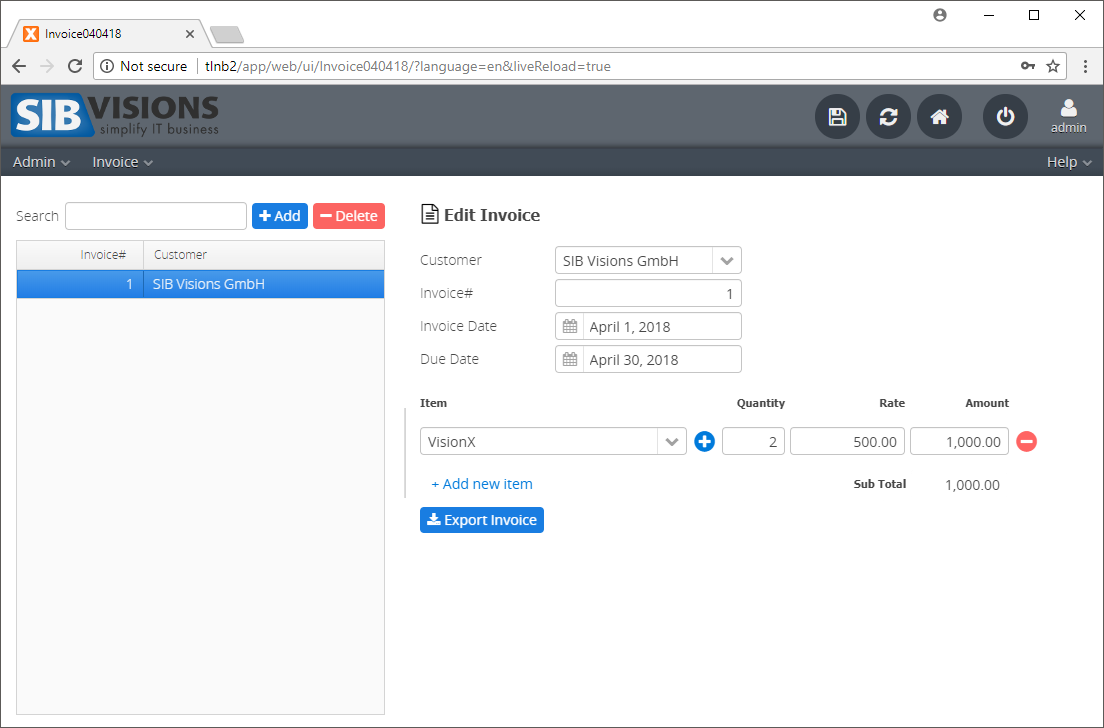
Trace: • Invoice Application
Table of Contents
Version: 5.0 / 2019-07-01
Introduction
The objective of this tutorial is the creation of an invoice application with VisionX. It is assumed that a VisionX project is already available. If you haven't created an application yet, refer to the VisionX documentation "First Application" where the creation is described in detail.
Creating a Workscreen
First, we need to create a workscreen in VisionX. Press the “New Screen” button (1), fill in a Name, and click “Next” (2).
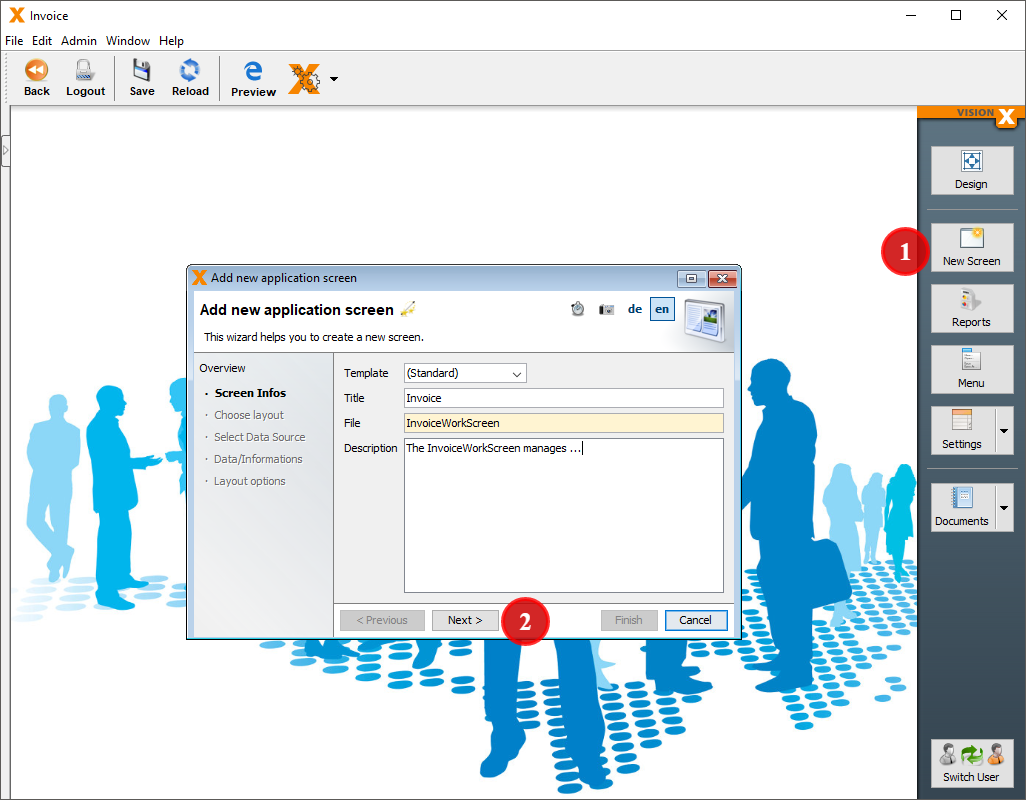
In the following wizard, select “Application screen with one Grid and Detail Form” and press “Next”.

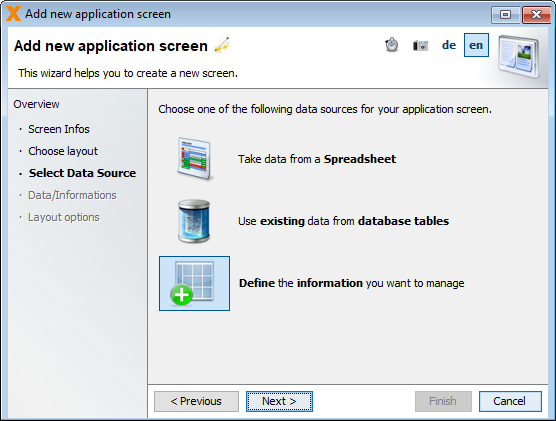
In the next step, we go with the third option and define the information we want to manage ourselves.
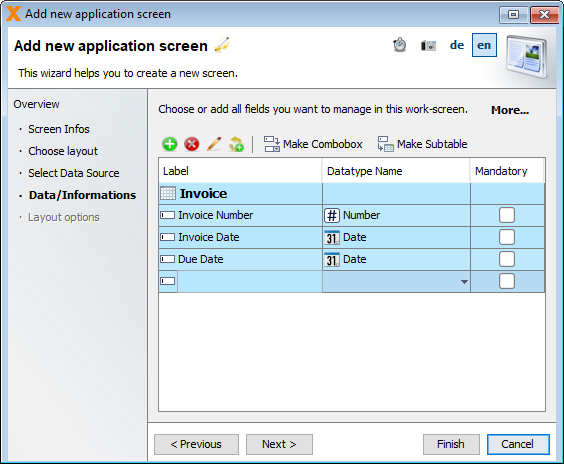
In this wizard, we create the table for our invoices. For this, we create three columns: one to store the invoice number, one with our invoice date, and one column when the payment is due.
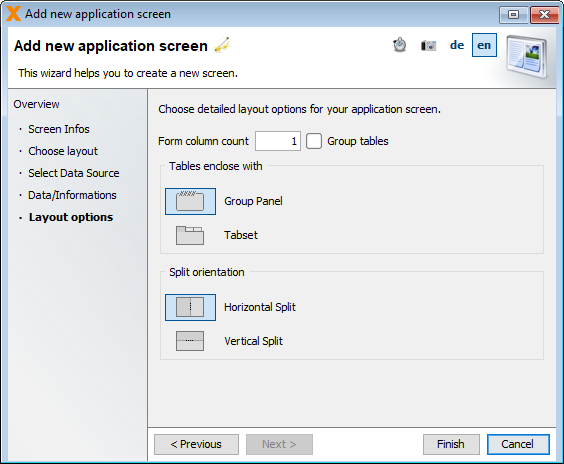
After pressing “Next”, we are prompted to choose the detailed layout options for our screen. We are going with a form column count of one and leave everything else as it is and click “Finish”.
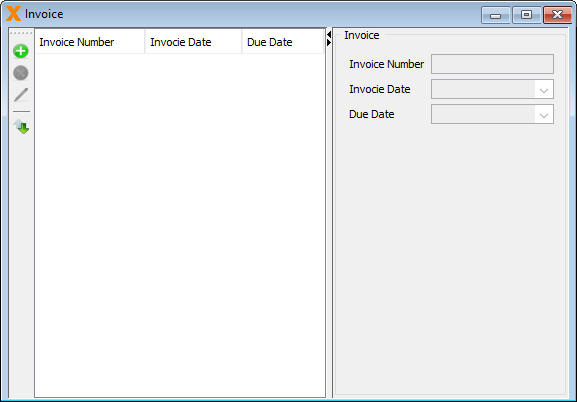
We are now greeted with our application screen.
Finishing the Data Model
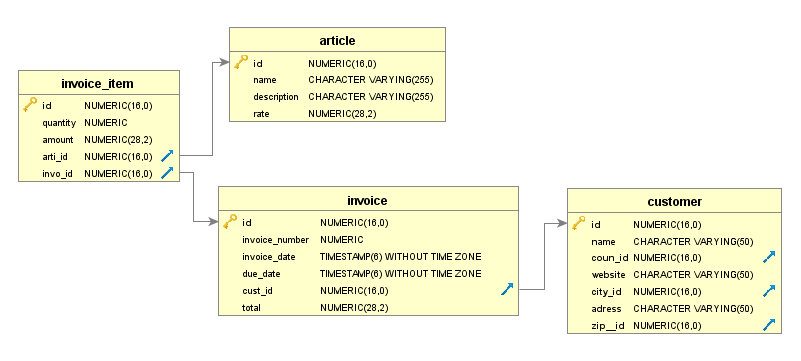
For this invoicing application, we are going to create the following data model:
Add Customers (Combobox)
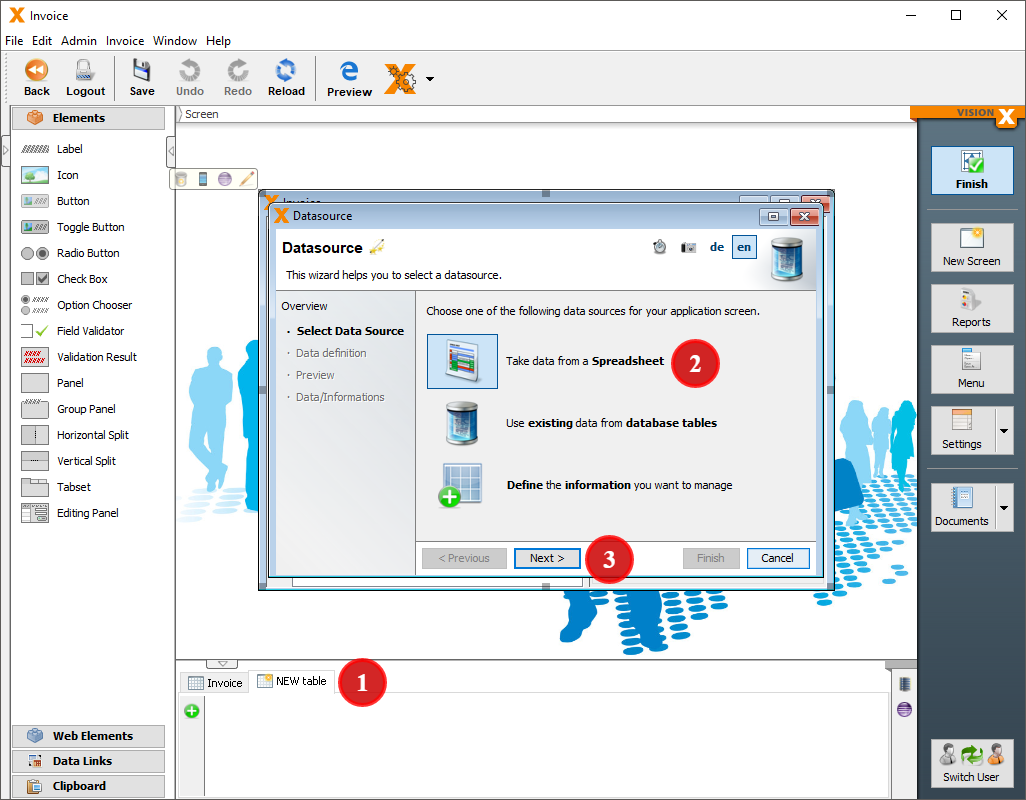
The data model for our invoice application is not done yet. To send out our invoices, we need a table to store our customers in. For this purpose, we are going to create our table from .csv data. In the bottom, middle part of VisionX, press “NEW table” (1) and choose the first option to “Take data from a Spreadsheet” (2). Press “Next” (3) to continue.
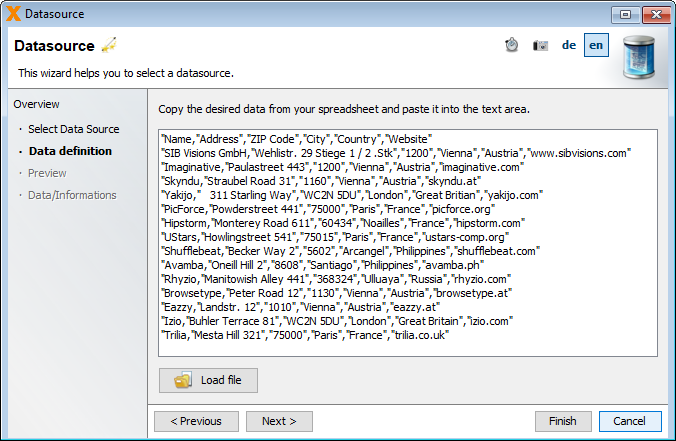
In this screen, we paste the following string of data to create the table and press “Next”. This list could be copied from an existing customer list as well.
"Name,"Address","ZIP Code","City","Country","Website"
"SIB Visions GmbH,"Wehlistr. 29 Stiege 1 / 2 .Stk","1200","Vienna","Austria","www.sibvisions.com"
"Imaginative,"Paulastreet 443","1200","Vienna","Austria","imaginative.com"
"Skyndu,"Straubel Road 31","1160","Vienna","Austria","skyndu.at"
"Yakijo,"   311 Starling Way","WC2N 5DU","London","Great Britian","yakijo.com"
"PicForce,"Powderstreet 441","75000","Paris","France","picforce.org"
"Hipstorm,"Monterey Road 611","60434","Noailles","France","hipstorm.com"
"UStars,"Howlingstreet 541","75015","Paris","France","ustars-comp.org"
"Shufflebeat,"Becker Way 2","5602","Arcangel","Philippines","shufflebeat.com"
"Avamba,"Oneill Hill 2","8608","Santiago","Philippines","avamba.ph"
"Rhyzio,"Manitowish Alley 441","368324","Ulluaya","Russia","rhyzio.com"
"Browsetype,"Peter Road 12","1130","Vienna","Austria","browsetype.at"
"Eazzy,"Landstr. 12","1010","Vienna","Austria","eazzy.at"
"Izio,"Buhler Terrace 81","WC2N 5DU","London","Great Britain","izio.com"
"Trilia,"Mesta Hill 321","75000","Paris","France","trilia.co.uk"
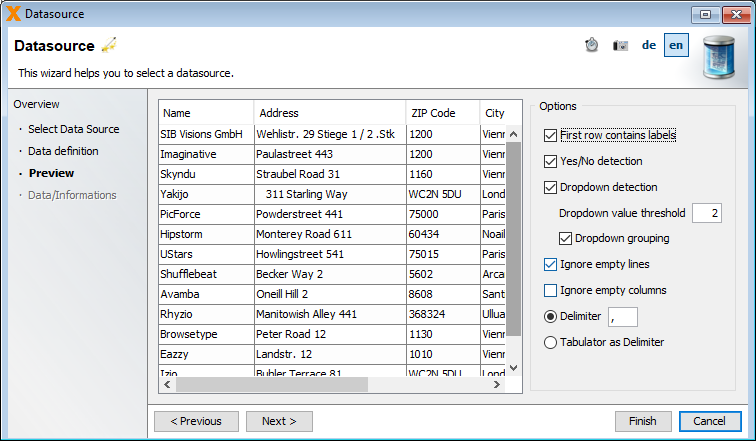
In the “Options” group of this screen, we select “First row contains labels” and choose “,” as the delimiter for our data.
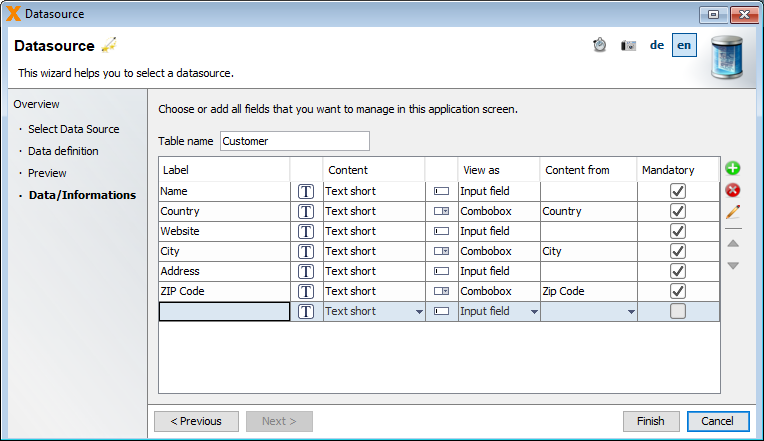
For the last step, we just change the “Table name” and leave everything else as it is. After pressing “Finish”, our customer table is created and already has some data in it.
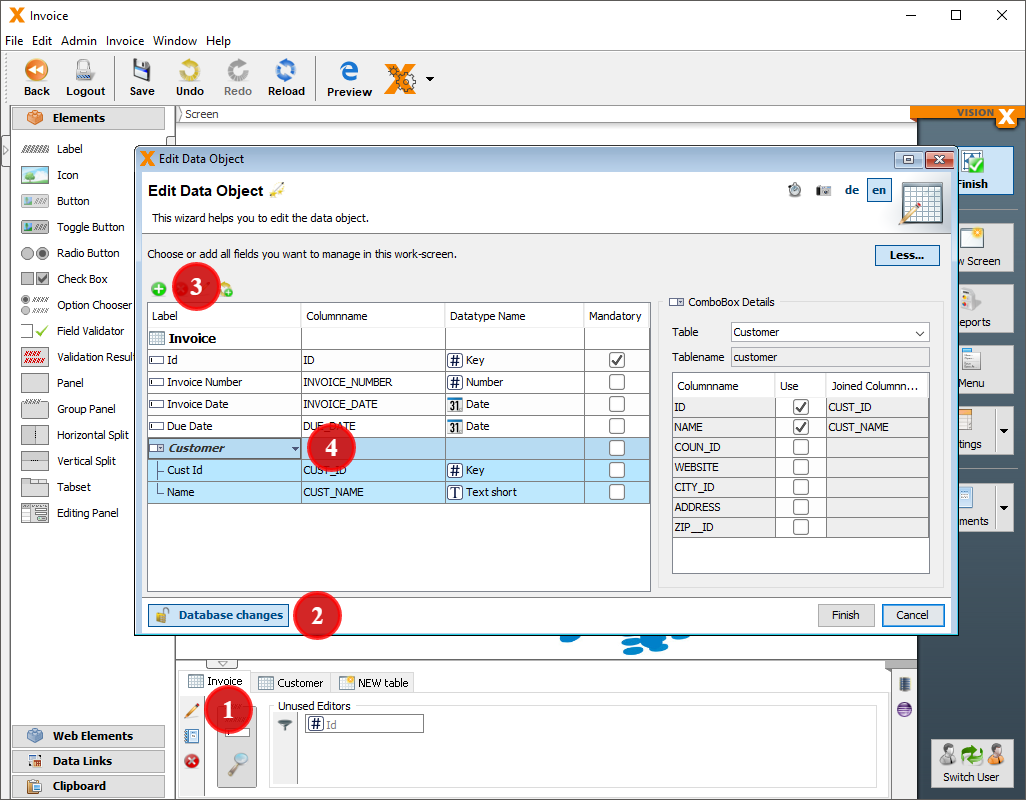
Our data model is not quite finished yet as we still need to create a reference of our customers in the invoice table. To do this, we are going to edit (1) the table. In this screen, we once again press the “More…” button to reveal additional options. Press the “Database changes” button (2), add a new column (3), and select “Make Combobox”. This time we select the customer table (4) and press “Finish”.
Add Articles
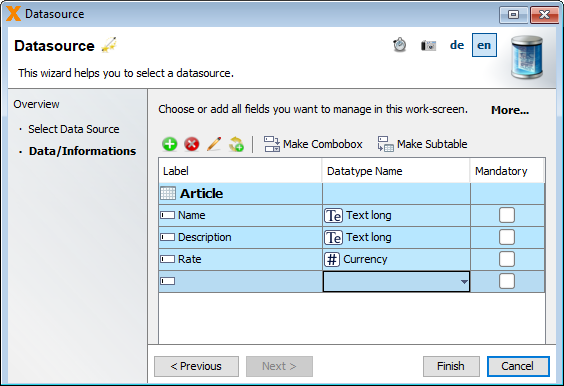
Every invoice needs articles/items, so, as the next step, we are going to create a table to store our articles in. We once again create a new table and, same as in the invoice table we created before we, are going to define the information ourselves. Our article table consists of a name, a description, and a the rate of our article.
Add Items (Master-Detail)
The last table we are going to create is the invoice item table. This table consists of a reference to the article table, a quantity, and an amount(rate * quantity). For this, we are going to create a subtable in our invoice table. This way the database already knows which invoice items are related to which invoices. To do this, we press the “Edit” button on the invoice table.
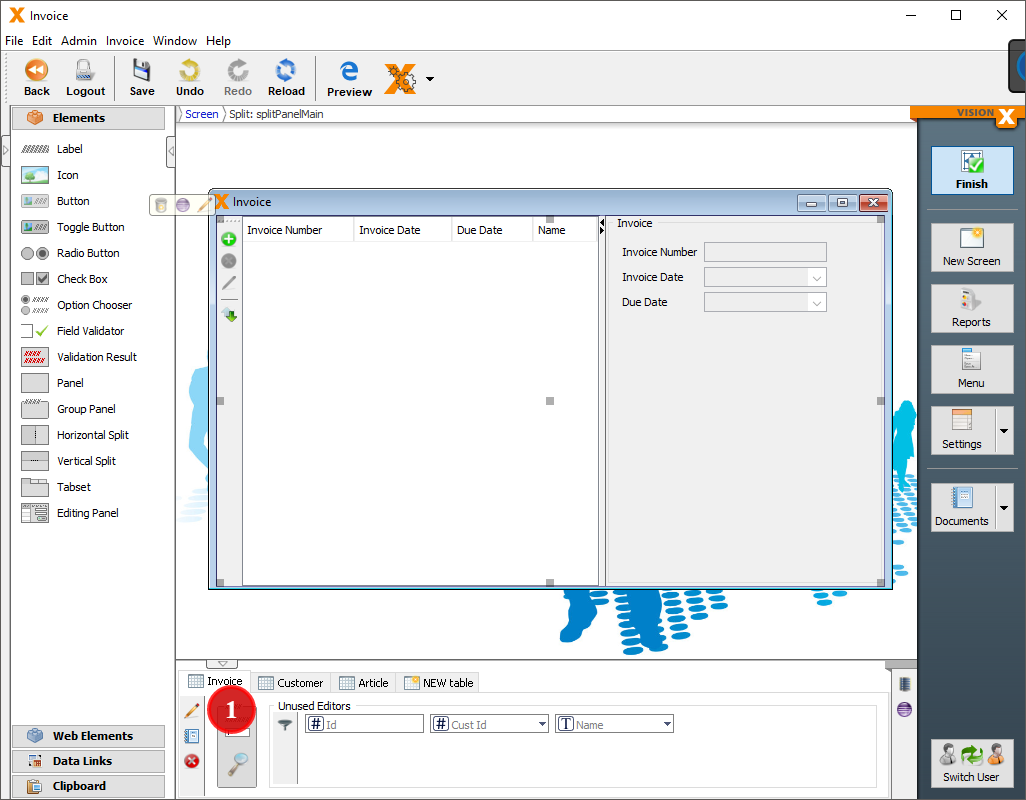
In the following wizard, we press the “More…” button. Press on “Database changes” and add a new column to the table. Now we press the “Make Subtable” button above the table.
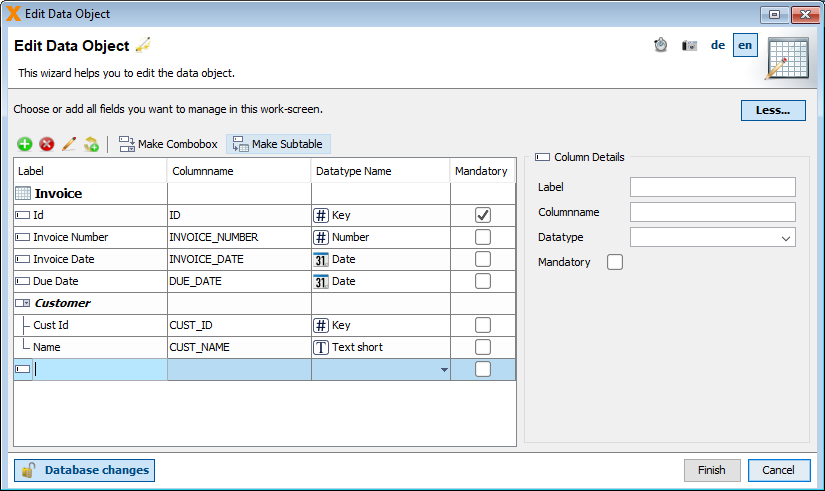
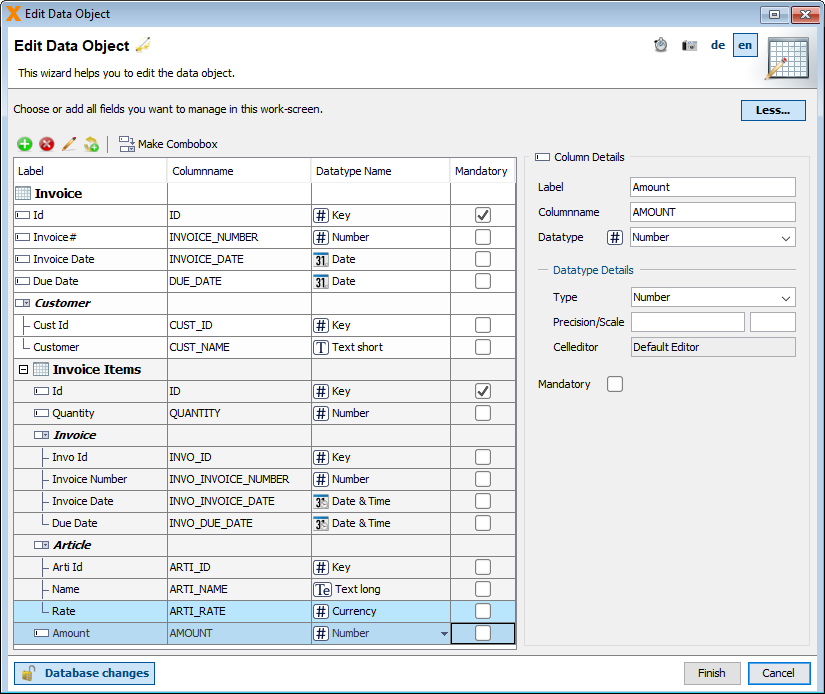
We name our table “Invoice Items” and add the columns quantity and amount and a reference to the article table. Press “Finish” to create the subtable and, therefore, our data model.
Laying Out the Invoice Screen
Change Table
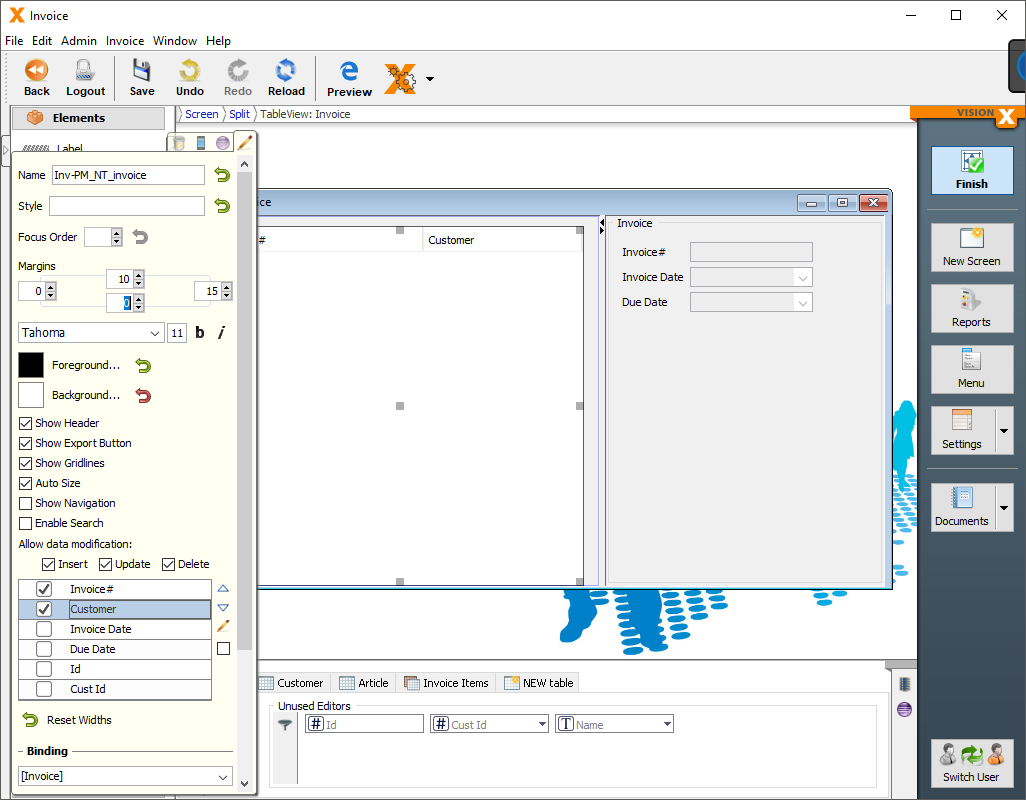
Up next is the laying out of our application. The created screen is a good start, but we need to change a few things to make it a proper invoicing application. First off, we are going to change the columns shown in the left side table. For this, we press the “Edit” button (1) on the table. Here, we tick off the columns (2) we don't want to be shown, in this case invoice date and due date. In this table, we also change the label of the columns. We also turn off the navigation (3) in this table, as we are going to do this via buttons. We change the margins (4) for our table to make it look nicer. With this, we are done editing the table.
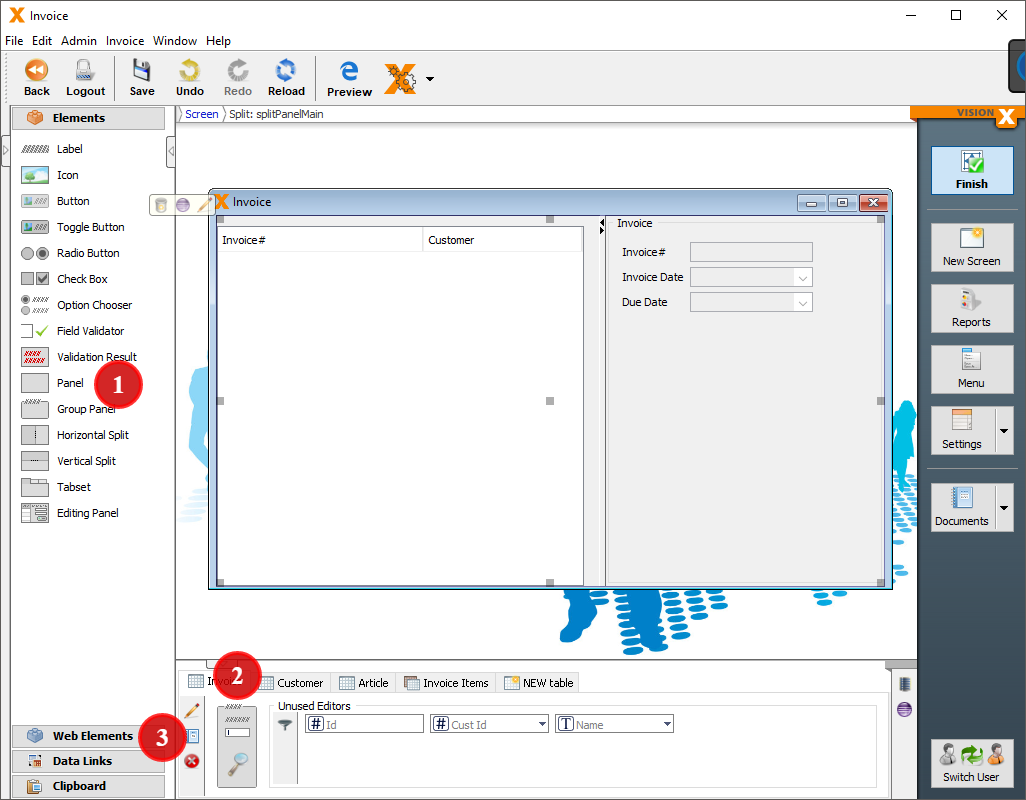
The table still needs a search bar and buttons for adding and deleting a new invoice. Add a panel (1) on the north side of our table. In this panel, we are going to add the search bar, (2) and an “Insert”, and a “Delete” button from the “Web Elements”(3).
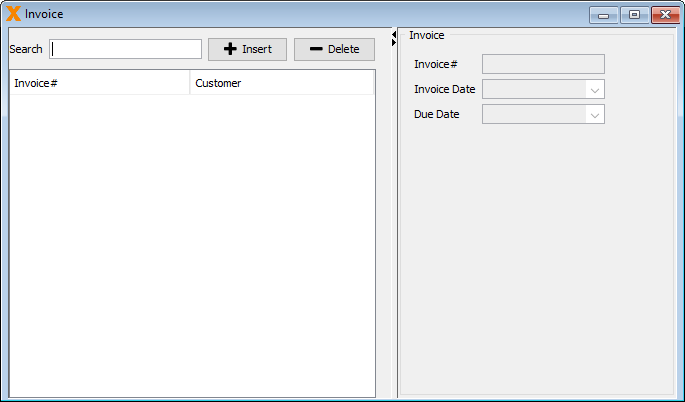
After changing the labels of our buttons, this is what the screen should look by now.
Add Invoice Items
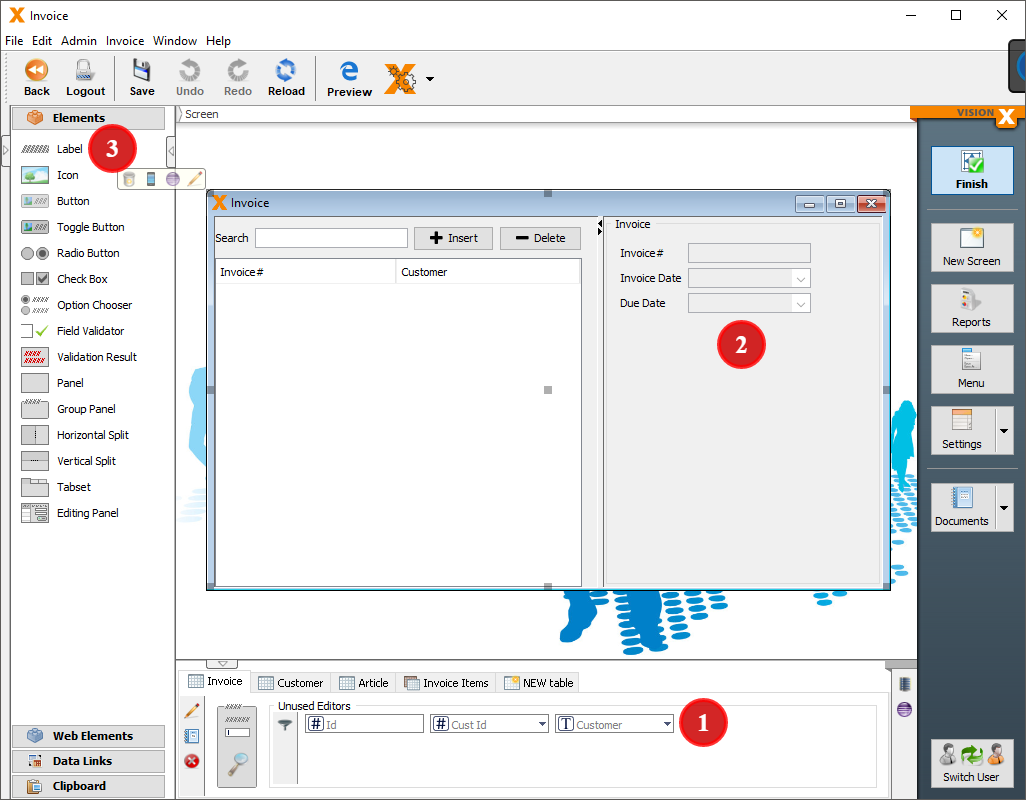
To lay out the form, we are going to add the customer selection on top. Just take the “Customer” (1) editor from the “Unused Editors” section and drag it into the screen (2). We also add a label (3) in front of the editor.
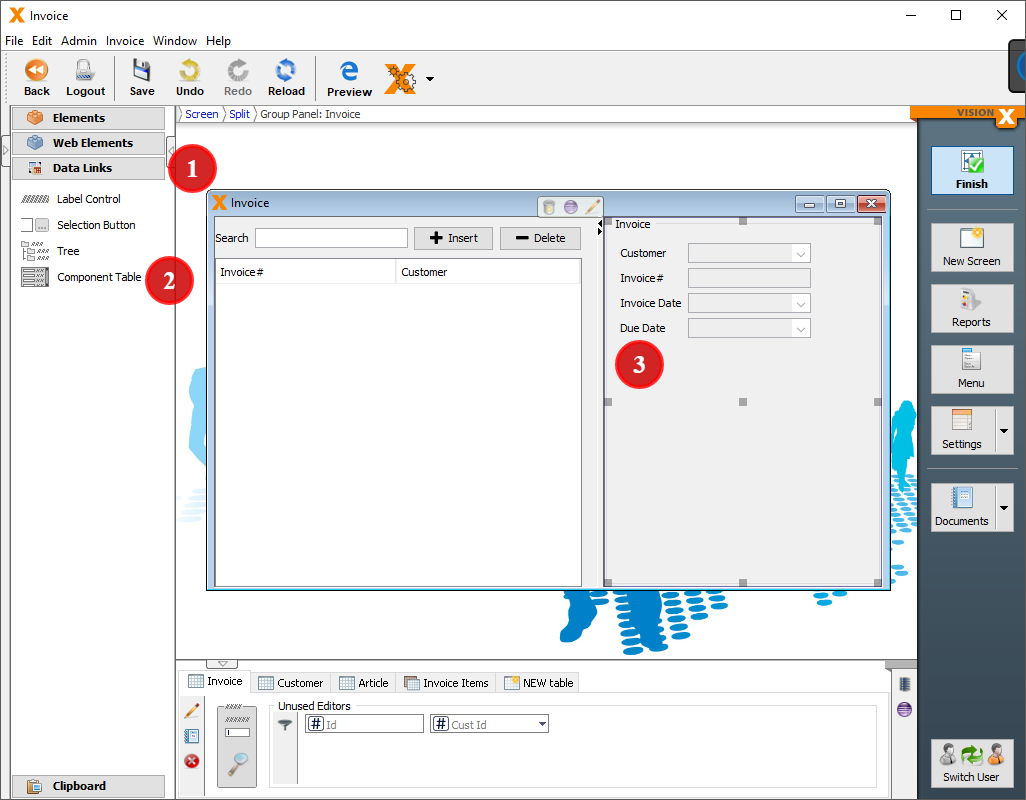
To add items to our invoice, we are not going to use a standard table, but a special “Component Table”. This kind of table is typically used in web applications. To add this control, we select “Data Links” (1) in the left sidebar of VisionX. Now, we drag the “Component Table” (2) directly under our form (3).
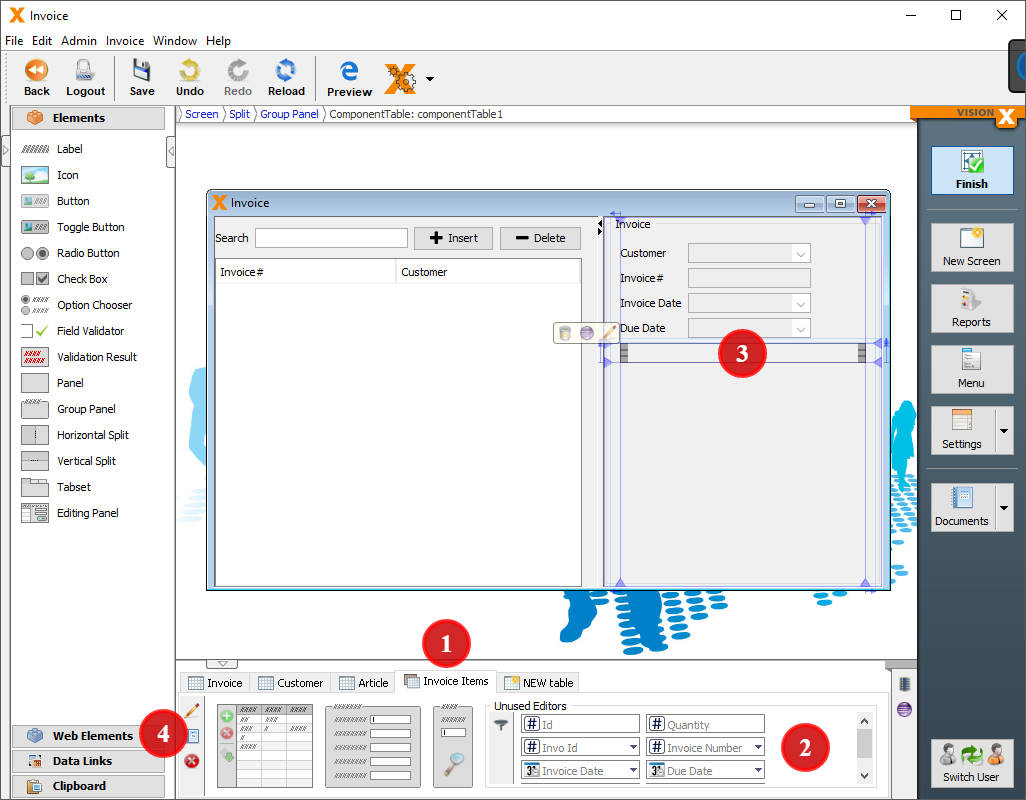
This control is built in such a way that everything you put into it is copied for each row in a table. For instance, if we add the editors of our invoice items table into the “Component Table”, the editors are “cloned” for every item in our invoice. That means we are going to select our invoice item table (1) in the bottom of VisionX. We are adding the following editors: “Name”, “Quantity”, “Rate”, and “Amount” (2) in this order into the control (3). Next to the editors we add a “Delete” button from the “Web Elements”(4) to delete the specific item.
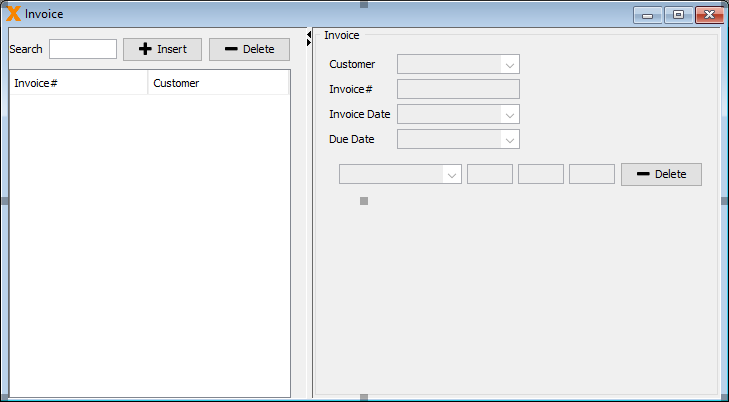
After this step, the screen should look like this in the designer:
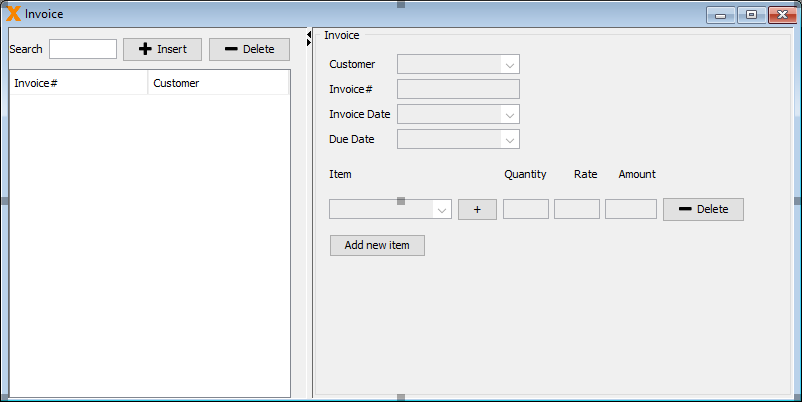
We don't want the labels for our columns cloned, so we add those outside and on top of our table in their own panel. As the last step, we are going to add a button next to the item column in order to add a new article to the article table and a button under the “Component Table” to add a new invoice item. When everything is set into place, this is how our screen should look in the editor by now.
Adding the Functionality
We added all those buttons in the preceding steps, and now we are going to add some functionality to them.
Adding/Deleting Invoices
The “Insert” and the “Delete” button from our “Web Elements” already have all the required actions to add and delete a new invoice, so we don't need to change anything here.
Adding/Deleting Invoice Items
Next up, we are going to edit the actions for the “Add new item” and “Delete” buttons for the invoice item table in the “Component Table”.
Action for the “Add New Item” button:
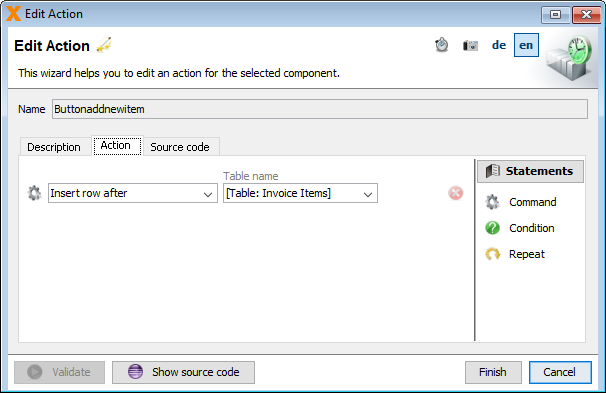
The “Delete” button we added already has all the required actions to delete an invoice item, so there is nothing to do here.
Adding Articles (Master Data/Popup)
The last button on our list is the “Add Article” button. This button will be used to add articles to our database that can be chosen as the items for our invoice. For this, we are going to create a popup screen. Press the “New Screen” button to create a new workscreen. In the second part of the wizard, we choose “Application screen as Form” now. As the data source, we choose “Use existing data from database tables”, select “Use Application Database User” in the next step, and select our article table in the penultimate step. In the layout options, we choose a “Form” column count of one and press “Finish” to create the screen. If everything was done correctly, we are greeted with this screen:
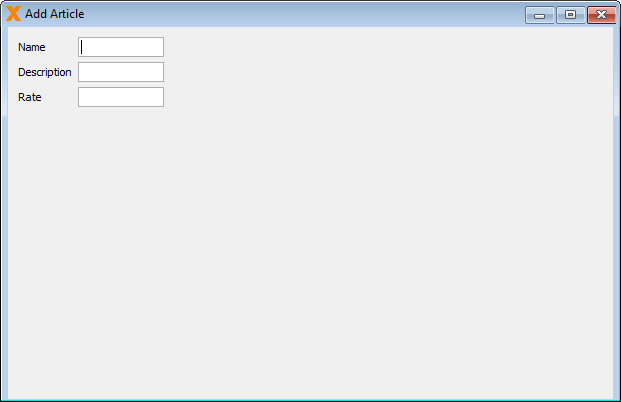
In this screen, we add a “Save” and a “Cancel” button and change up the layout and size a bit.
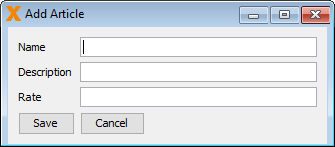
To make our screen open as a popup, select the screen and press its edit button (1). Tick “Show as Popup” (2), and we are done.
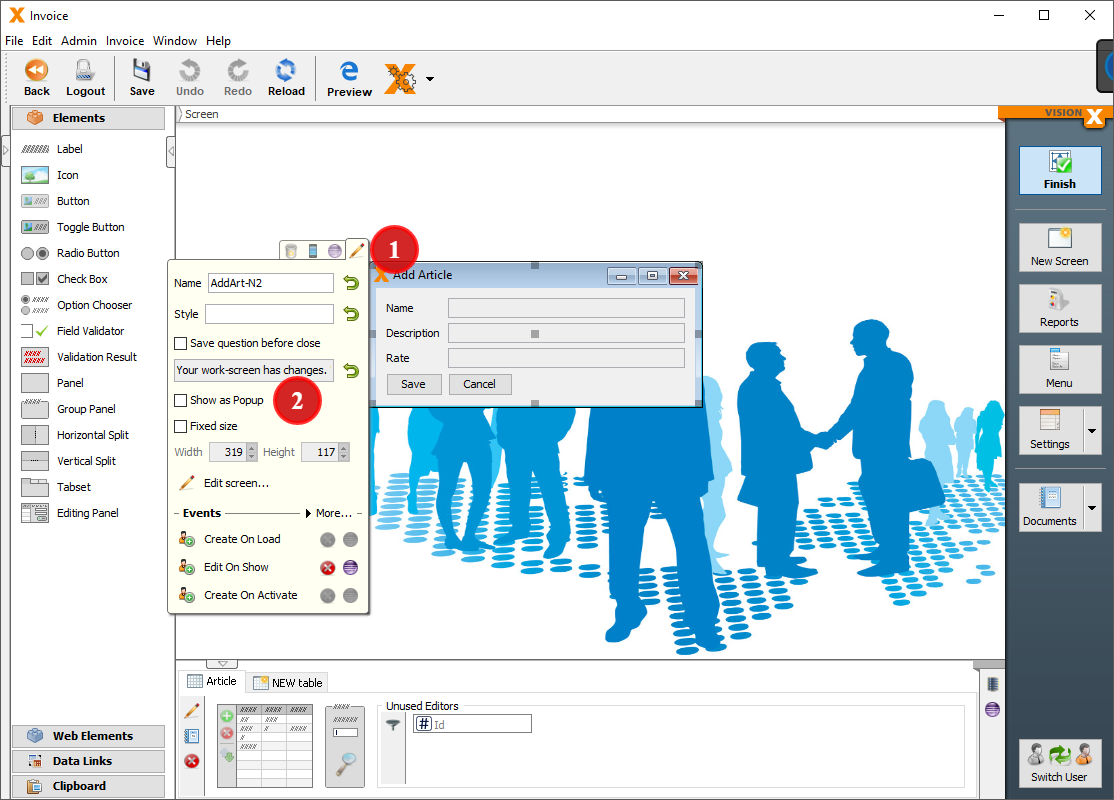
To give this screen its desired functionality, we have to add actions to our buttons.
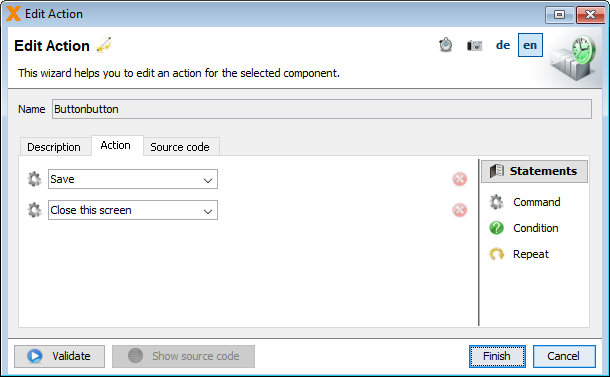
Action for the “Save” button:
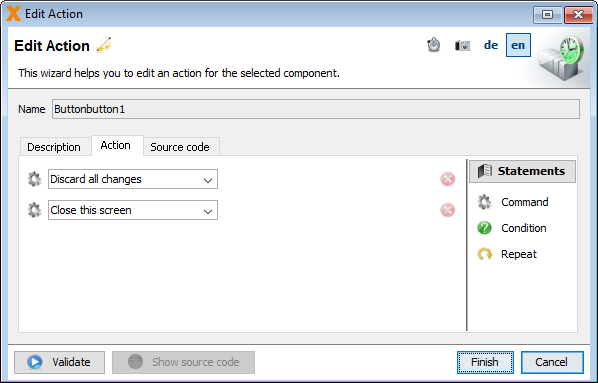
Action for the “Cancel” button:
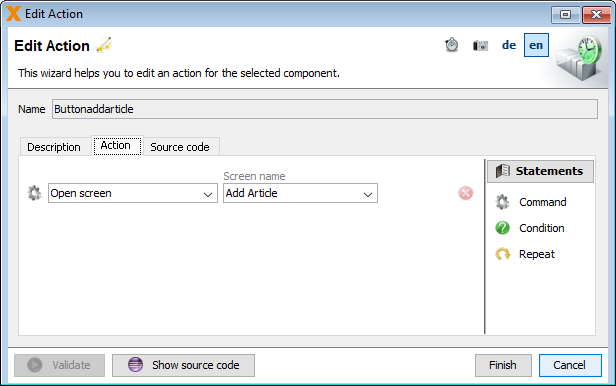
To incorporate this popup to our invoice screen, we are going to edit the action of our “+” button next to the item column.
Styling the Application
Changing the Application Style
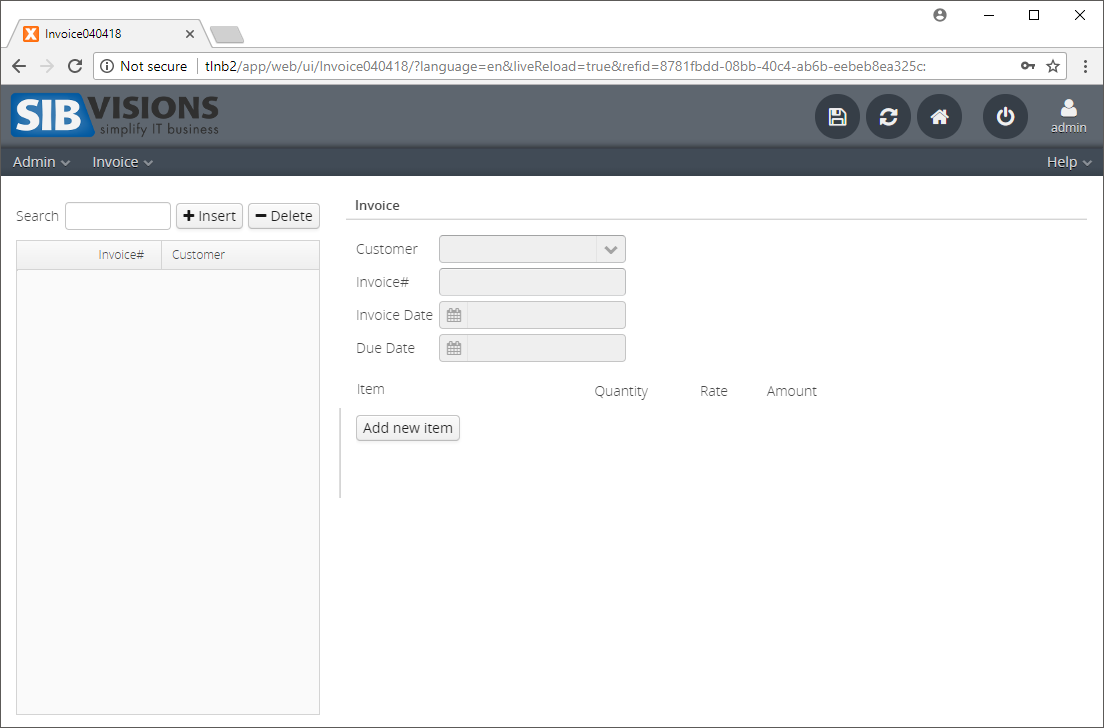
Without any additional styling done, this is what the application looks right now in the web preview.
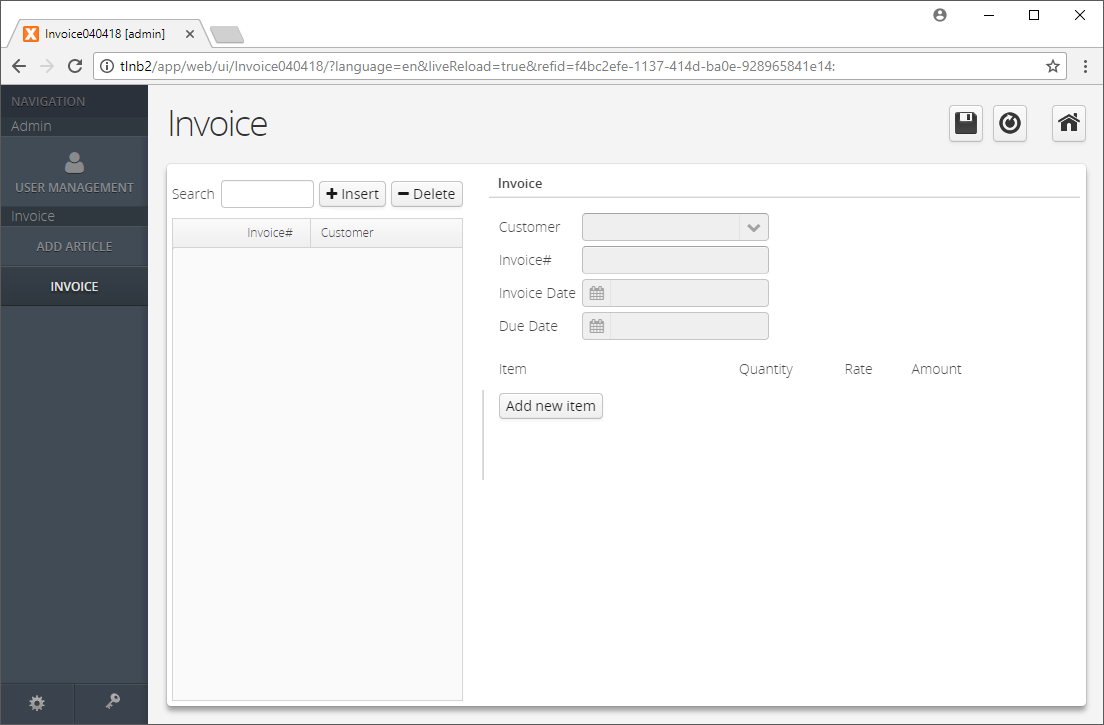
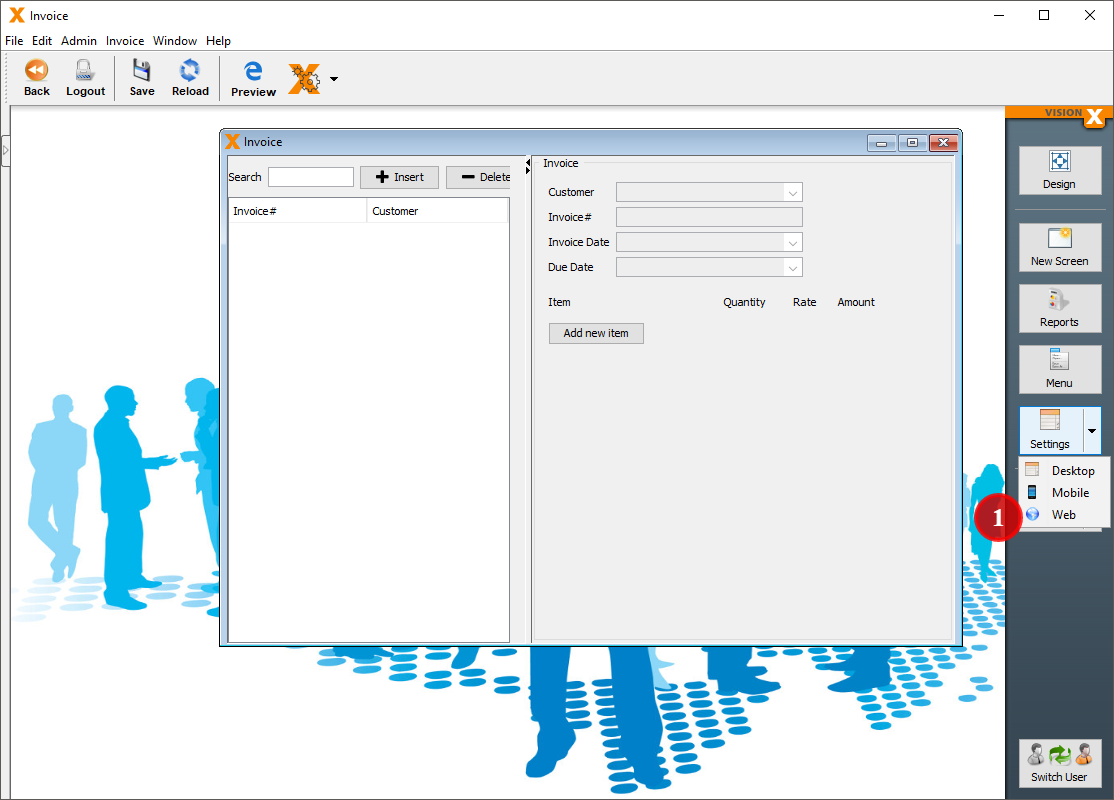
Not the prettiest application yet but, with a few tweaks, we can change that pretty fast. As the first step, let's change the display mode and theme for our web application. For this, we select the dropdown next to “Settings” in the right VisionX toolbar and press “Web” (1).
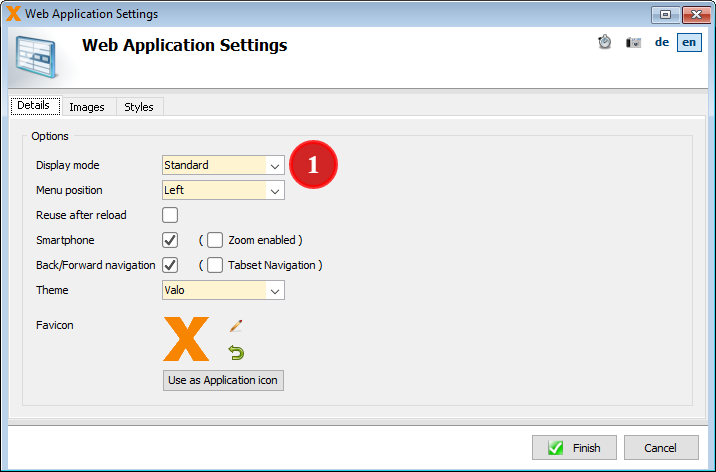
In the following wizard, change the “Display mode” to “Corporation” (1) and the “Theme” to “Valo” (2).
This is how our screen looks with the Valo theme now:
Changing the Invoice Screen
As the next step, we are going to style our buttons beginning with the “Insert” and “Delete” buttons above our invoice table. To do that, we press the “Edit” button (1) on our button and set the foreground color to white (2), the background color to a nice blue (2) for the “Add” button, and red for the “Delete” button. Additionally, we are going to turn off the border of our button (3). We're also going to change the text from “Insert” to “Add”.
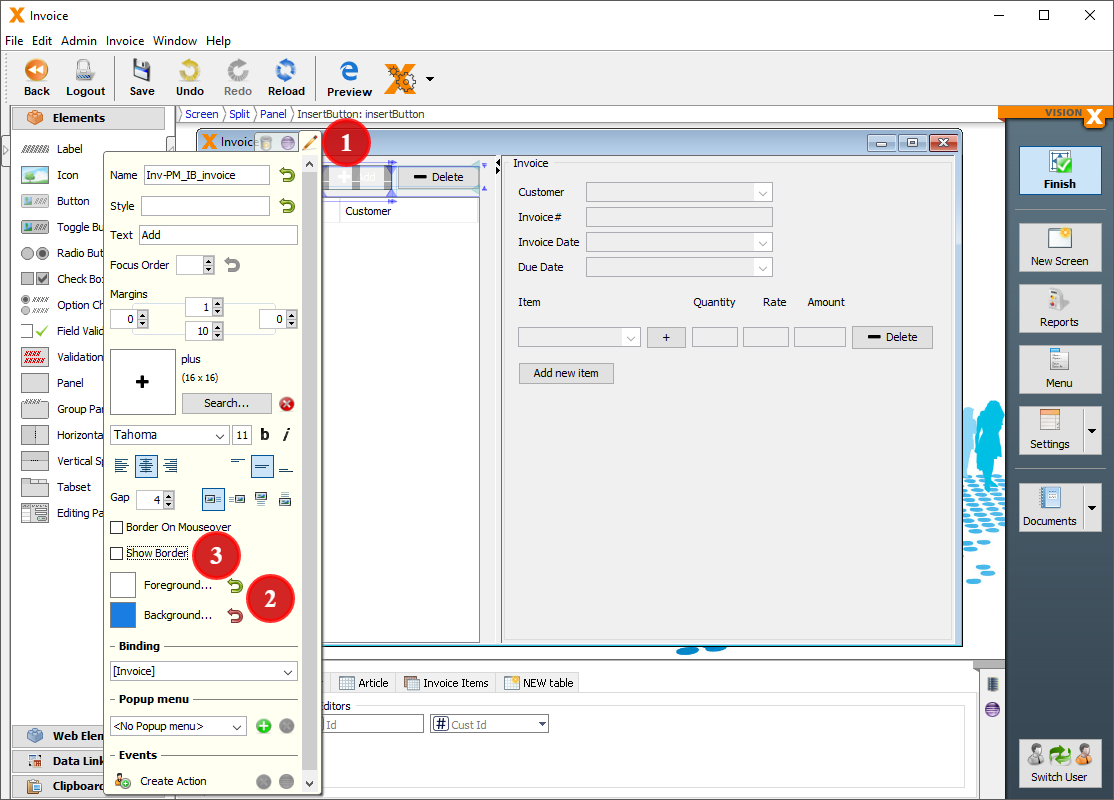
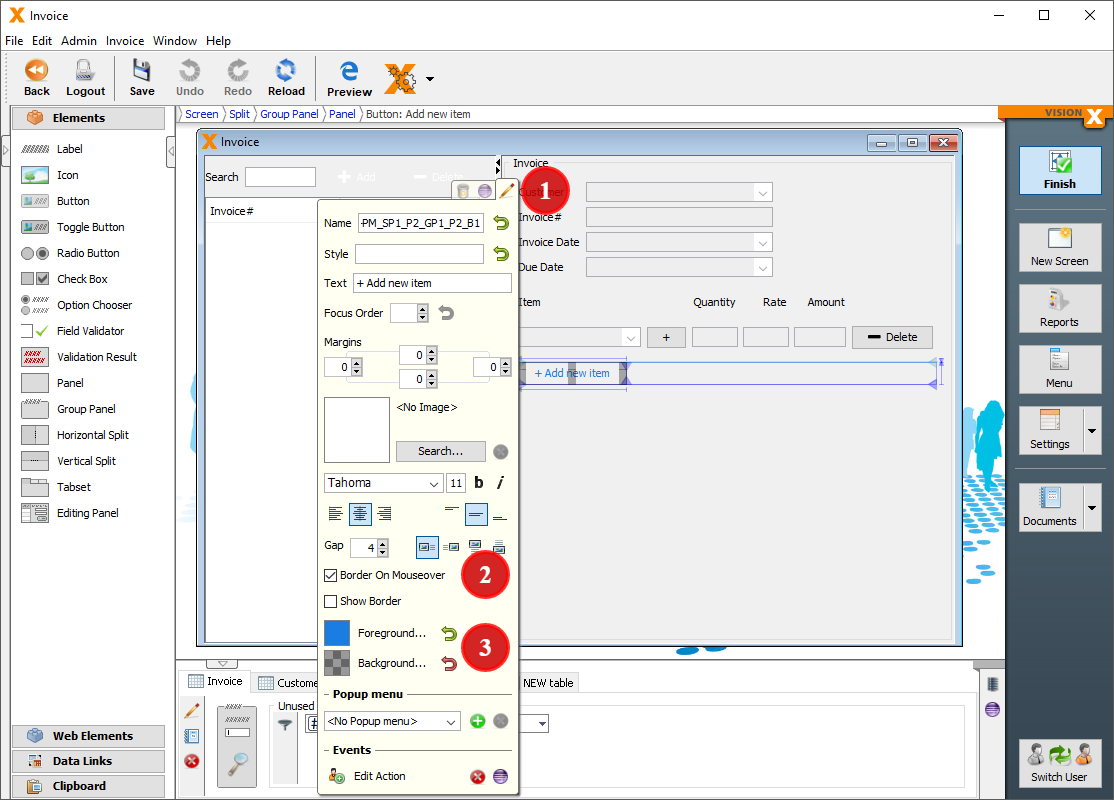
The “Add Article” and “Add new item” buttons are getting a new style as well. Press the “Edit” button (1), uncheck “Show border” (2), and check “Border on Mouseover” (2). Additionally, we set the foreground color to the same color as our “Add” button (3) and the background to transparent (3).
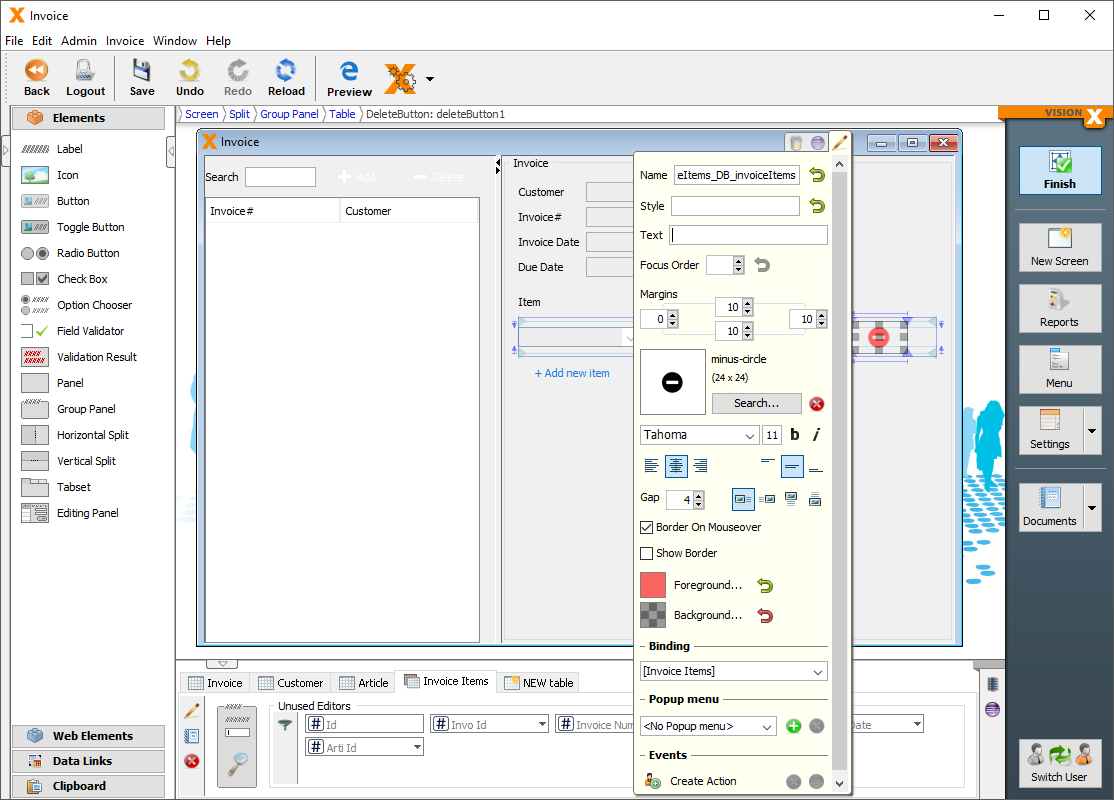
Now we style the “Delete” button of the component table. We remove the text altogether (1) and set the foreground to the same red we used for the “Delete” button (2). Uncheck “Show border” (2), check “Border on Mouseover” (2), and, as the last step, select the “minus-circle” icon with a size of 24 for this button (3).
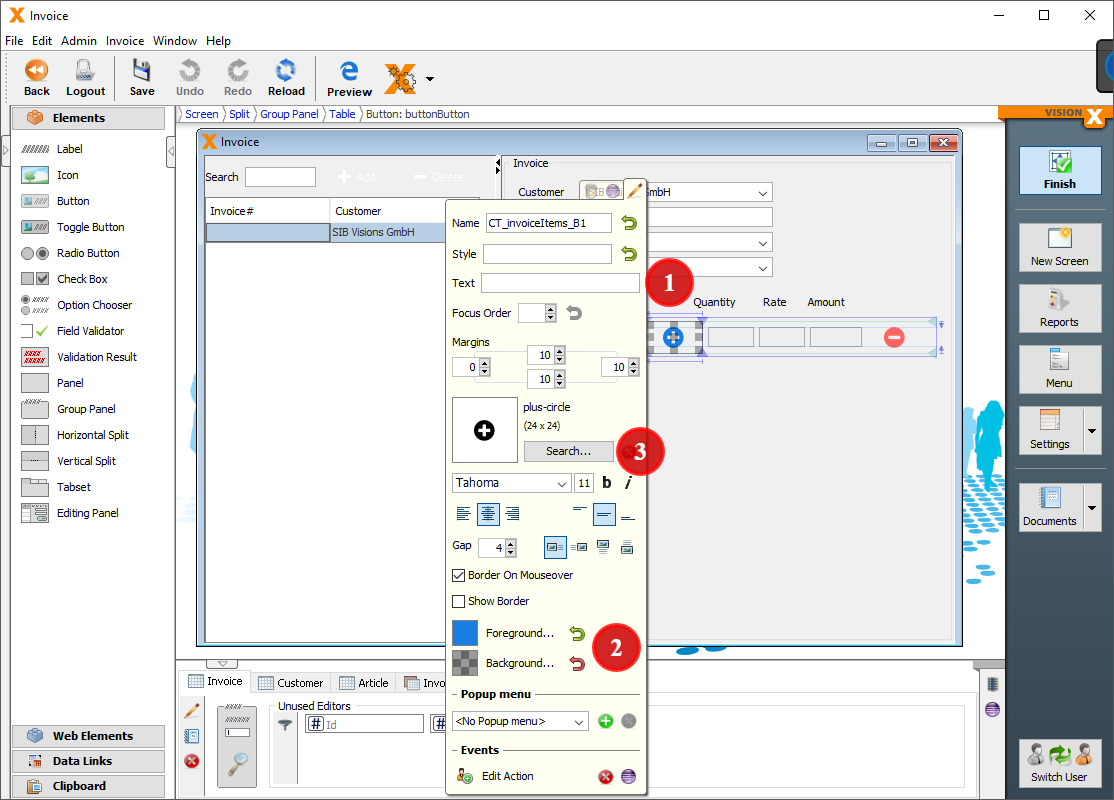
The last button we are going to style is the “+” button of the component table. We remove the text altogether (1) and set the foreground to the same blue we used for the “Add” button (2). Uncheck “Show border” (2), check “Border on Mouseover” (2), and select the “plus-circle” icon with a size of 24 for this button (3).
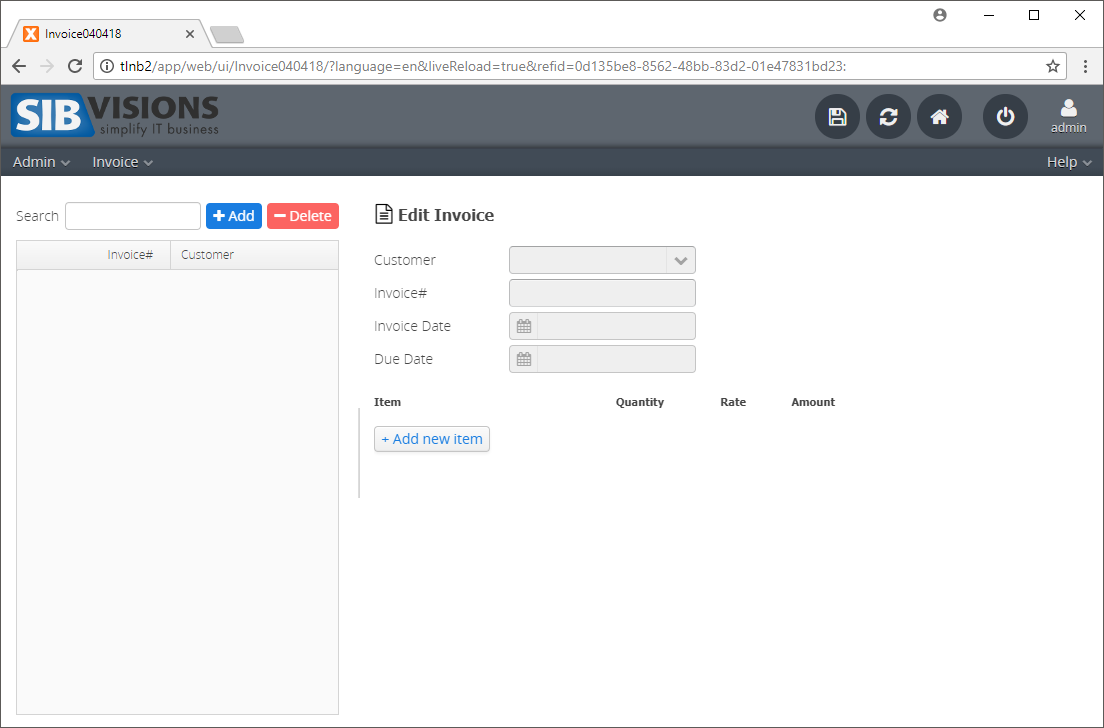
To make the component table look like a real table, we have to line up the labels with the editors. To do that, you select the label in the editor and set the anchors to your desired positions. In the “Edit” menu of the labels, we set them to bold as well. Next up, we are going to add a title to the right side of the screen. To do that, we change the type of our panel in its “Edit” menu. To do that, we select the left side icon under the “Margins” of the panel. After that, we add a label “Edit Invoice” and add an icon in front of it with the Font Awesome Icon “file-text-o”.
Calculations in the Application
For the last few steps, we are going to add a “Sub Total” area under the component table. For this, we have to add a “Total” column to our invoice table. We already added a column in this tutorial, so we are going to skip this part. As the next step, we are going to add a label “Sub Total” and the new editor “Total” from our table directly under the “Amount” column of our component table. We remove the border of our editor in the “Edit” menu to make it fit better.
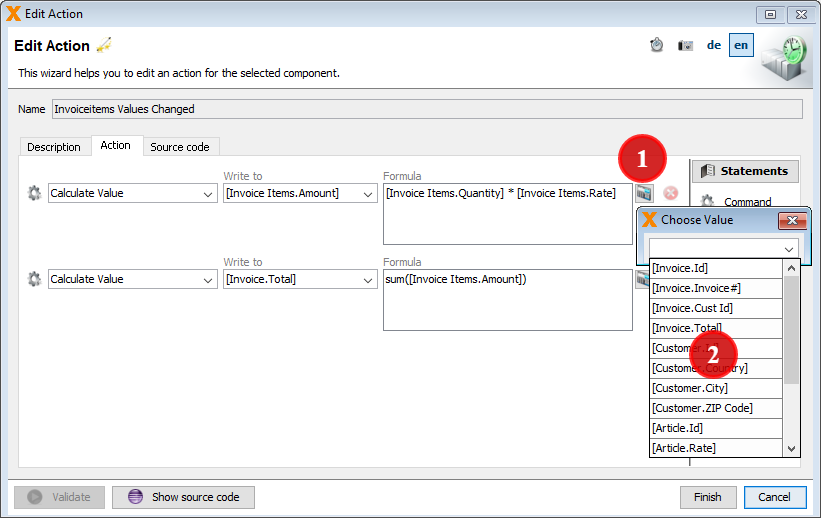
Next, we are going to make the table do the calculations when a row is changed. Select a component in our component table and press “Create Row Value Changed”. In the following wizard, we select “Calculate Value”, specify that we want to “Write to” the invoice item amount column, and add “[Invoice Item.Quantity] * [Invoice Item.Rate]” as the formula. This is done to save the amount into the invoice item row. We add another command, select “Calculate Value” once more, but “Write to” our total column in the invoice table now. The formula is “sum([Invoice Item.Amount])” in this case. To add columns to our formula, we can press the button (1) next to the formula field. This way you can add the columns of our tables via dropdown (2).
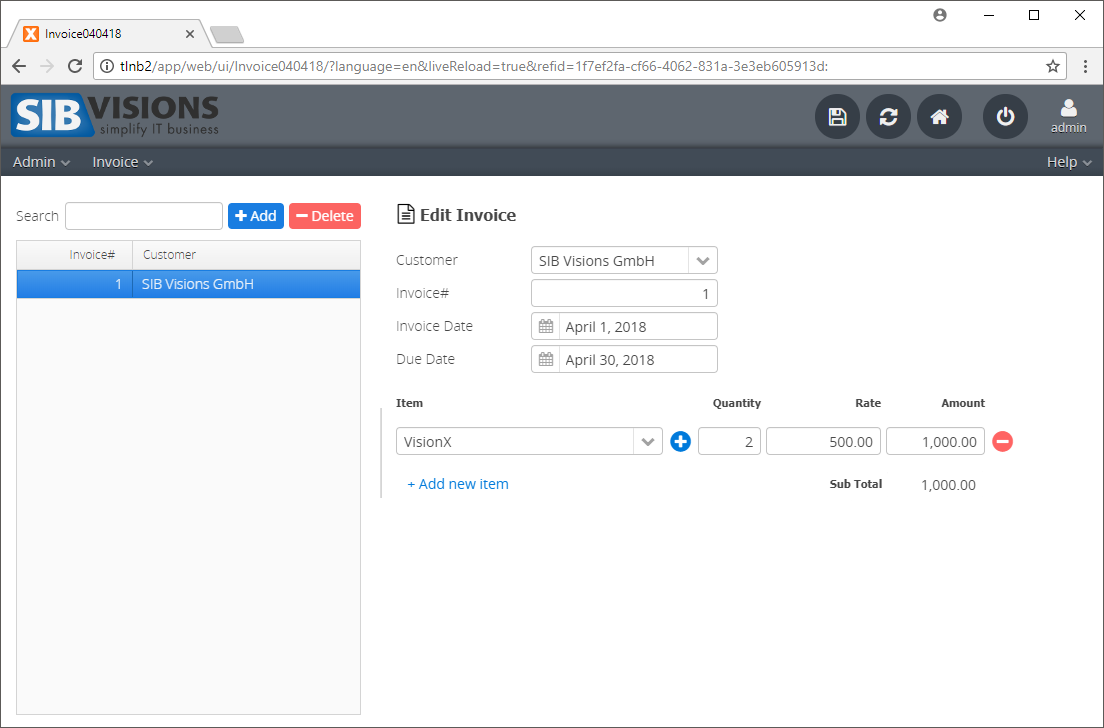
After that, we can add items and the calculations will be done. To make sure that the values are also changed when we delete an item, we have to add a “Create After Deleted Row” event with the same commands as well. Our application should now look somewhat like this:
Creating a Report
The last step of our tutorial is going to be a report of our invoice. For this matter, we add a “Export Invoice” button under the “+ Add new item” button. This button will have the same style as the “Add” button, but the icon we choose will be “download”.
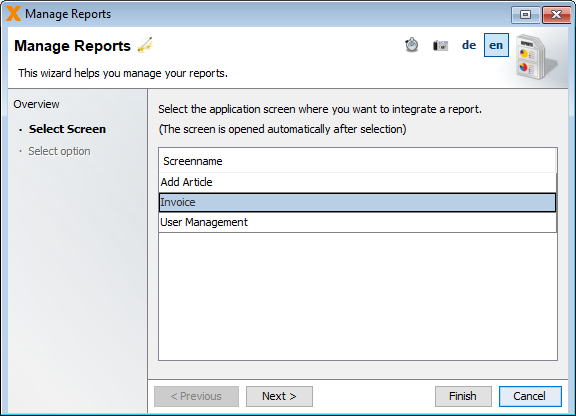
To add a report, we press the “Reports” button on the right side of the VisionX designer. In the following wizard, we select “Invoice” screen and press “Next”.
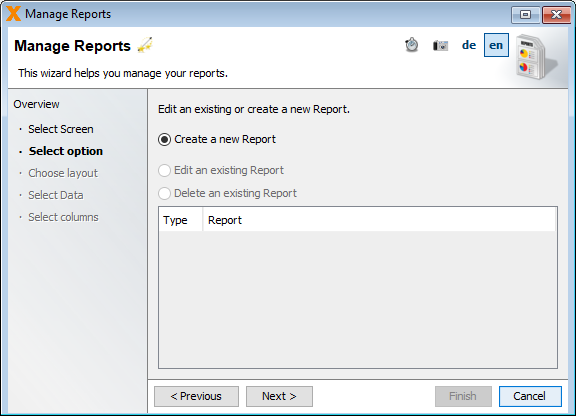
Select “Create a new Report” in the next screen and continue.
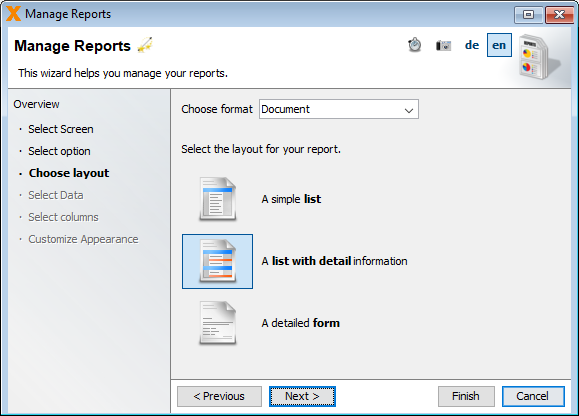
We are going to create a “Document,” and it will contain “A list with detail information”.
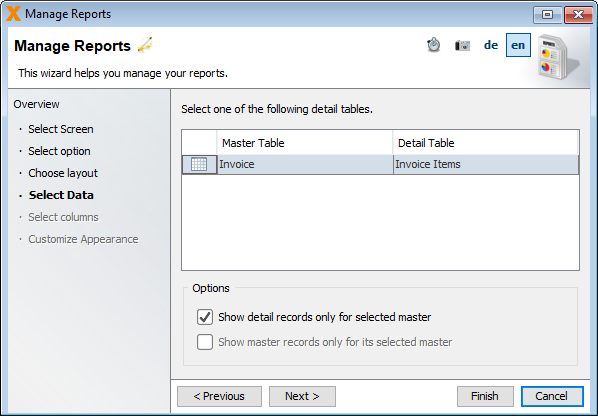
In the next step, we select our invoice table, specify that we only want to “Show detail records only for selected master” and press “Finish”.
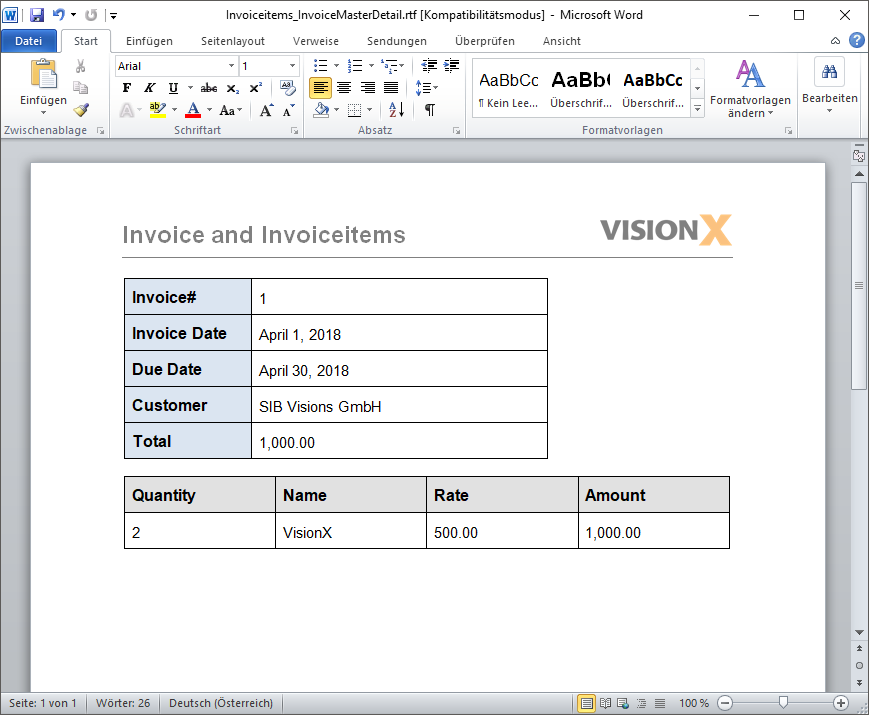
VisionX will now create our report and ask us how we want to add the report to our application. Select “Add “Show Report” automatically” in this step and select the “Export Invoice button”. After pressing “Finish”, our report will now be available when pressing the button. If we do that, this is how the report will look now.
And this is how the template of our report looks initially:
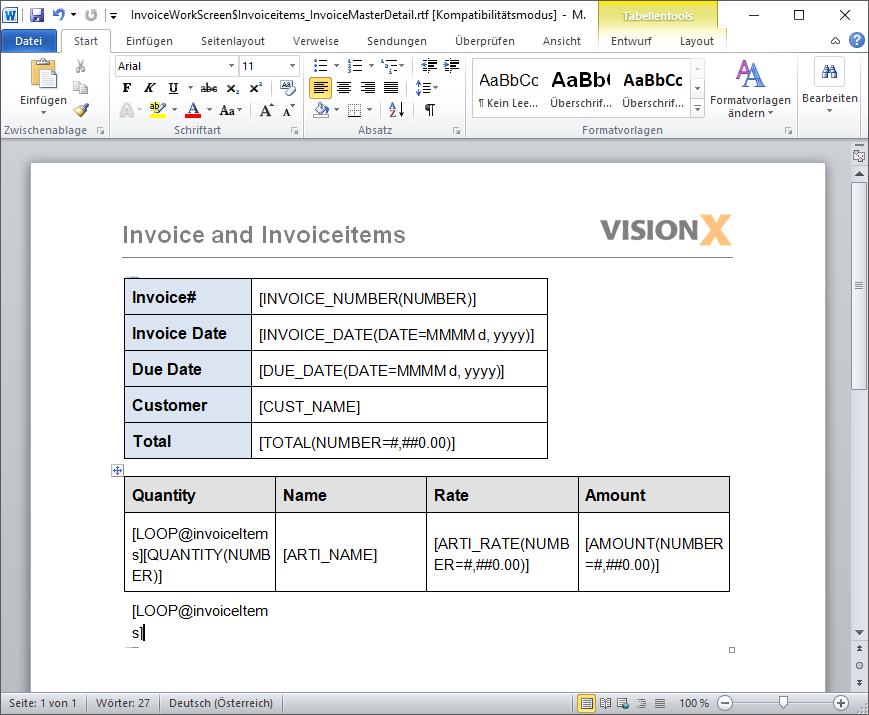
The initial report doesn't really look like an invoice, but you can change it with Microsoft Word/Open Office/Libre Office. You can find additional information on how to change a report in the VisionX report documentation. To download and later upload an alternative template for this report, you press the “Reports” button on the left side of VisionX again. In the following wizard, once again select our invoice screen.

Select “Edit an existing report”, select our previously created template, and press “Next”.
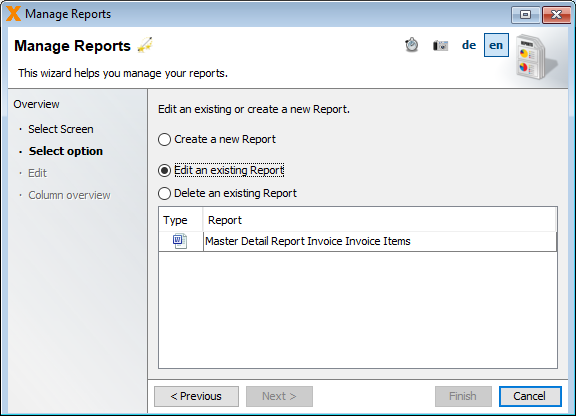
In the following dialog, press either the “Get Template” button to download the template or the “Change Template…” button to upload the changed template. If you decided to upload a template, press “Finish” and your selected template will be used for the export.
This is how the changed invoice could look like:
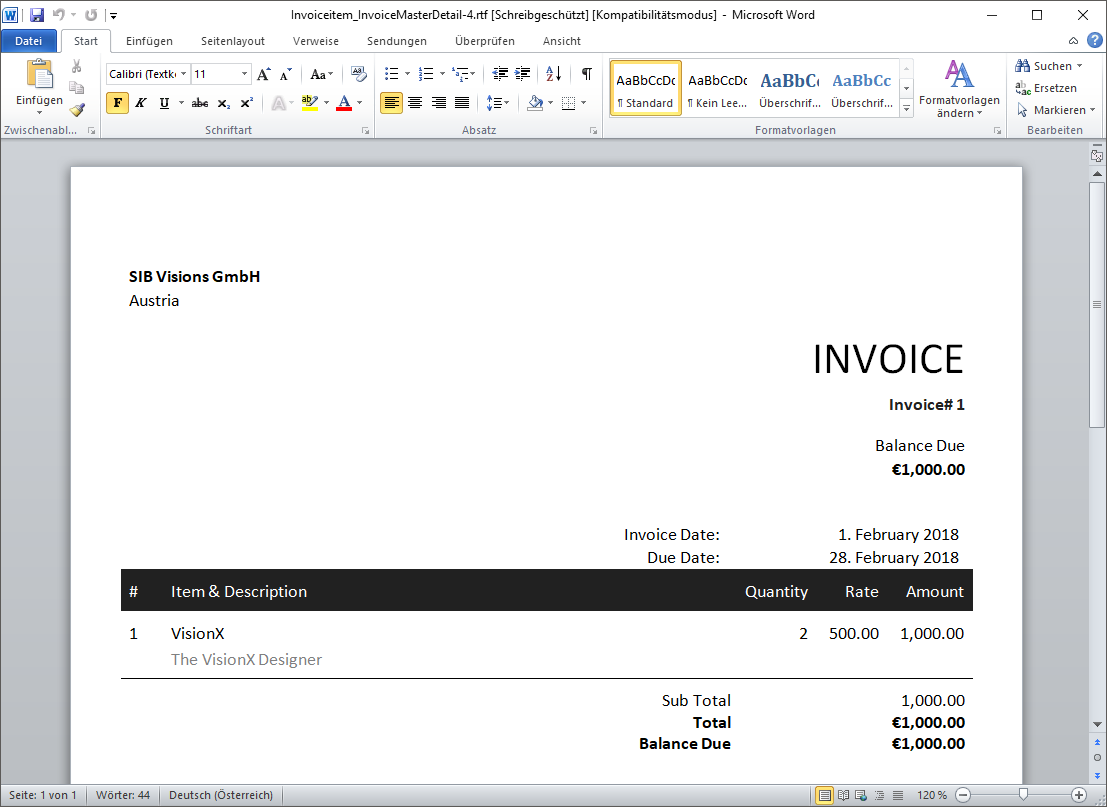
And once again this is what the template looks like:
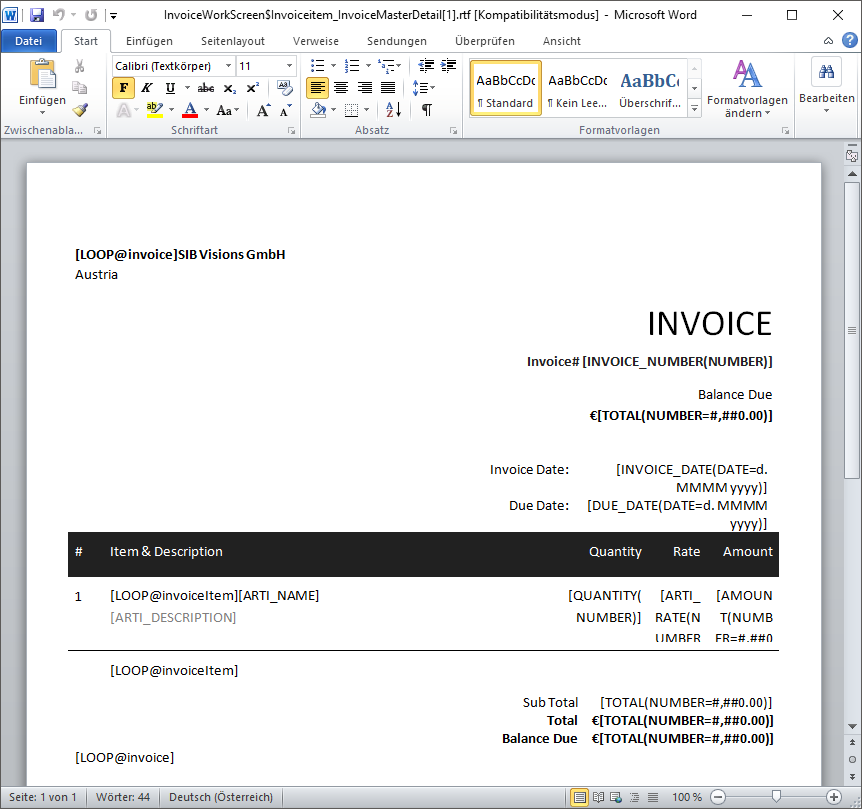
You can download the changed template from here.
The Finished Application
With this done, let's see at how our application looks in a web environment. For this, we once again use the “Preview” button in VisionX. This will start a browser window which shows our finished application:
