Trace: • Eclipse Plugin for VisionX (EPlug) • Query Editor
Table of Contents
Version: 1.0 / 2022-03-31
Introduction
The VisionX Query Editor helps Citizen Developers to link data from multiple tables, group data or create SQL statements.
The resulting queries can be used in any VisionX screen, for example, on dashboards, reports or specific reporting screens.
Note: Database queries are a fairly complex topic, but are a powerful tool for sorting and displaying the data in your application. The VisionX Query Editor tries to simplify the process as much as possible, but even then the topic can be a bit difficult. Two tips for following along: 1) Use the “Result” tab at the bottom of the editor window to see results in real time and 2) take a look at the examples below. It is much easier to see what's possible when you can see the data.
Installation
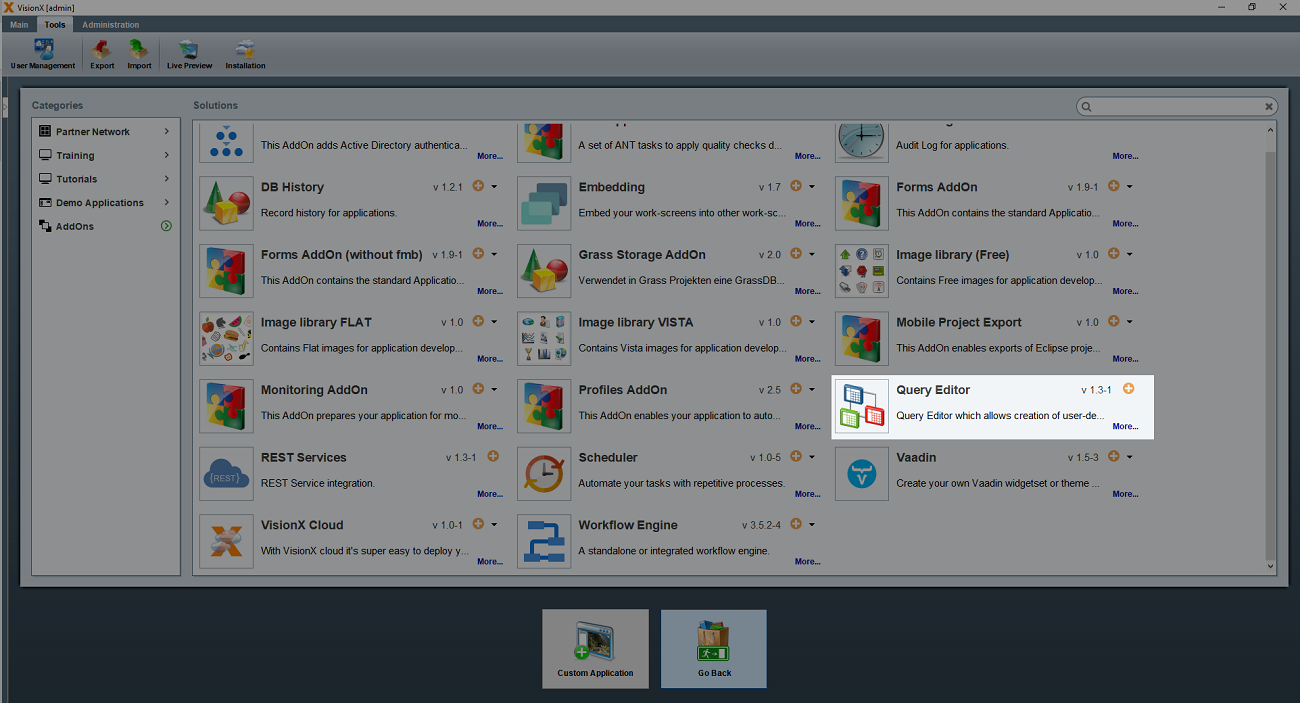
To install the Add-on, start VisionX and click on “Ready Made Solutions” at the bottom of the screen.
Then click Add-ons on the left side of the screen under “Categories” and click the plus icon next to Query Editor to install the module.
After the installation a restart of VisionX is necessary. After restarting, select the application you want to use, click on “VisionX Settings” on the top toolbar and select “Modules”.
A list of available modules will appear. Check the box associated with the Query Editor in the “Installed” column to install the module in the application.

To start the Query Editor, click on the Query Editor button on the right side of the screen and a new window will open.

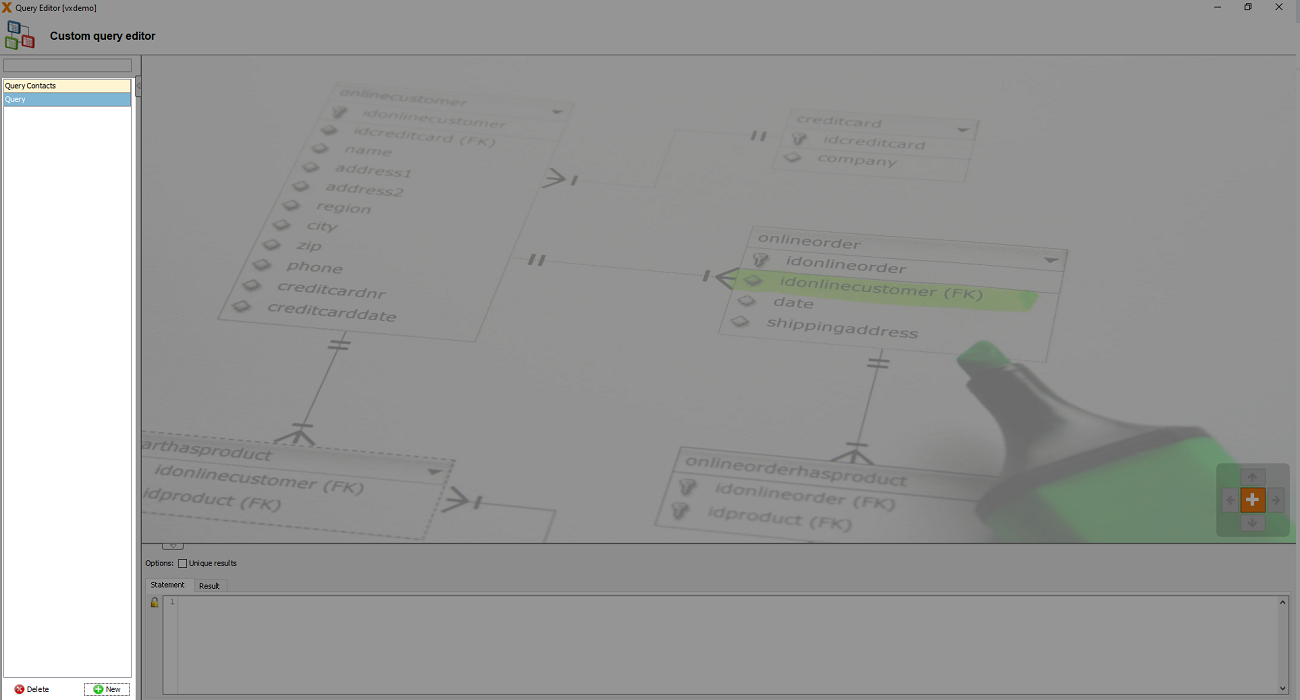
Query Editor
Creating the query
We can create a new query by clicking the “New” button on the left side of the editor. If there are existing queries saved for this application, they will also be displayed on the left side of the editor.
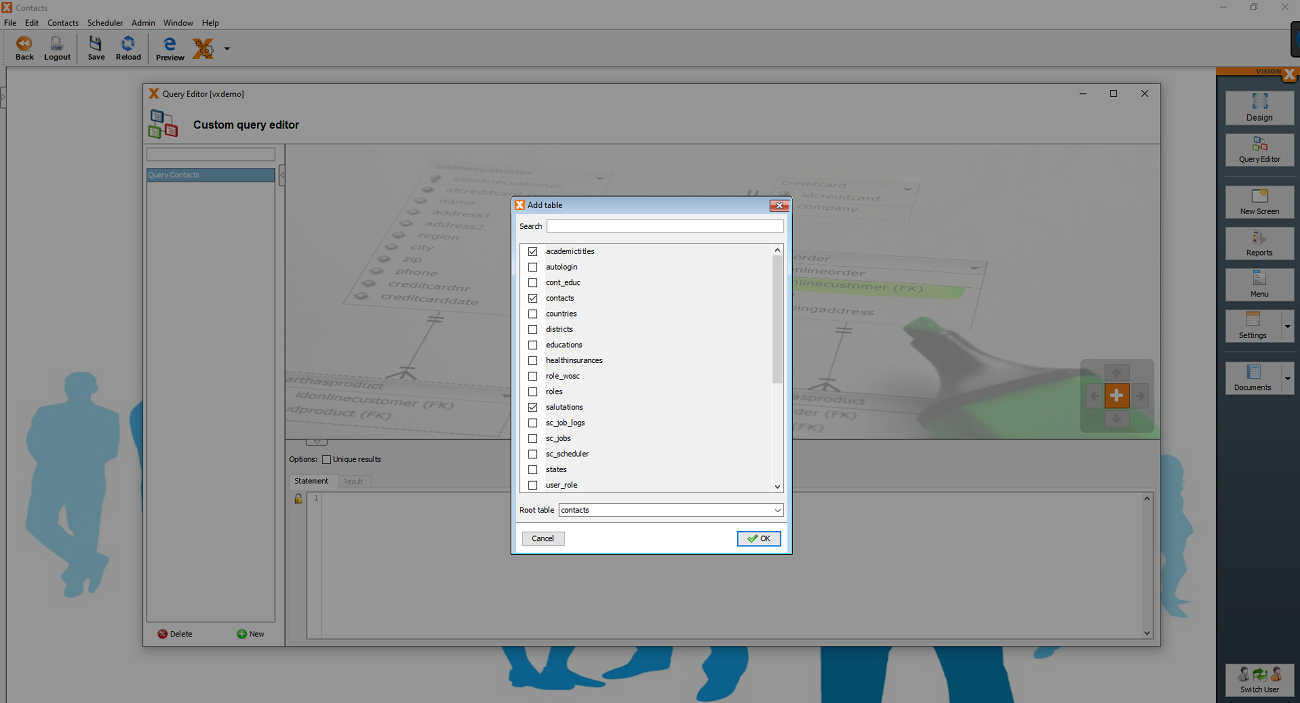
After pressing the “New” button, select the desired tables or views from the existing database to create a query.
The root table drop-down list can be used to select the table from which the query should start. The root table is also the source table from which data rows are selected. Data from other tables is then added by linking these tables to the initial source table. In most cases, however, the correct root table is detected automatically.
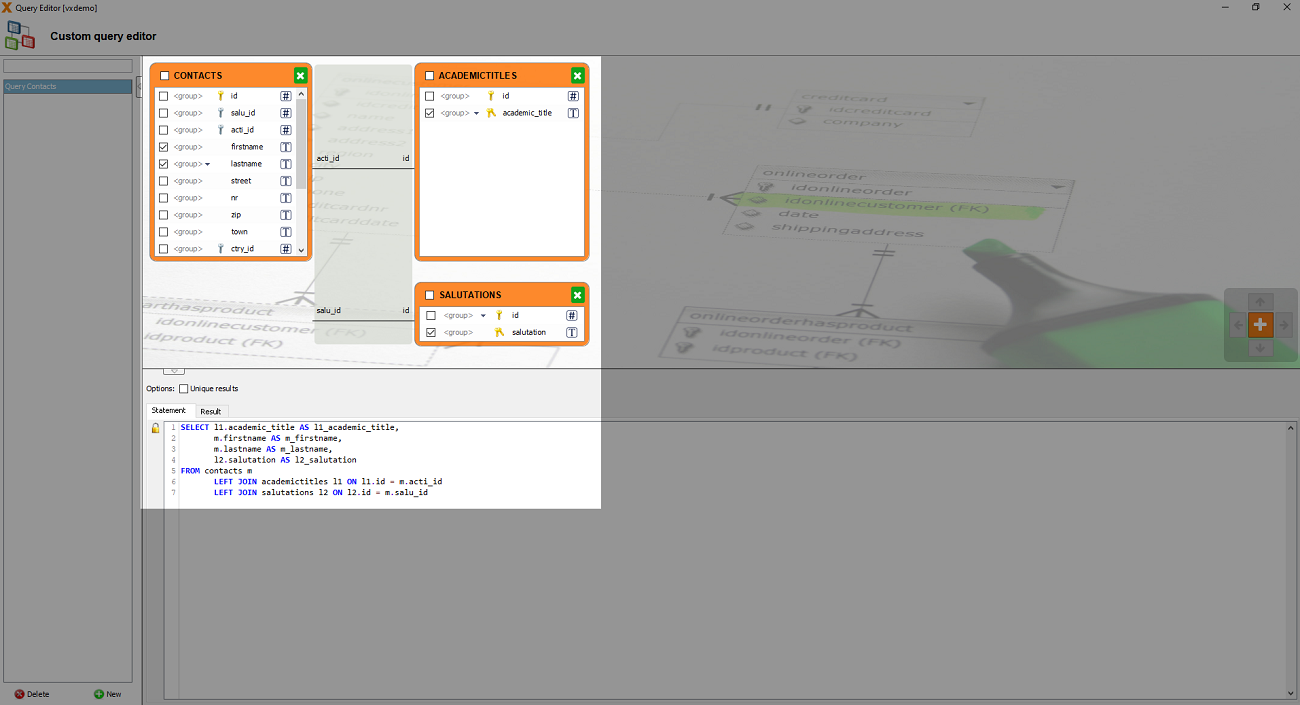
In our example, we have selected the tables contacts, academictitles and salutations, and we have defined contacts as the root table.
After clicking “OK”, the selected tables are displayed in the editor and the query can be edited further. We can now select the table columns we want to use in our query from all of the columns in the selected tables. The individual columns are selected by clicking on the checkboxes. To select or deselect all columns of a table, click the checkbox next to the table name. The newly selected columns are immediately updated in the query statement at the bottom of the screen.
In our example, we select the columns “firstname” and “lastname” from the Contacts table, “academic_title” from the Academic Titles table, and “salutation” from the Salutations table.
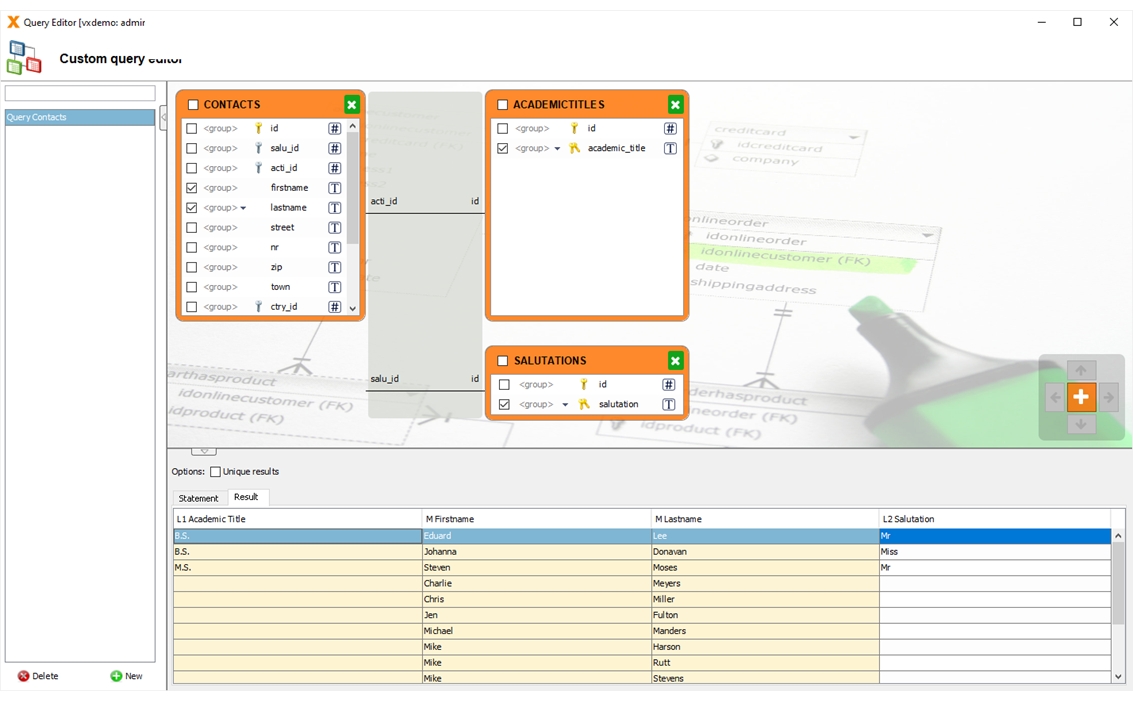
Result
To get to the result of our query, we simply select the “Result” tab and our data will be displayed.
Add tables
We can add a new table to the editor by clicking on the plus symbol on the right side of the screen. As with the creation of the query, we can easily select the desired tables by checking the respective boxes and then clicking OK.
Note: As a best practice, always select an existing table on the query editor before adding a new table. Selecting a table will highlight it yellow. When you do that, only tables that are related to the selected table are displayed after clicking the plus button. Selecting the checkbox “Show all tables” expands the selection to all tables.
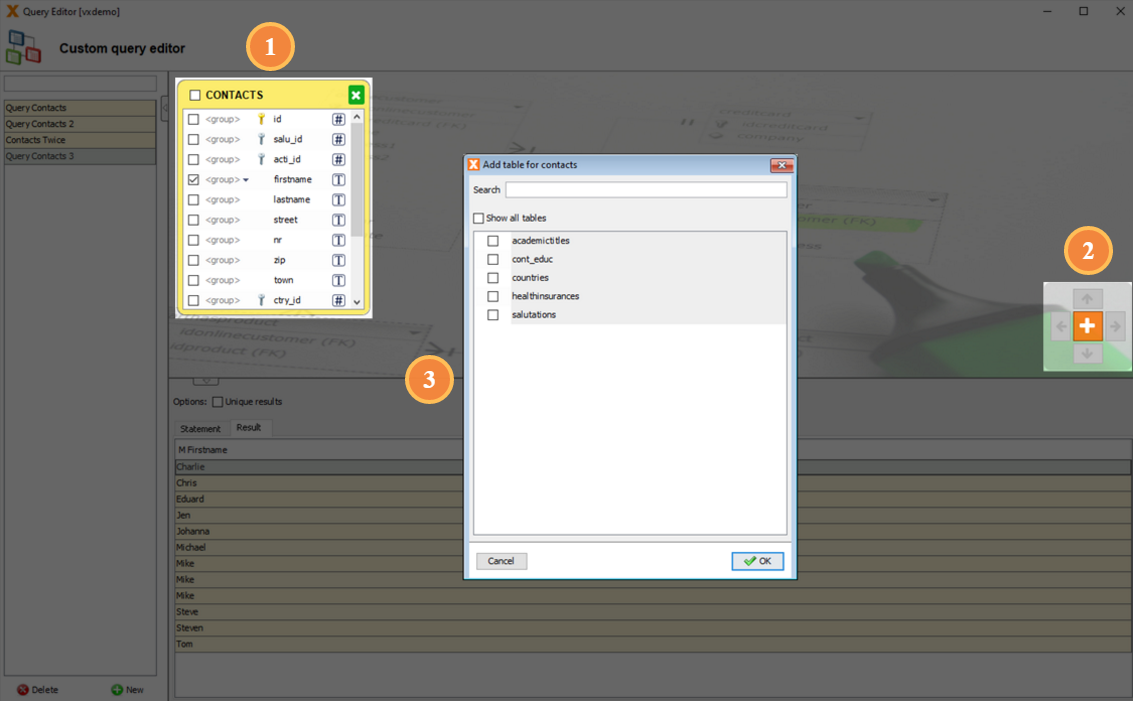
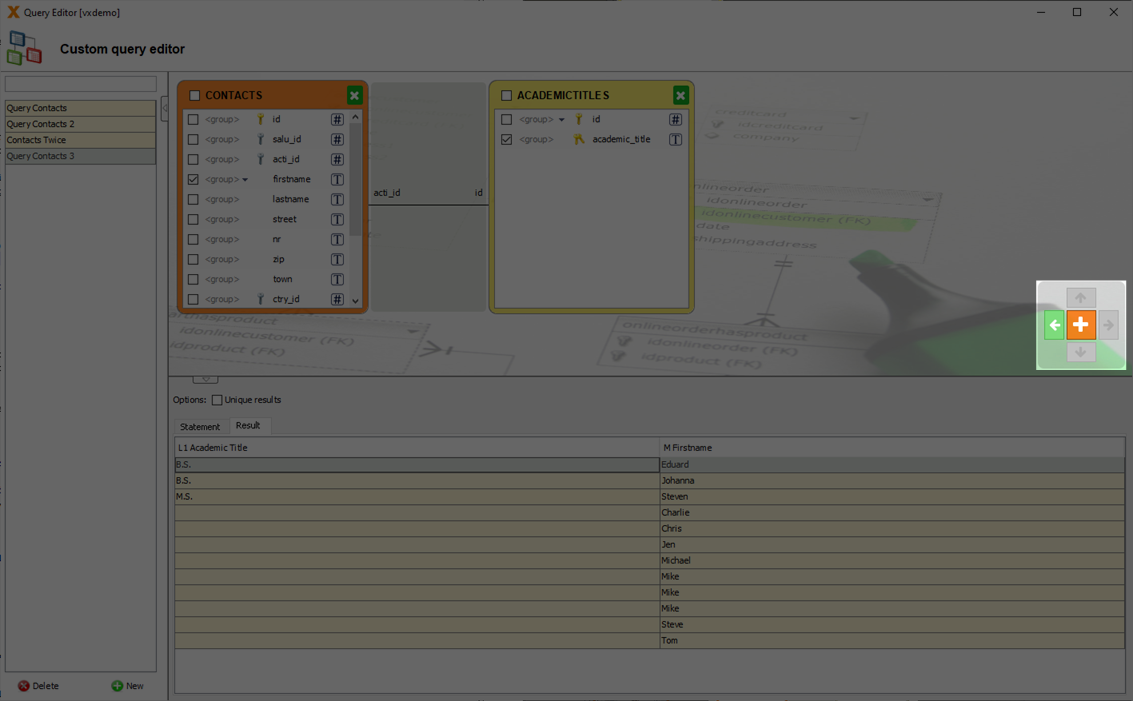
We can then change the position of the new table(s) by using the arrow keys.
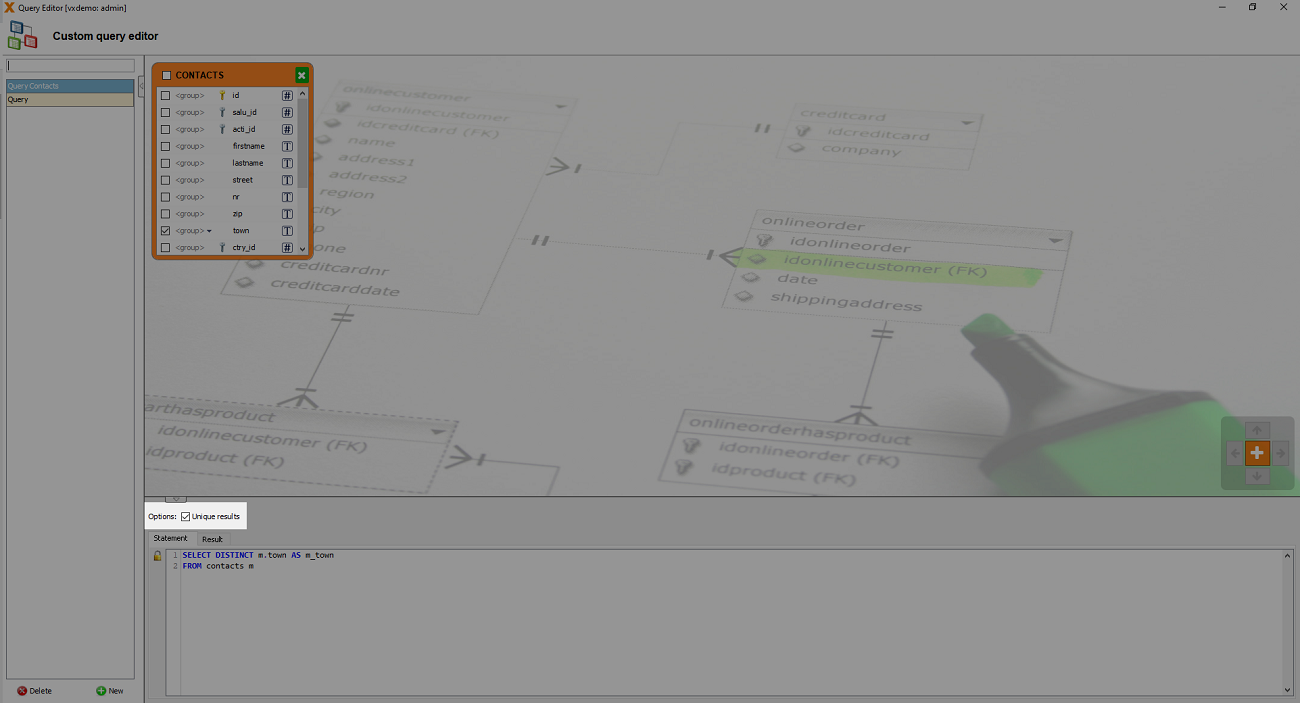
Unique results (distinct)
A table can have duplicate values in a column, but sometimes we just want to list the different (distinct) values.
To add this feature to our query, we just select the checkbox “Unique results”. Our query statement is updated immediately and the output no longer contains duplicate records.
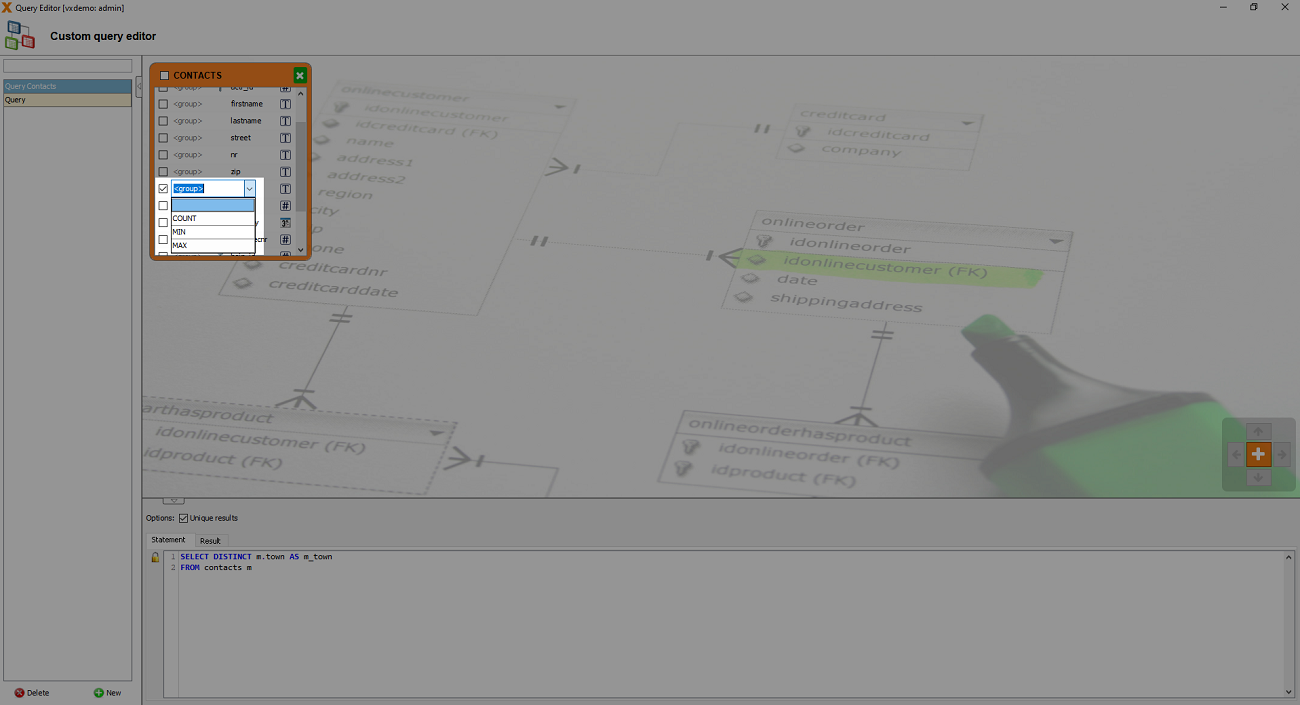
Group functions
The group function groups all rows of the result. Therefore, all rows that have exactly the same values in the selected columns are grouped into one row. E.g.: If we have the same city several times in an address list, we can group the list so that each city is only shown once, and calculate the number of addresses per city.
The group functions are applied to all rows that fall into this group. E.G.: SUM - The sum of the same rows.
Available group functions in the Query Editor are:
- COUNT Returns the number of records in a table.
- MIN Returns the smallest value of a table column. Can also be used for text fields.
- MAX Returns the largest value of a table column. Can also be used for text fields.
- SUM Returns the sum of the values of a column and can therefore only be used for numeric fields.
- AVG Calculates the average value of a column and can also only be used for numeric fields.
To use these functions, select one from the corresponding table. Only the functions that are applicable for the respective column and datatype are displayed.
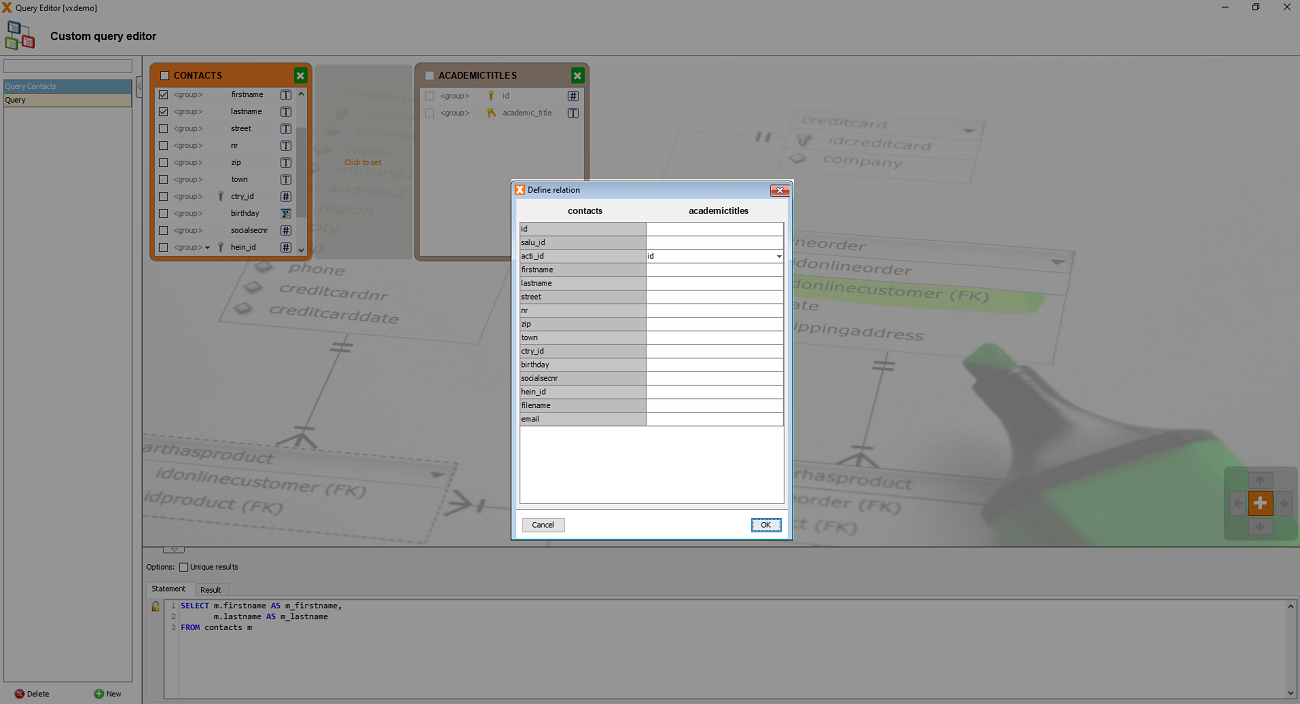
Add connections
If there is a connection between two tables, it will be marked by a line connecting these tables. If there is no connection between the tables, we can configure it by clicking on “Click to set”.
Note: This function allows us to create connections even when no foreign key relationship (combobox or subtable) exists between the two tables.
Before two tables can be connected, we have to position them using the arrow keys so that they are next to each other. “Click to set” will then appear between the tables.
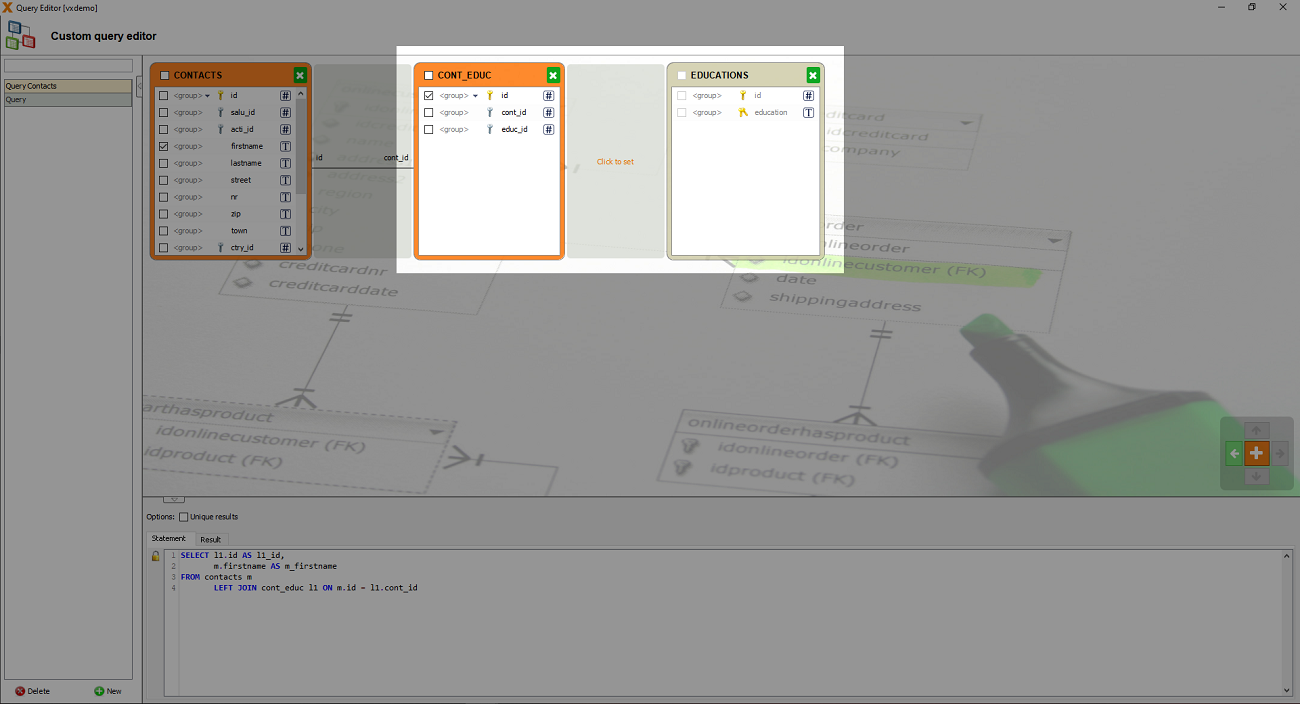
We can now create the connection between the two tables by assigning any column of the first table to any column of the second table.
Please note that values from the selected column of the first table should be equal to the values from the selected column of the second table. Otherwise, no results will be returned in the query.
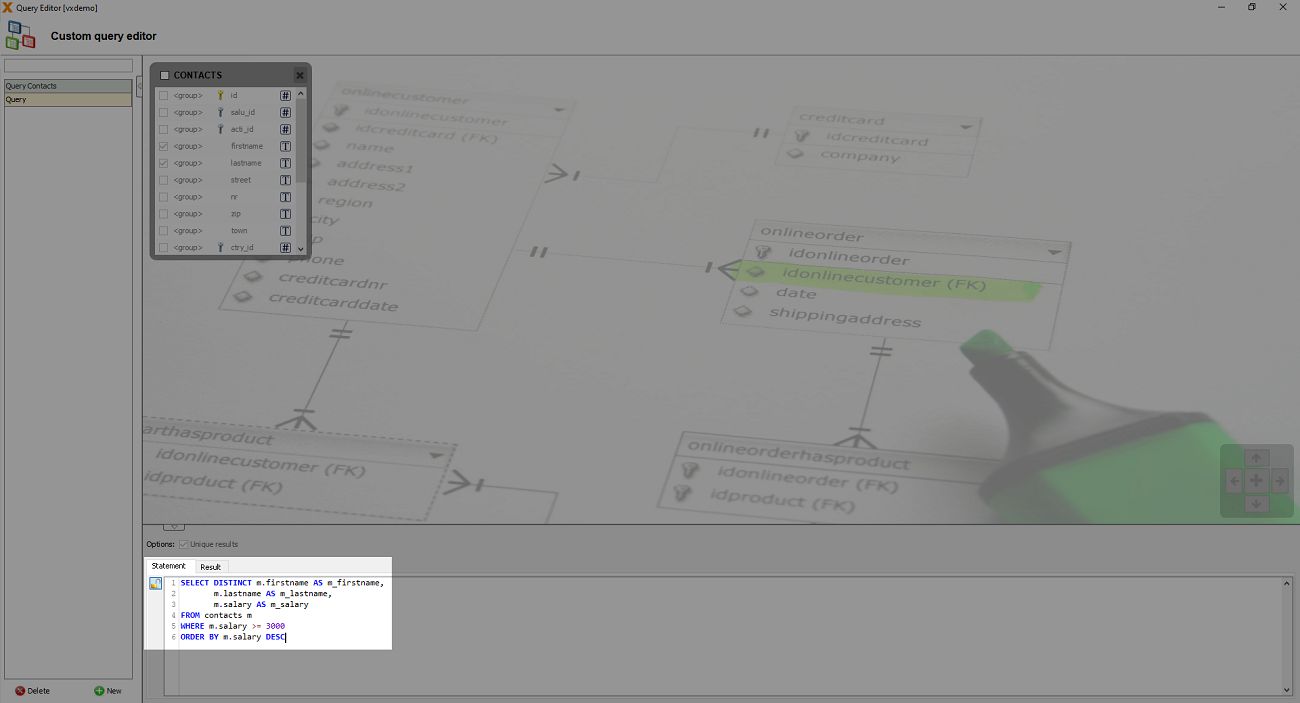
Advanced query
We can make our query more specific by directly editing the SQL statement, e.g. add a “where” clause or sort the results. To enable editing, click on the lock next to the statement.
In the example below we want to know which employees earn over 3000 and sort the query descending by salary. But this is only a small sample of SQL functions that can be used.
Using the query
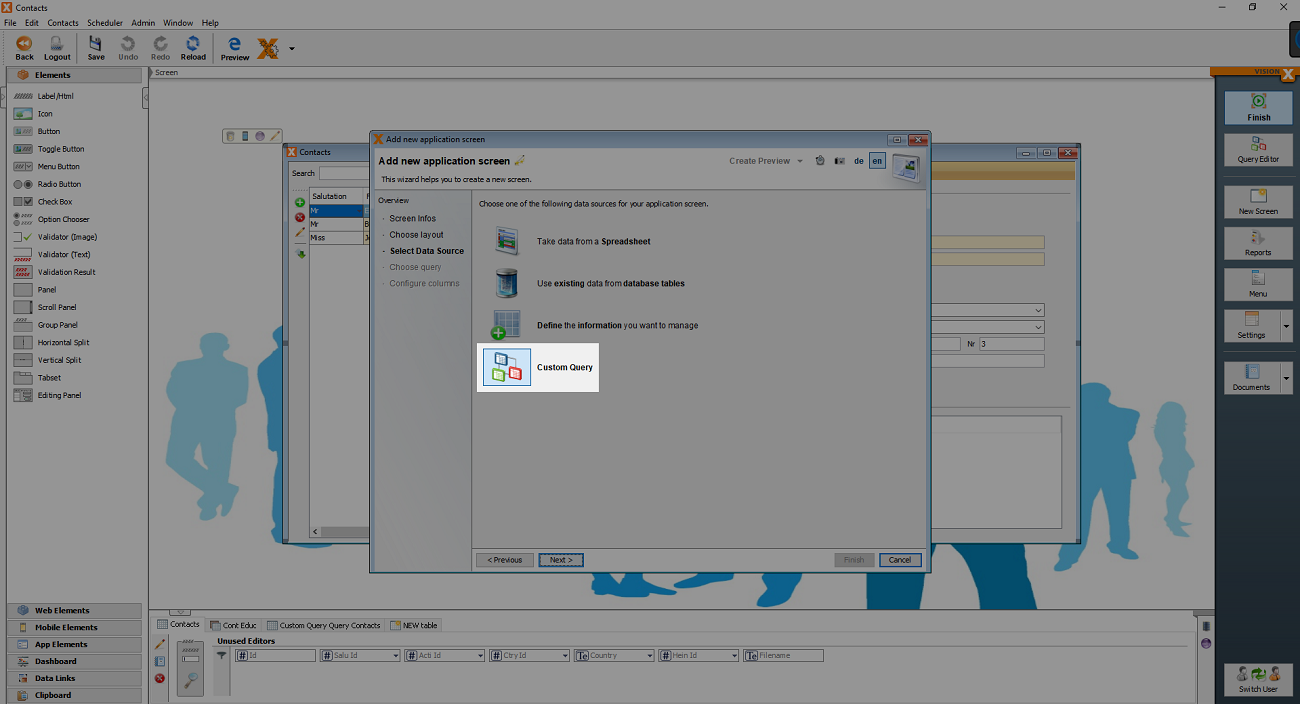
Now let's switch back to the application for which we created the query. The queries created in the Query Editor can be used in screens as a data source instead of tables.
To do that, we create a new screen with the “New Screen” button on the right side of the editor. Enter a name for the screen and click “Next”. Then pick a layout for the screen, click “Next” again, and select “Custom Query” as the data source.
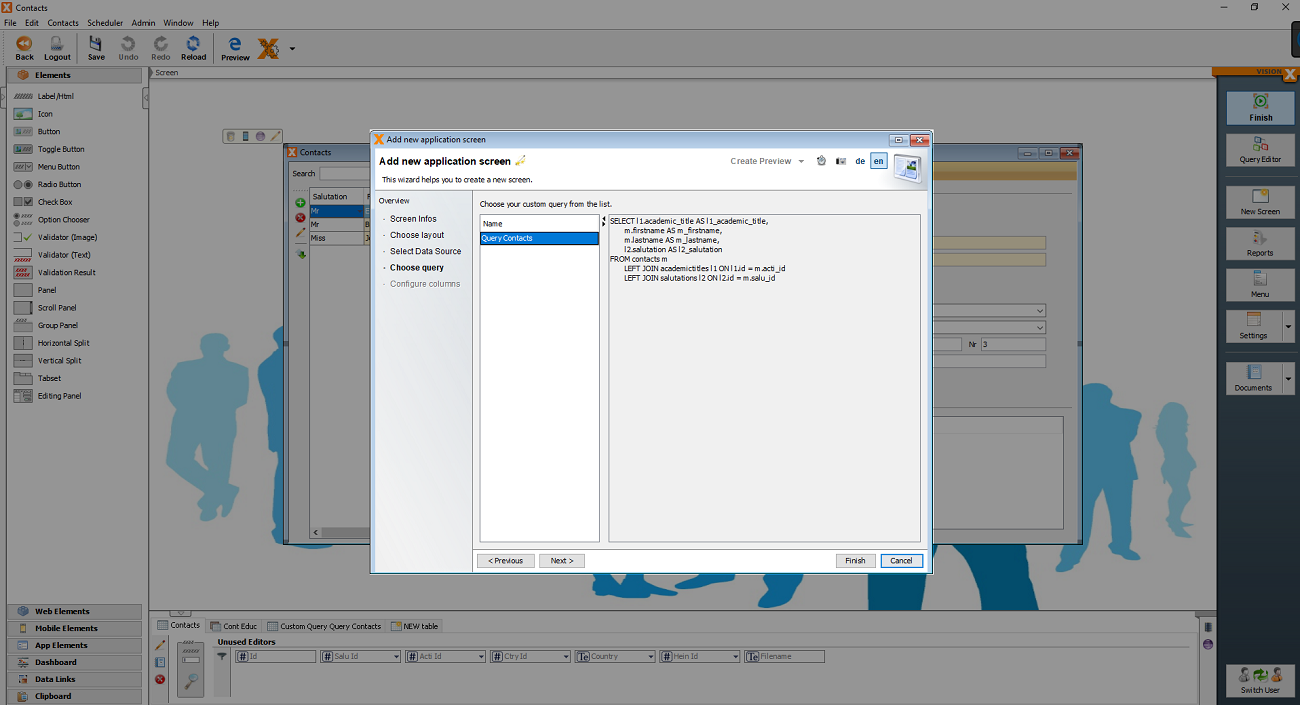
After clicking “Next” again, select one of the created queries.
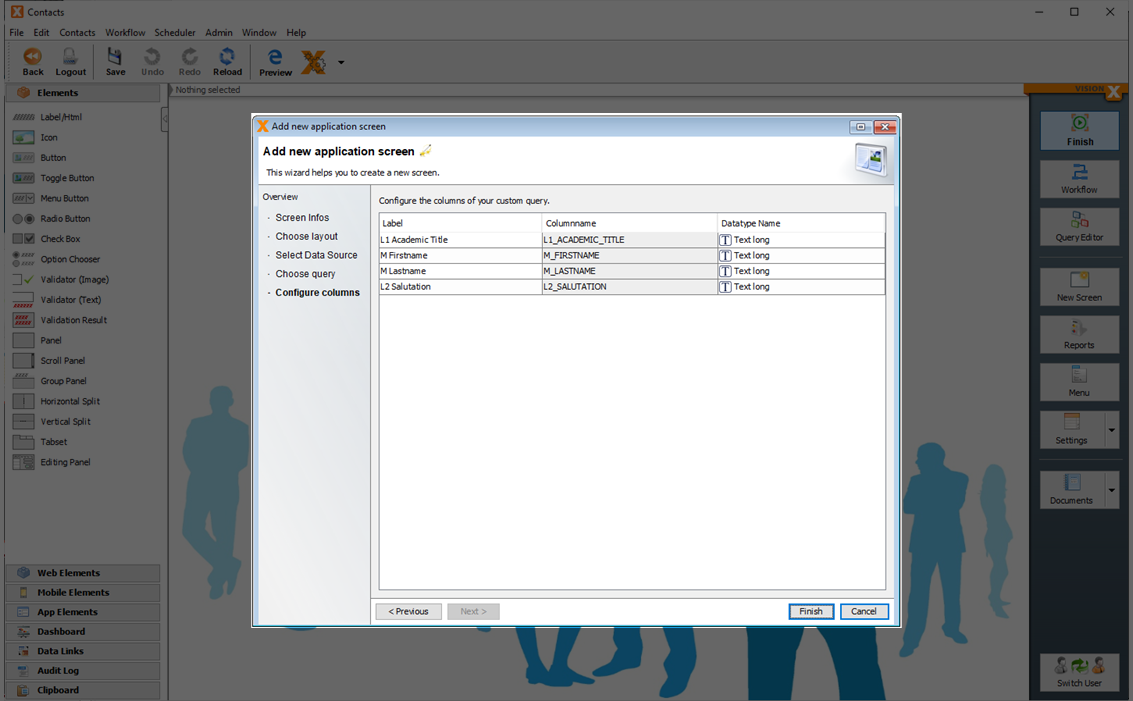
After clicking “Next” again, we can edit the labels and data types of the individual columns.
Press “Finish” and the new screen will be created with the previously queried data and can be edited further.
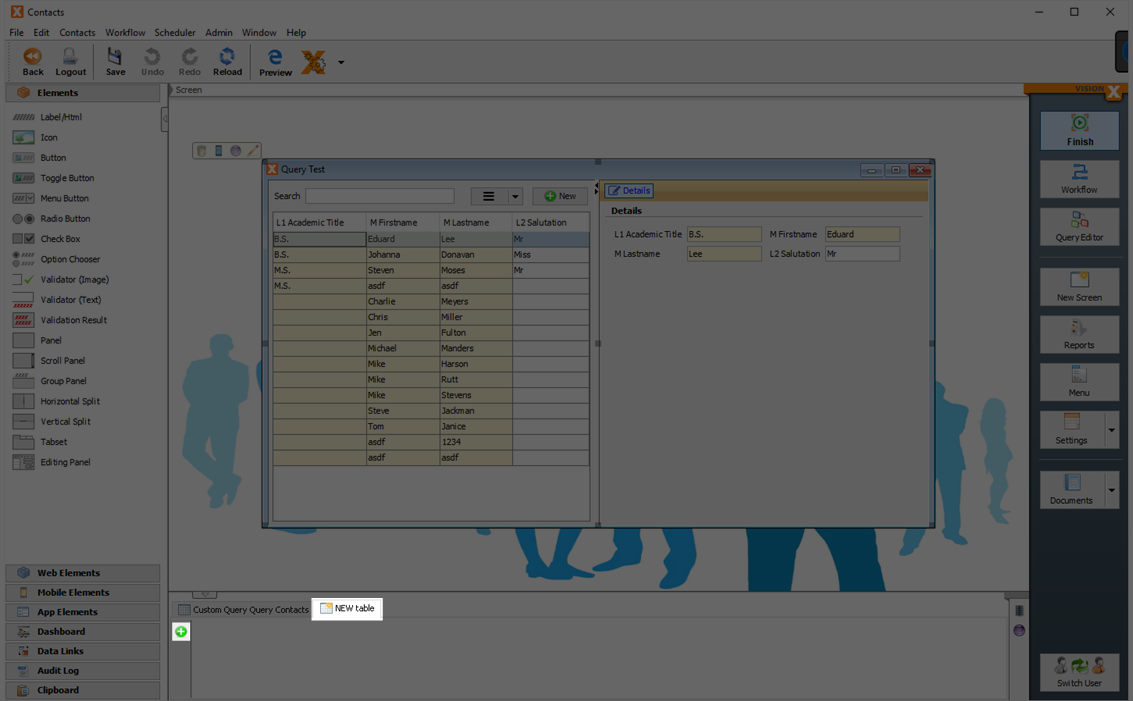
Another options is to use the created query and its data in an already existing screen. To do this, select a screen, switch to the design mode, click on the “NEW Table” tab at the bottom of the screen, and then on the plus symbol. The next steps are the same as described above.