Trace: • Workflow engine Documentation
Table of Contents
Version: 1.0 / 2022-03-31
Introduction
VisionX includes a complete workflow engine for automating business processes such as approval workflows. It includes a visual designer, debugger, monitoring, to-do management, REST, database access, flow control, custom functions and many other features. Workflows are always stored in the database of the VisionX application and are the ideal solution for long running or complex business processes.
Easily automate business processes with drag and drop.
Examples of business processes built with VisionX:
- Any approval process
- Connect system and exchange data automatically
- Automatically perform routine tasks daily, weekly or monthly
- Optimize back office processing
- Quality control in manufacturing
- Case, claim and ticket management systems
- and much more
Installation
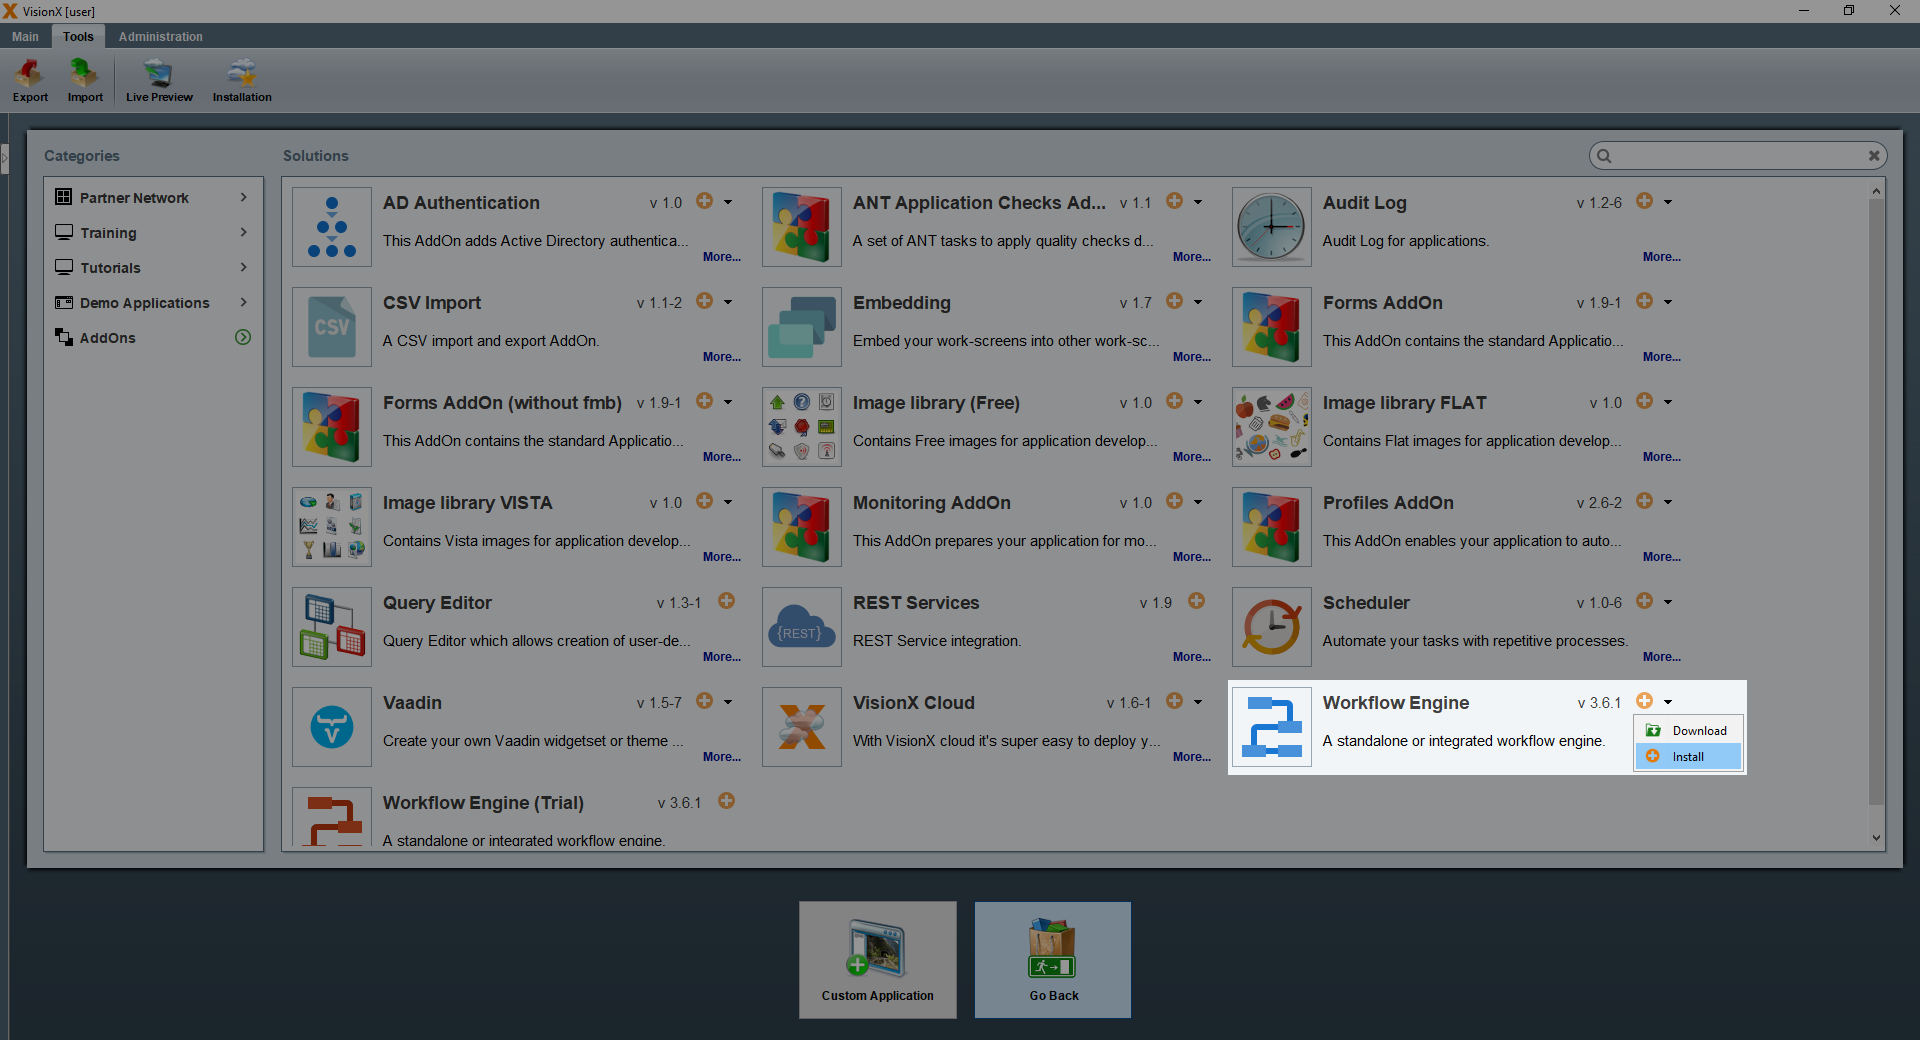
To install the Workflow Add-on, launch VisionX and click “Ready Made Solutions” at the bottom of the screen. Then click on Add-ons on the left side of the screen under “Categories”, select the dropdown list next to the Workflow Engine icon and click “Install”.
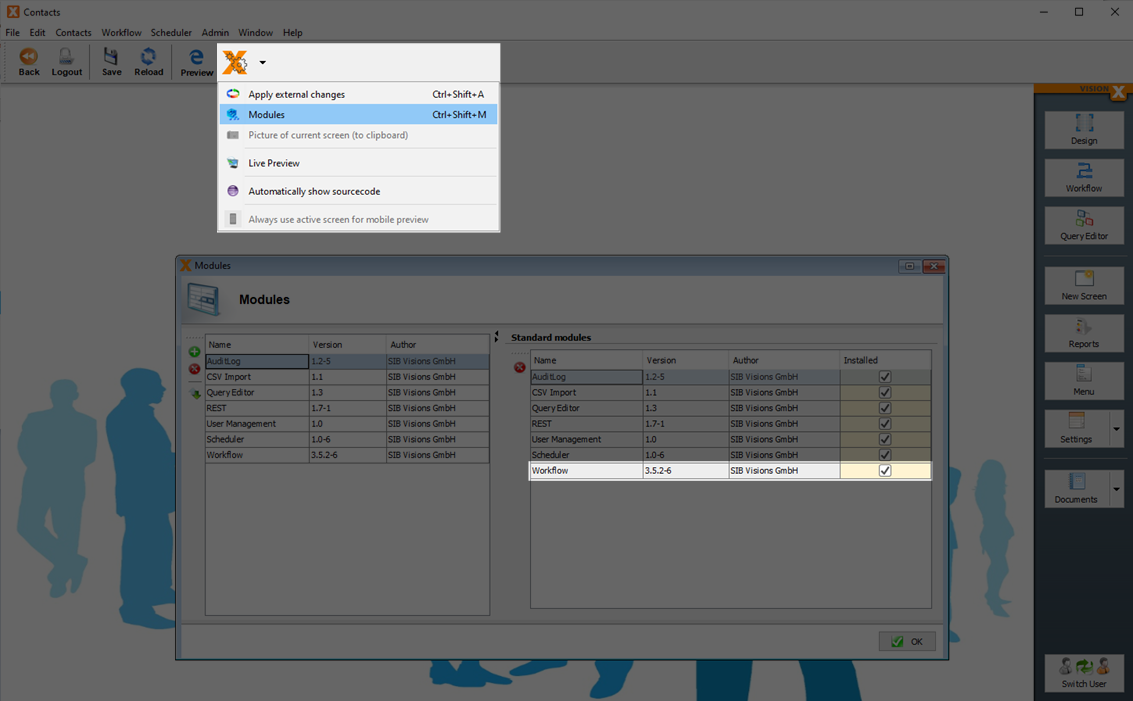
After the installation a restart of VisionX is necessary. After restarting, select the application you want to use, click on “Settings” at the top of the screen, and select “Modules”.
A list of available modules will appear. Select the checkbox associated with the Workflow module to install the module in the application.
Workflow Designer
To start the Workflow Designer, open your project and click the Workflow button on the right side of the screen.

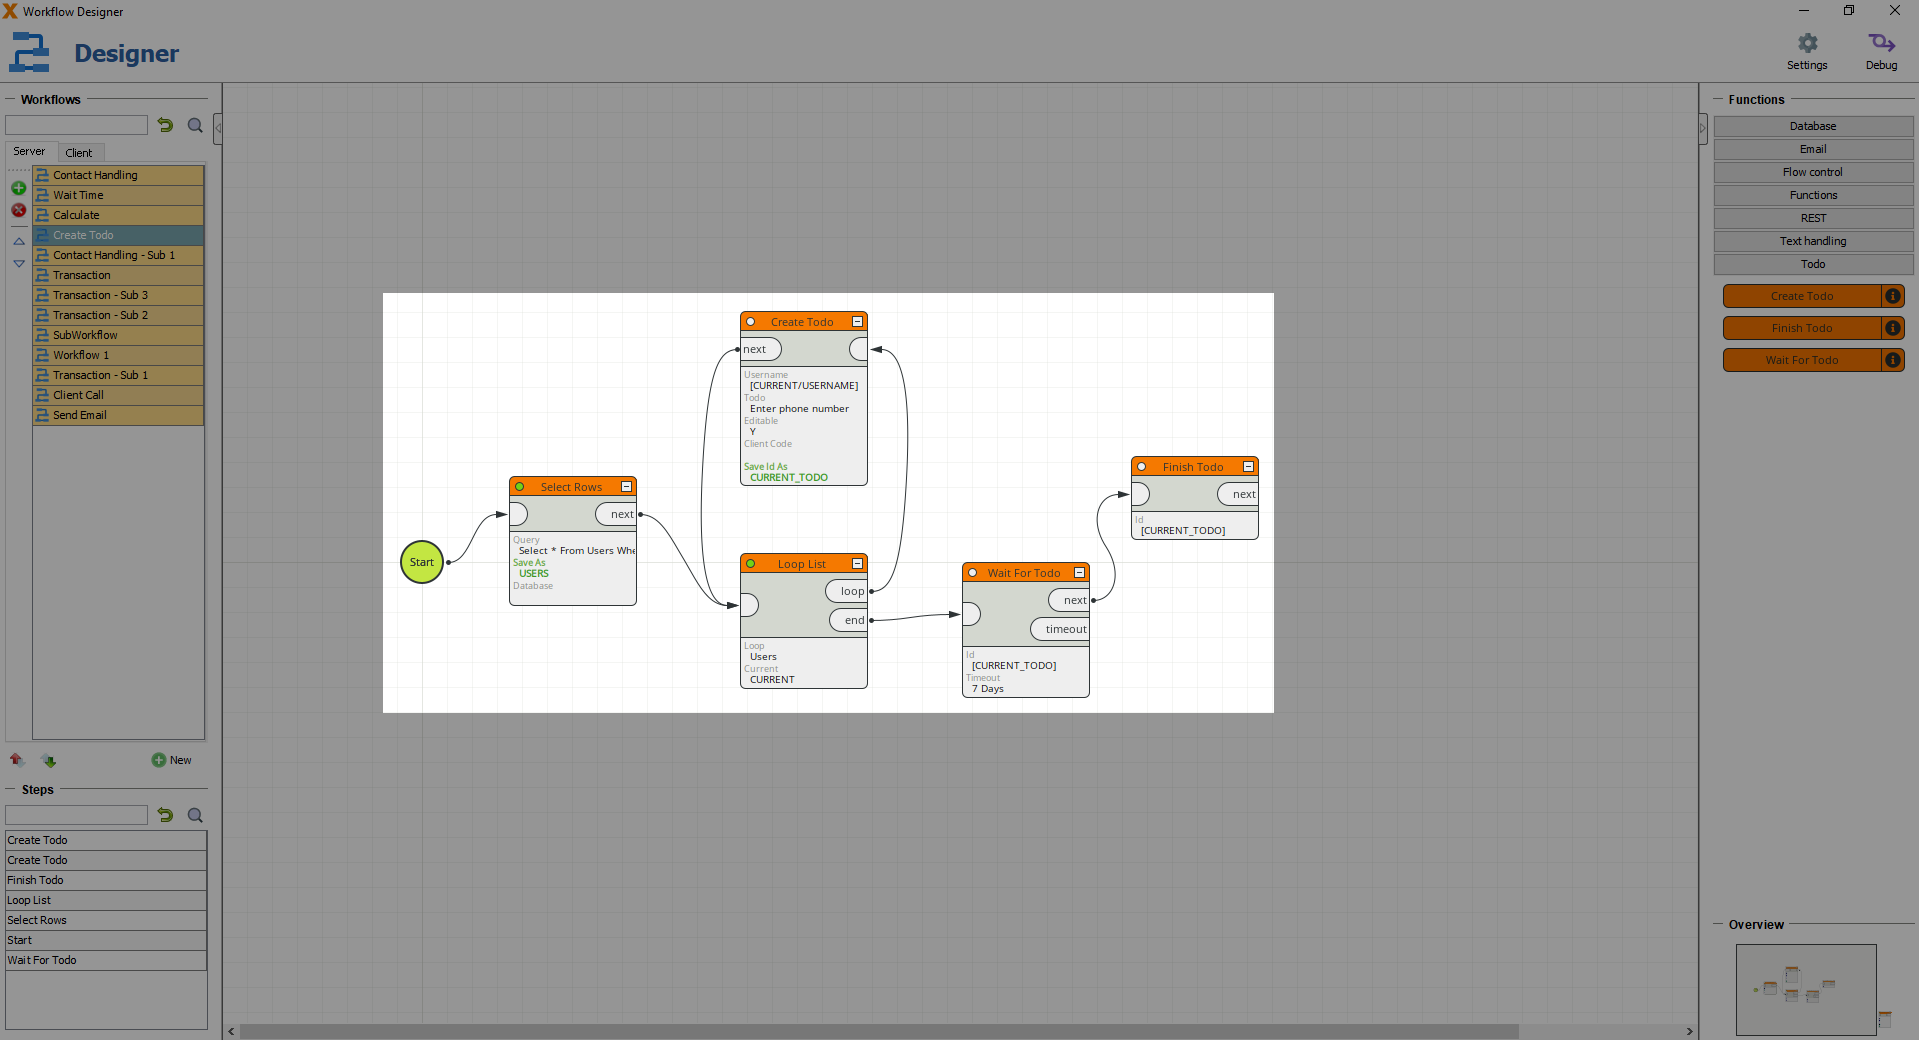
Structure of the Workflow Designer

| Element | Description | |
|---|---|---|
| 1 | List of workflows | All workflows used in the application are displayed here. You can create and delete folders using the + and x buttons, and then use the arrow buttons to move workflows between folders. This structure keeps workflows organized and is helpful in projects with many workflows. |
| 2 | Search bar | Search function for your workflows. Click on the magnifying glass or press the Enter key to start the search. Pressing the green arrow displays all workflows again. |
| 3 | Import / Export | Allows you to export workflows as a ZIP file and then import them back into another project to edit them. |
| 4 | Creating Workflows | The “New” button is used to create a new workflow. |
| 5 | Steps | Displays all steps used in the selected workflow. Just like with the workflow search function, you can use the search box to find workflow steps. |
| 6 | Workflow Functions | Shows all available workflow functions. |
| 7 | Overview | Used for better navigation in workflows with many steps. A click on the desired position centers the designer on that position. |
| 8 | Custom Functions | Opens the configuration window for new functions. |
| 9 | Debugger | Used to simulate workflows and analyze errors. |
Creating Workflows
This section contains general information about creating and configuring a workflow and shows the individual steps of an e-mail workflow example. In the example, we automatically send an email to the admin user of the application.
New Workflow
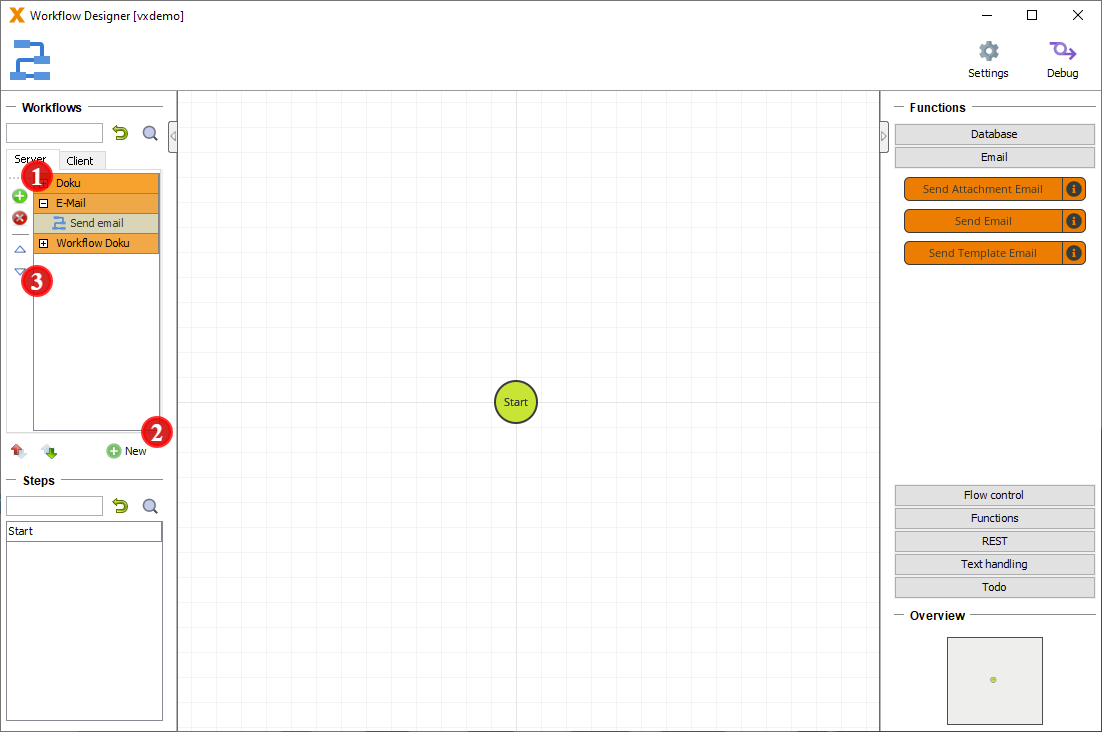
To keep workflows organized in applications with multiple workflows, we recommend grouping them in folders. So let's first create a folder by clicking on the 'Plus' button (1) and name it based on the workflow category.
We then select the newly created folder and click the 'New' button (2) to create a new workflow. The arrow keys (3) allow us to move workflows between folders.
Example: In our example, we created a new folder named 'E-mail' and added the workflow 'Send email'.
Add/Delete functions
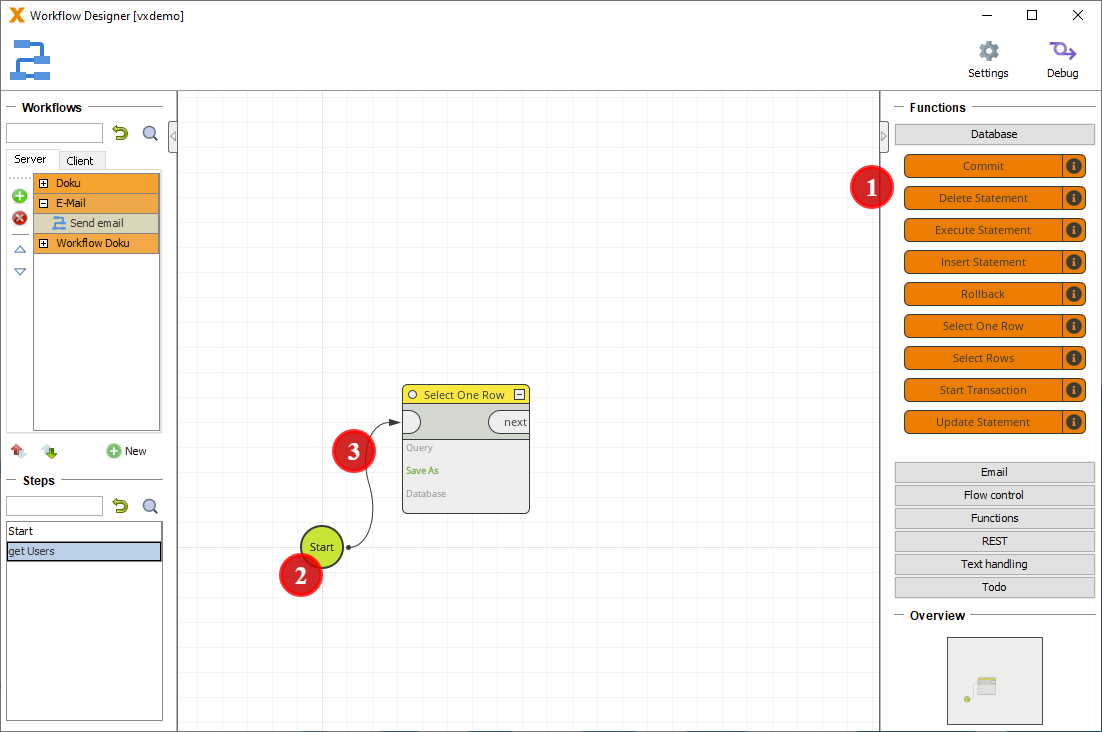
After creating a new workflow, we can add functions using drag and drop. The first function must be connected to the starting point (2). Select a function from the function list (1) and drag and drop it next to the starting point. A connection (3) will be made automatically if the selected workflow step is close enough to the starting point or to another step.
Example: To get the administrator's email address, we need the function 'Select One Row'. This can be found in the “Database” category on the “Functions” list (1).
Any number of workflow steps can now be added using the same process.
Example: As the next step in our e-mail example, we add the function “Send E-Mail” from the “Email” cateogry of the “Functions” list. We drag the function next to our first workflow step and again an automatic connection is created between the two steps.

To delete an unwanted workflow step, right-click the step and click “Delete”. Alternatively, select the step with the left mouse button and press delete on your keyboard.

Add/Delete connections
Instead of connecting two workflow steps by moving them next to each other, we can also create a connection manually. Click on the output (1) of the first step and then on the input (2) of the second step to create the connection (it also works in reverse order).

A connection can be deleted by right-clicking on the corresponding input (1) or output (2).

Example: In our example, it is not necessary to add more functions or delete connections.
Workflow Step Configuration
Double-click on a workflow step to open the configuration window. Label (1), parameters (2) and output parameters (3) can be configured. Labels can be added for each workflow step. Parameters vary by workflow function and the output parameter only exists if the workflow function has a return value.

Label
This is the name of the workflow step. The advantage of setting labels is that you get a better structure in the element tree. All keys and values are also assigned to the workflow step with the associated label in which the data was fetched. If no name is assigned to the label, you will also see the fetched data, but only with the name of the function used, which can become confusing if there are multiple workflow steps in the application.

Example: Two workflow steps were previously configured with the labels “get Admin” and “get Users”.
Parameters
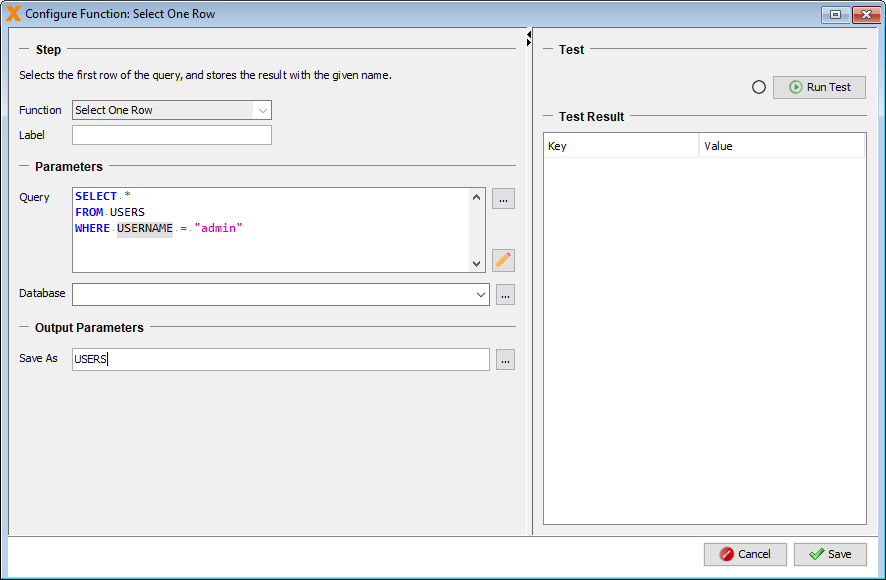
Parameters differ from function to function. For example, in our first workflow step, there are two parameters: a query (1) and a database (2). The parameter query requires an SQL statement. This statement is then executed in the selected database. If multiple databases are configured for your project, you can select the desired one in the “Database” parameter. If no specific database is selected, the default database of the VisionX project will be automatically selected and accessed.

Parameters can be filled with placeholders (1), fixed values (2) or a combination of both (3).

Placeholders
Placeholders are written in square brackets and are used to refer to a specific value from the previously saved steps in your workflow.
Here are some examples for the declaration of parameters with placeholders:
| Placeholder | Description |
|---|---|
| [ADMIN/EMAIL] | The value of the e-mail address of the previously saved user is used when the workflow step is executed. |
| [USERS(0)/EMAIL] | By specifying an index, the corresponding entry of a list is used. In this example, the first entry of the USERS list is used with the value of the email address. |
| [CURRENT/EMAIL] | If a loop list is used, the e-mail of the currently selected user is used for each loop pass. |
Fixed Values
Fixed values are values that, unlike placeholders, do not change and will be the same for each workflow run.
Output Parameters
Output parameters are data that is fetched and saved in your workflow step. In the text field 'Save as' (1) you can declare and save an appropriate name for the parameter. This data can be accessed repeatedly in the remainder of the workflow.
After a successful test is executed, an element tree will be displayed on the right side of the window. The fetched data (2) is displayed here with the stored output parameter.
Element Tree
The Element Tree displays all the tree elements and their values that are stored by other steps of the workflow. It can be used as support for the selection of elements.
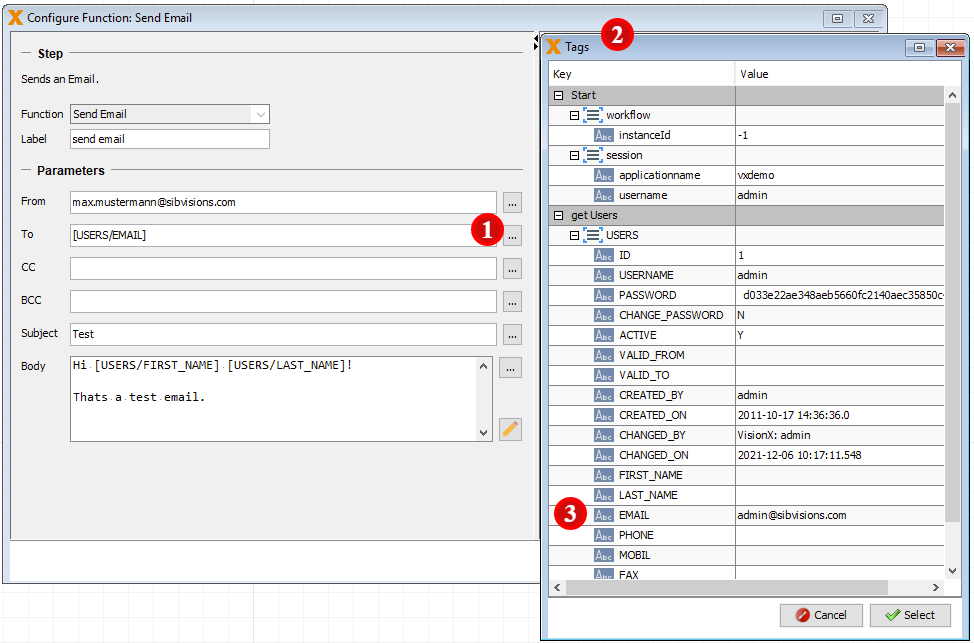
Clicking on the '…' button (1) opens the element tree (2). A double click on the desired key selects that key as a placeholder for the parameter. In this example we used the value of the key 'EMAIL' (3).
The Element Tree is also displayed after a successful test of a function and in the debugger for each individual step that was performed.
Test
The 'Run Test' button (1) allows you to check if a workflow step works as intended. If you use placeholders (2) for your workflow step, you have to enter them in the upper right corner to get to your result.
A datatype has to be selected for each placeholder. You can choose between text, number, date and binary data types. You can change these by clicking on the button (3) next to the corresponding text field.
After the test run has been performed, the test result or an error message is displayed in the Test Result (4) area.
Let's continue editing our example workflow:
In the first step we read out the email address from the standard user and role administration. For this we use the database function “Select One Row”.
With a double click we can configure the parameters of the step.
We assign 'get Users' as the label and get our admin user via a database query. We just have to write the SQL statement in the query text field.
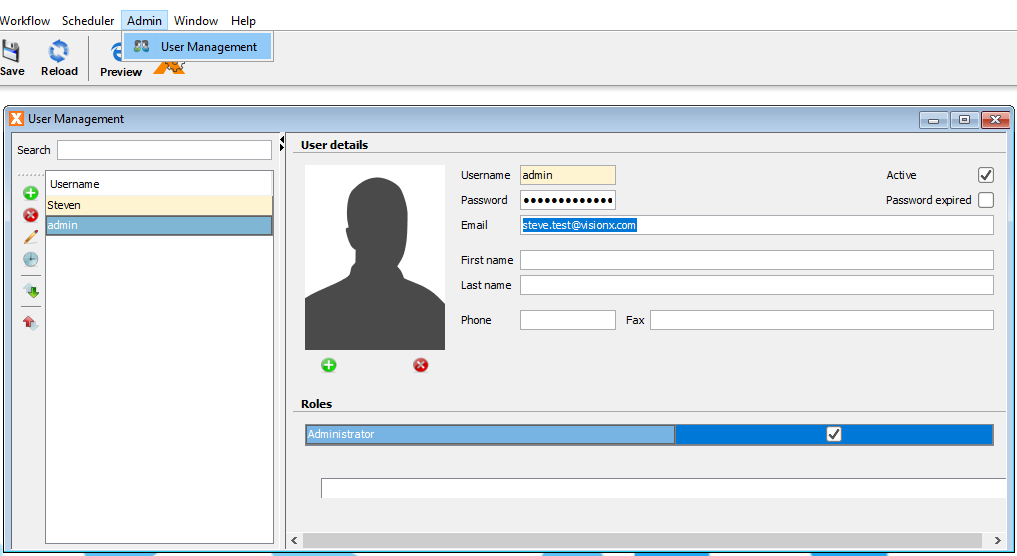
If you have not yet entered an e-mail address for the admin user of your application, please open the “User Management” screen on the “Admin” menu in VisionX and enter an email address, so that it can be used it for this example.
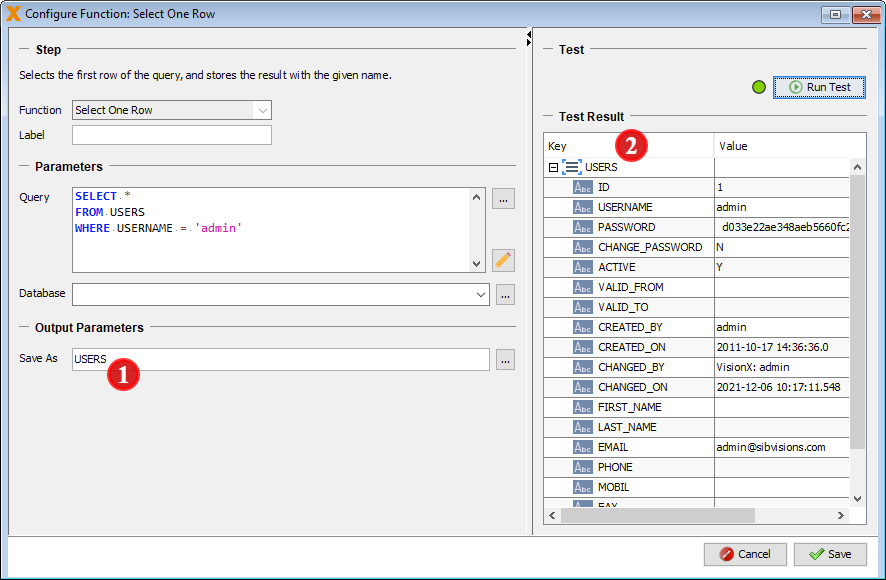
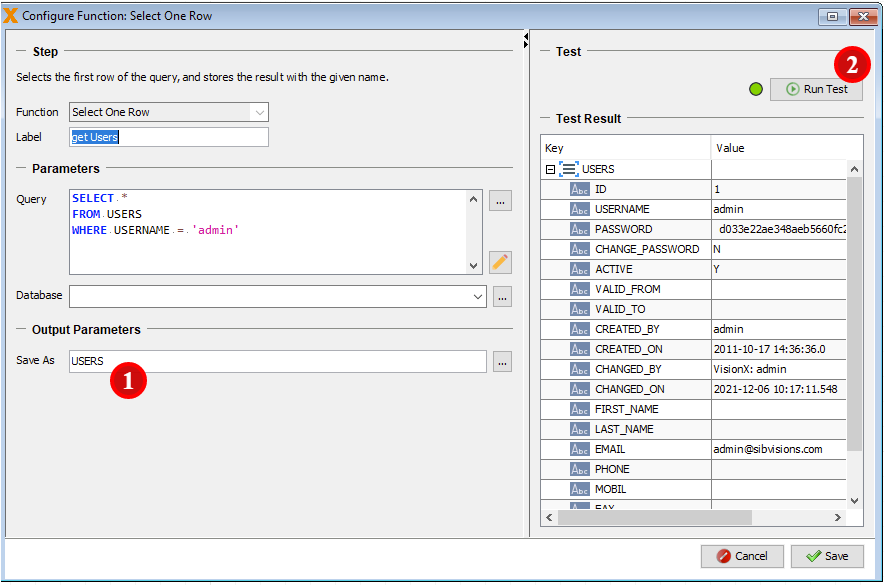
To save the result, we enter 'USERS' in the “Save as” field under “Output Parameters” (1). This makes the result available for all future workflow steps.
We can now press the 'Run Test' button (2) to test the current workflow step. In this case, we get the result of the SQL-Statement displayed under the “USERS” key.
Our next step is to configure the “Send E-mail” step we added earlier.
Double click on the “Send E-mail” step to configure the parameters.

We label the workflow step 'send email' and add our e-mail address to the ‘From’ field.
For the 'To' field, we can use the '…' button to open the element tree that contains the available variables. We then select the admin user's e-mail address from the SQL-Statement result.

Then fill in the subject and body of the email. In the body we use the FIRST_NAME and LAST_NAME from the SQL-Statement result.
Note: Fixed values can also be used for parameters, as in the “From” text field.

We then test the Workflow Step using the 'Run Test' button. An exception occurs. This is because we have not yet configured the email server parameters.
To do this, switch to VisionX and select “Settings” on the right side of the screen.
We can now select the 'Email' tab to configure the email server.
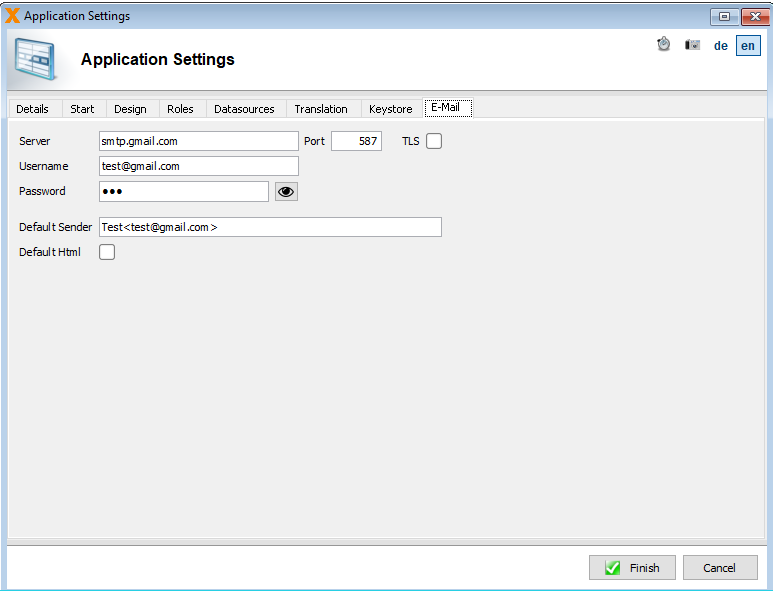
The example uses a gmail account with an SMTP email server. After completing the configuration, we can run the test again.
Start Parameters
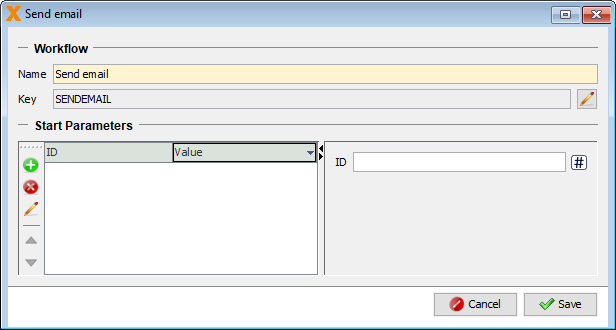
To configure parameters that are passed to the workflow before it is started, double-click Start. You can now define which (list or value) parameters must be given to the workflow.
Example: Let's say we want to pass a user ID from the application to the workflow and use this ID to filter for a user with the “Select One Row” function at the start of the workflow. To do this, we simply define a start parameter called “ID” that we can then use to pass the user ID to the workflow.
Starting Workflows in VisionX Applications
It is easy to integrate workflows into a VisionX application. A workflow can be started in any screen using using VisionX Actions and parameters.
For example, we can give users the option to send an email from one of our application screens. To do this, we first add a button to the screen in Design Mode and name it “Send Email”.
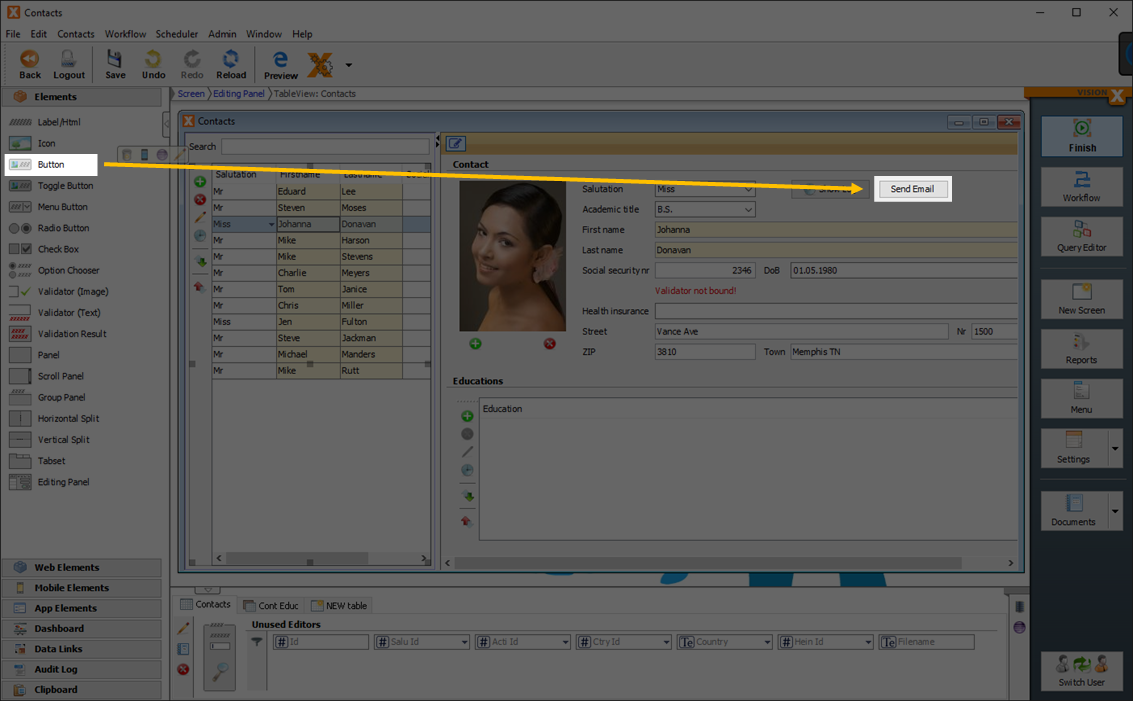
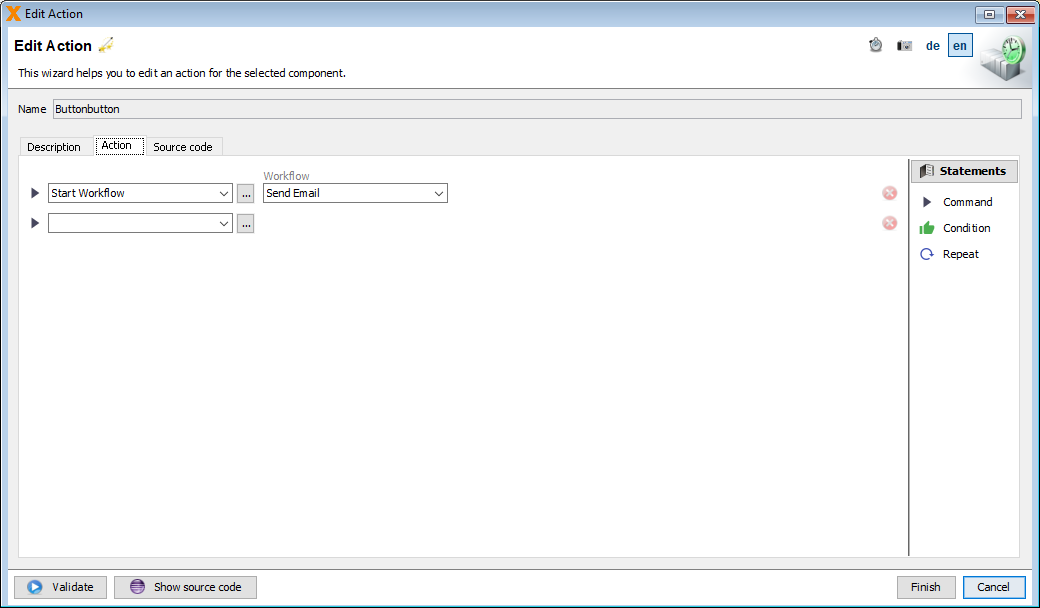
We then right-click on the button and select “Create Action” at the bottom of the context menu.
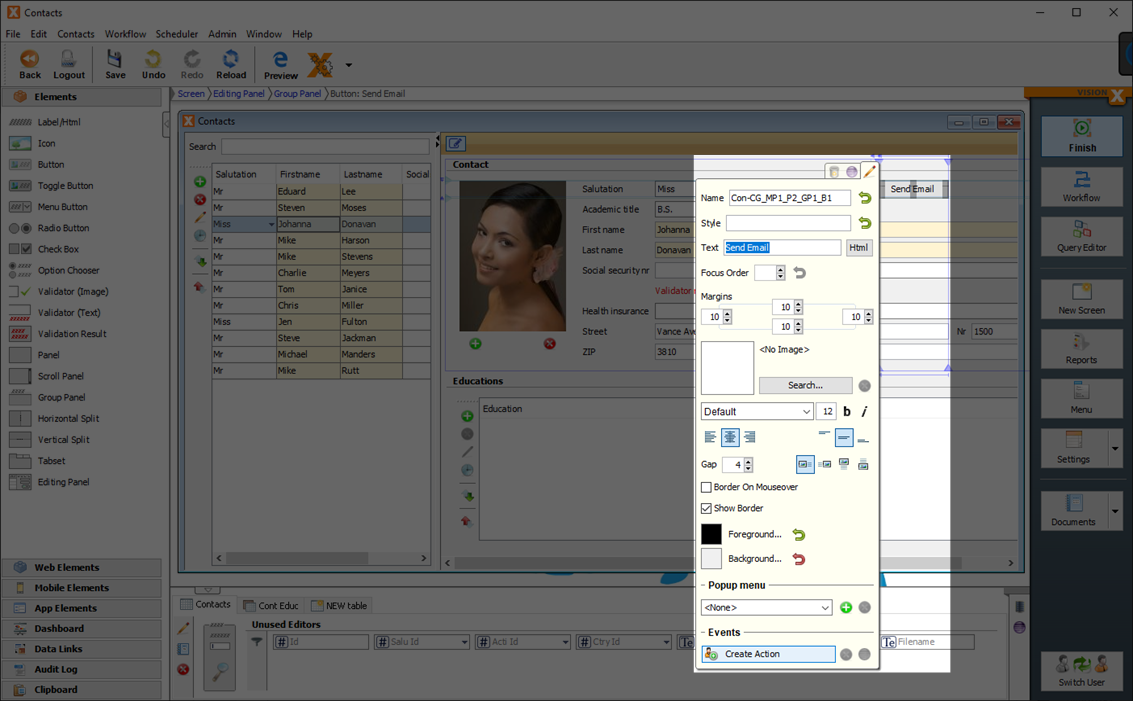
On the “Action” tab, we now select “Start Workflow” and then the “Send Email” workflow we created earlier. Click “Finish”. The workflow will now start when the button is clicked.
Workflow Functions
With an extensive package of powerful functions, countless activities can be automated using workflows.
The following categories of functions are available:
| Function Category | Description |
|---|---|
| Database | Access data from all major SQL databases, including full transaction support. |
| Send messages to the various people involved in a business process. These templates can also be customized in your VisionX application. | |
| Flow Control | Provides a variety of options, such as checking a condition / status, looping through lists, and handling specific exceptions. |
| Functions | Various application functions |
| REST | Access, change or delete data via REST services |
| Text Handling | Text manipulation functions such as trim, left, right, and concatenate |
| To-Dos | Create todos that are immediately visible for users in the application through push notifications. The To-do management screen is fully editable in VisionX. |
Database
Using the funtions in the “Database” category, all databases used in the VisionX application can be accessed via SQL. This allows you to read data and then process it in further workflow steps (e.g. send an e-mail, trigger approvals, or transfer data to interfaces).
Furthermore, data can be changed via Insert, Update, Delete. You can also access stored procedures in the database.
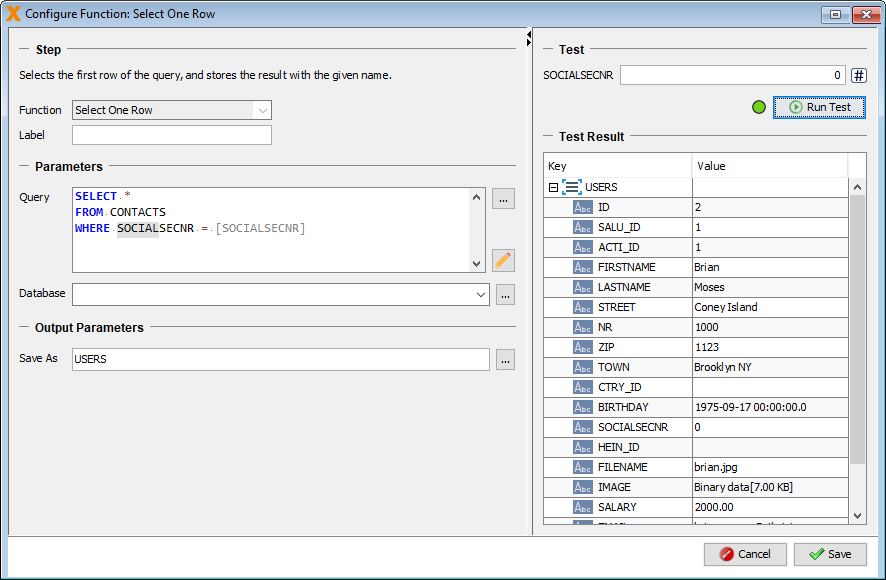
Select One Row
With this function you can filter for exactly one record from the database. This record can be saved as an output parameter and passed back to other functions of the workflow as a parameter. The SQL statement for filtering the data is declared in the Query text area.
Example: You want to filter employees by social security number. Since this is a unique identifier, you get exactly one record as the result of the query.
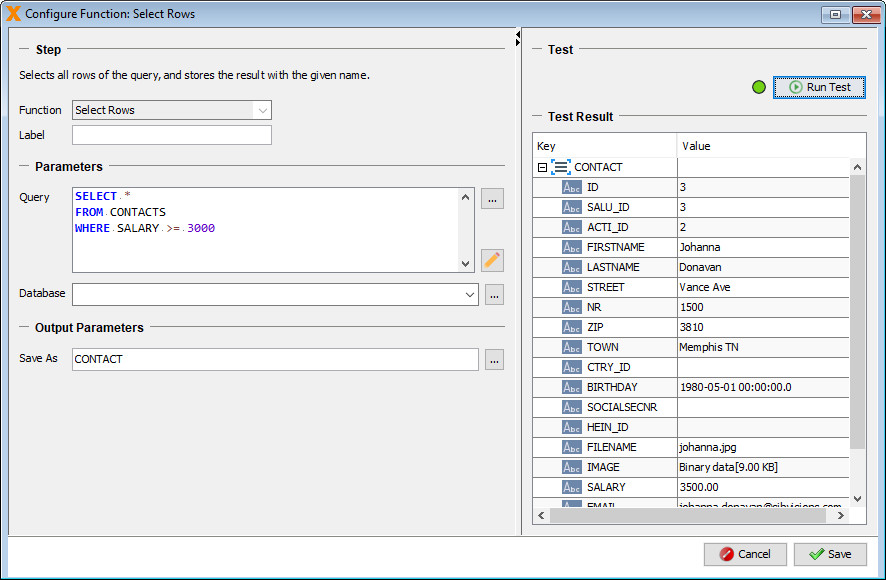
Select Rows
Unlike the “Select One Row” function, this function can be used to store several data records in a list. The records can then be modified in the further course of the workflow, deleted or processed with other functions. The configuration of the function is otherwise the same as with “Select One Row”.
Example: You want to filter all employees who earn more than 3000.
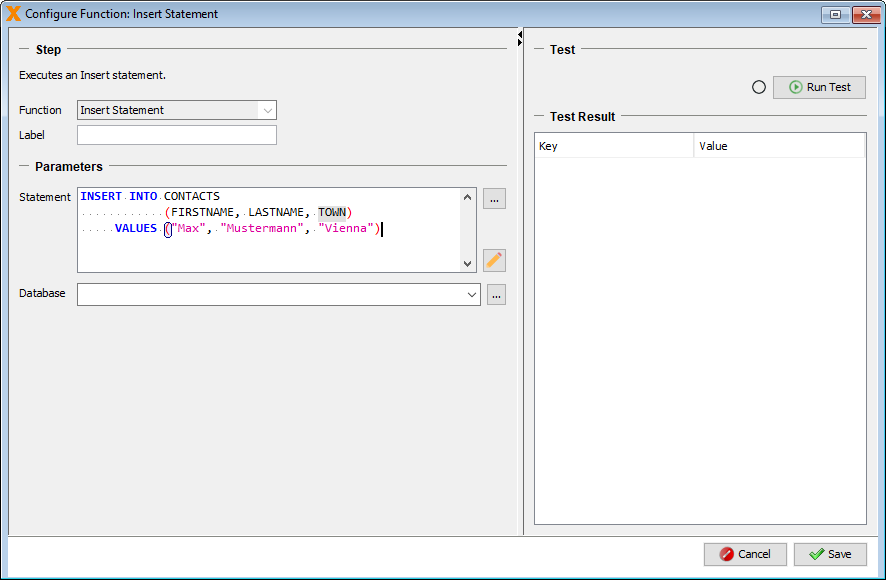
Insert Statement
This function is used add a new record to the defined database table using an insert statement. A statement template is displayed when you open the function configuration window, so you only have to edit the table name, column name and values.
Example: Adding a new employee to the “Contacts” table.
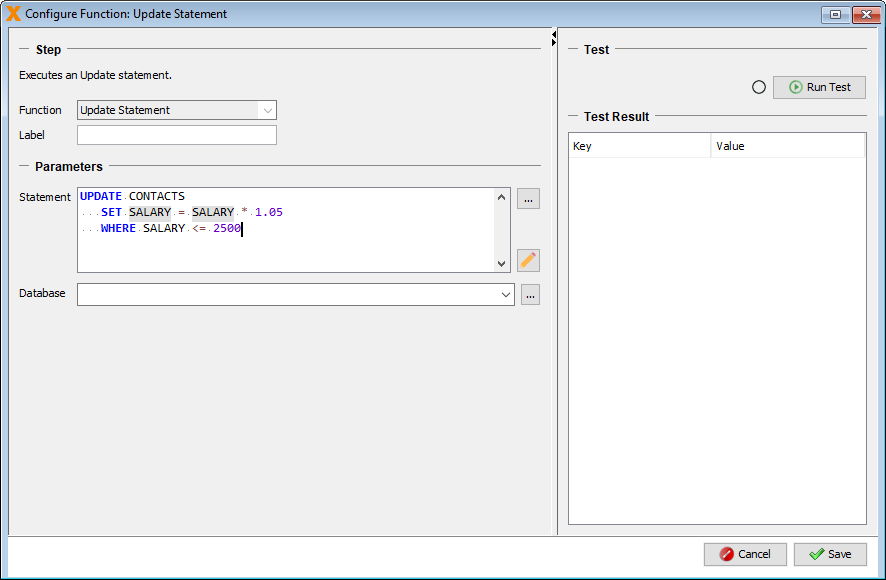
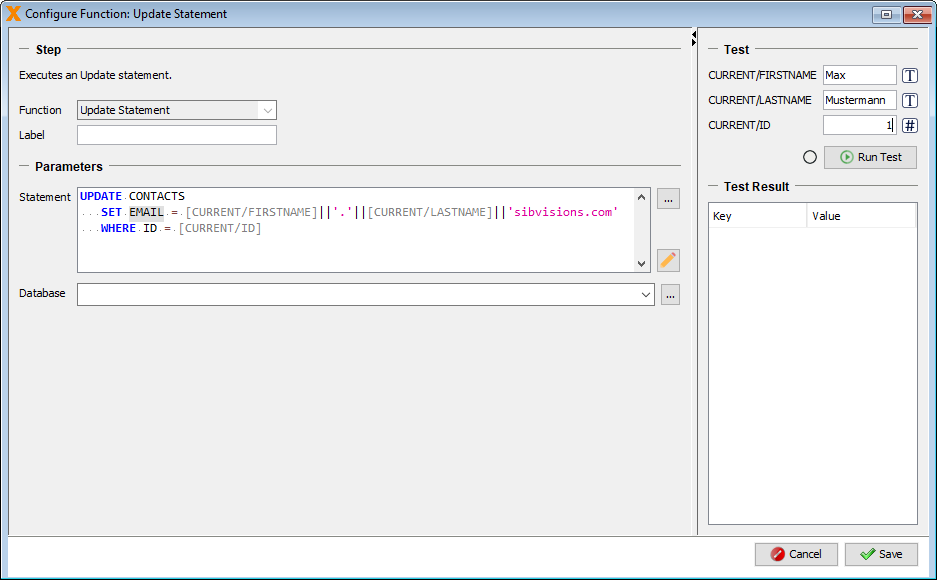
Update Statement
Unlike the “Insert” statement, no new records are added during an update. Instead, the existing entries in a table are changed. We can either change all entries in a table or use a WHERE clause to restrict the change to a certain subset.
Example: All employees earning less than 2500 receive a salary increase of 5 percent.
Delete Statement
The “Delete” statement executes the deletion of records. Here again, a WHERE clause can be used to restrict the deletion to certain records.
However, it should be noted that after a delete the records are permanently deleted from the database.
Example: Employee with ID 1 is deleted from the database.

Execute Statement
With the “Execute Statement” function you can, as already described, execute Insert, Update and Delete statements or call a procedure.
Call a procedure:
BEGIN
    > TestProcedure([Parameter1],[Parameter2],...);
END
Note that this function cannot be used to issue statements that have a return value, like the Select One Row or Select Rows functions.
Start Transaction
A transaction in SQL is a chain of SQL statements that are executed one after the other. Changes in the database are not saved at the time of execution of the statement, but only when all have been successfully processed without an error message and at the end the transaction is confirmed with a commit.
Only after the commit are the changes visible to other database users and the edited records are released by the database for other users again. You can drag this function into your workflow designer and then link it to other database functions. The transaction must be confirmed after the last SQL statement with a commit or with a rollback to reset all changes in the database that have not yet been saved permanently.
Example: A concatenation of SQL statements that starts with the “Start Transaction” function and ends with a commit.

Here several tables are filled with SQL statements. It is important that all statements are executed successfully and are only confirmed or completely undone at the end in order to avoid incorrect bank transfer.
Commit/Rollback
The transaction must be completed with commit or rollback.
| Function | Description |
|---|---|
| Commit | Saves all changes made during a transaction. |
| Rollback | Undoes the changes made during a transaction. |
Functions in the “Email” category allow us to send emails using templates and workflow variables.
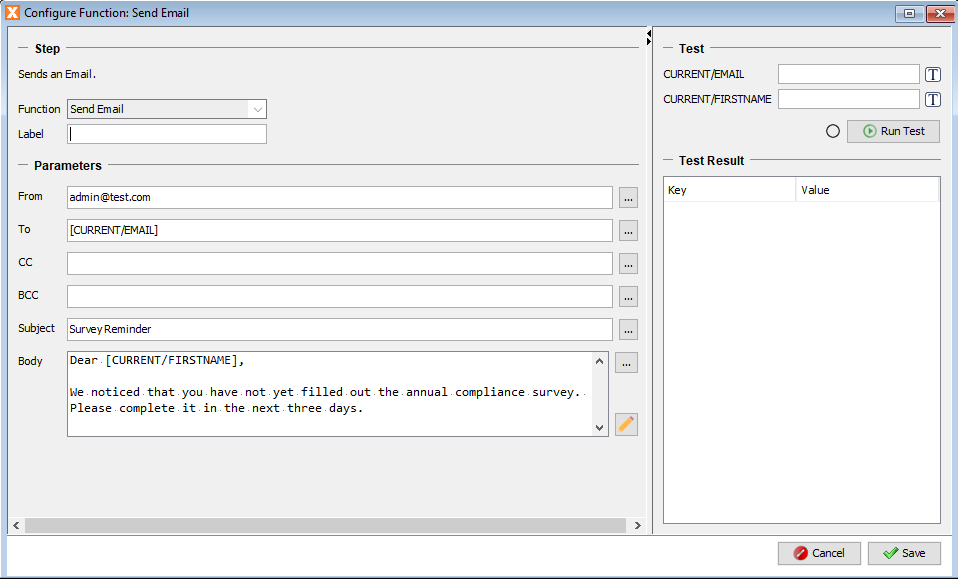
Send Email
With the “Send Email” function, emails can be sent automatically during a workflow. The email address can either be read from the database or via a REST service. The required parameters of the function can be filled with relevant keys, as well as with static values (e.g. [CURRENT/EMAIL] to use the email address of the currently selected record when passing through a loop).
The email server has to be configured before emails can be sent using workflows. There are two different options: one in VisionX and the other directly in the source code.
Configuring the Email Server in VisionX
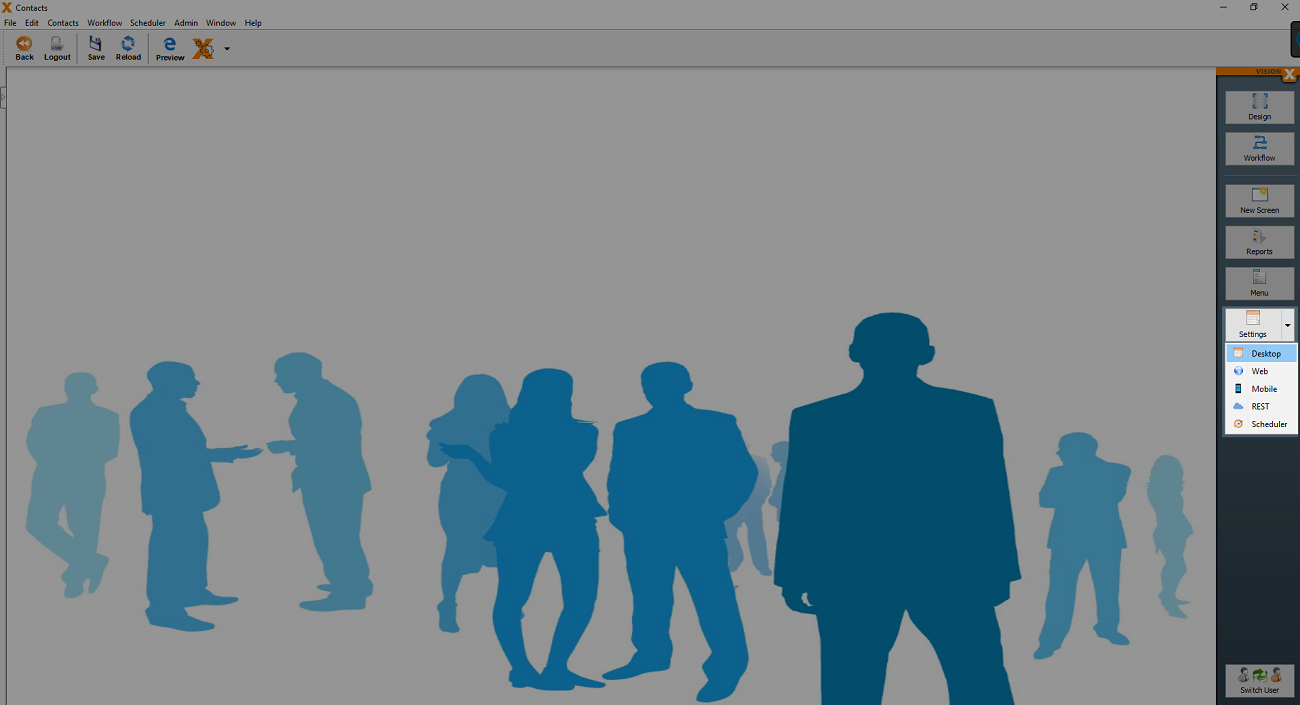
On the right side of the VisionX editor, select “Settings” and then “Desktop”.
Now switch to the tab Email to configure your email server.
Configuring the Email Server in the Source Code
Open the project's config.xml file in Eclipse and insert the following block </application>:
<mail>
<smtp>
<host>smtp.gmail.com</host>
<port>587</port>
<username>test@gmail.com</username>
<password>123</password>
<tlsenabled>true</tlsenabled>
<defaultsender>Test<test@gmail.com></defaultsender>
</smtp>
</mail>
In this example we use a SMTP Gmail server. Please edit the details based on your email server settings.
Example: We want to send a reminder email to each employee who has not yet completed a required survey. The workflow will do this with the help of a loop. We first configure the “Send Email” function by double-clicking on the workflow step.
We then add the loop to cycle through the employees. See Loop List for additional details on loops.
Send Attachment Email
This function extends the “Send Email” function by allowing attachments to be added to your emails.
To add multiple attachments, use a comma as a separator for the attachment name.
You can also use combined names such as [attach1]_Invoice.pdf, [attach2]_Invoice.pdf.
Send Template Email
“Send Template Email” sends emails based on templates created in VisionX.
To create a template, run your application in the web live preview and open the screen “Email Templates” under the “Workflow” menu item.
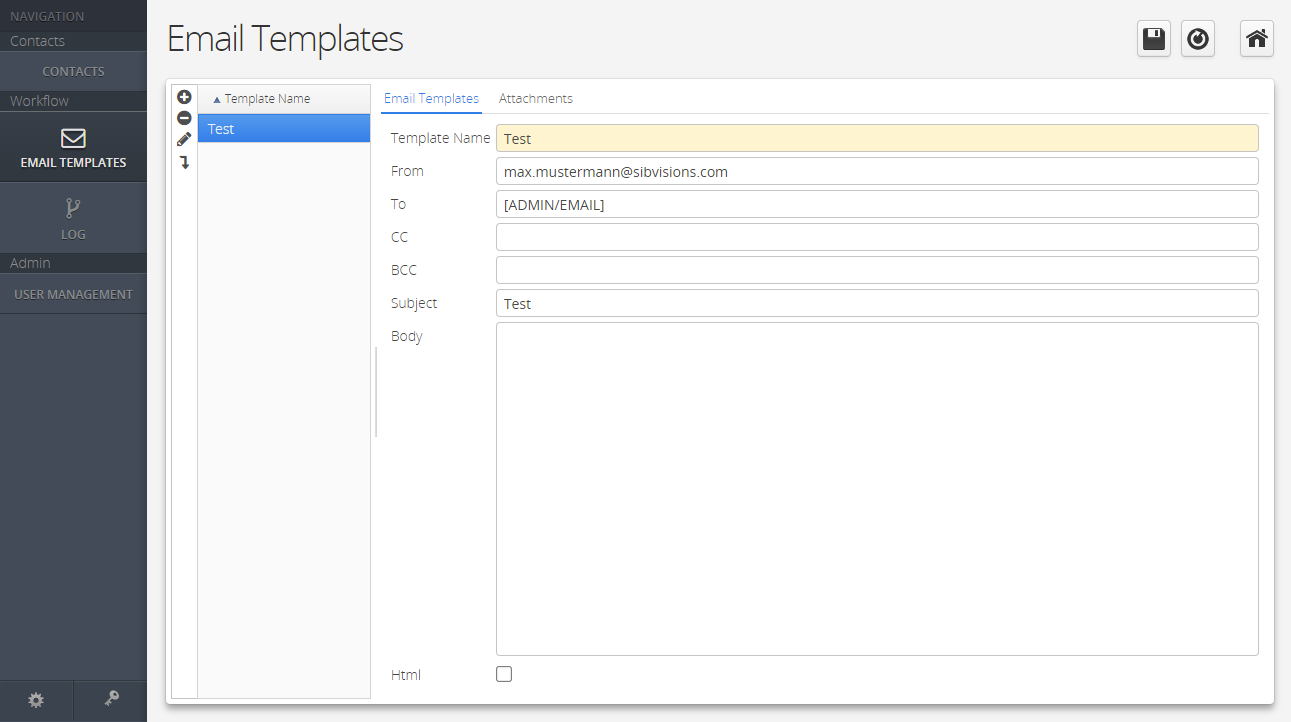
A new screen opens where we can create templates including attachments.
Note: Attachments can also be added when configuring the function in the workflow editor.
For the workflow it is important to specify a receiver. This can be an email address or a key that you use in your workflow.
The workflow parameters can be used in all fields of the e-mail template.
Flow Control
The “Flow Control” function category provides a variety of options, such as checking a condition / status, looping through lists, and handling specific exceptions.
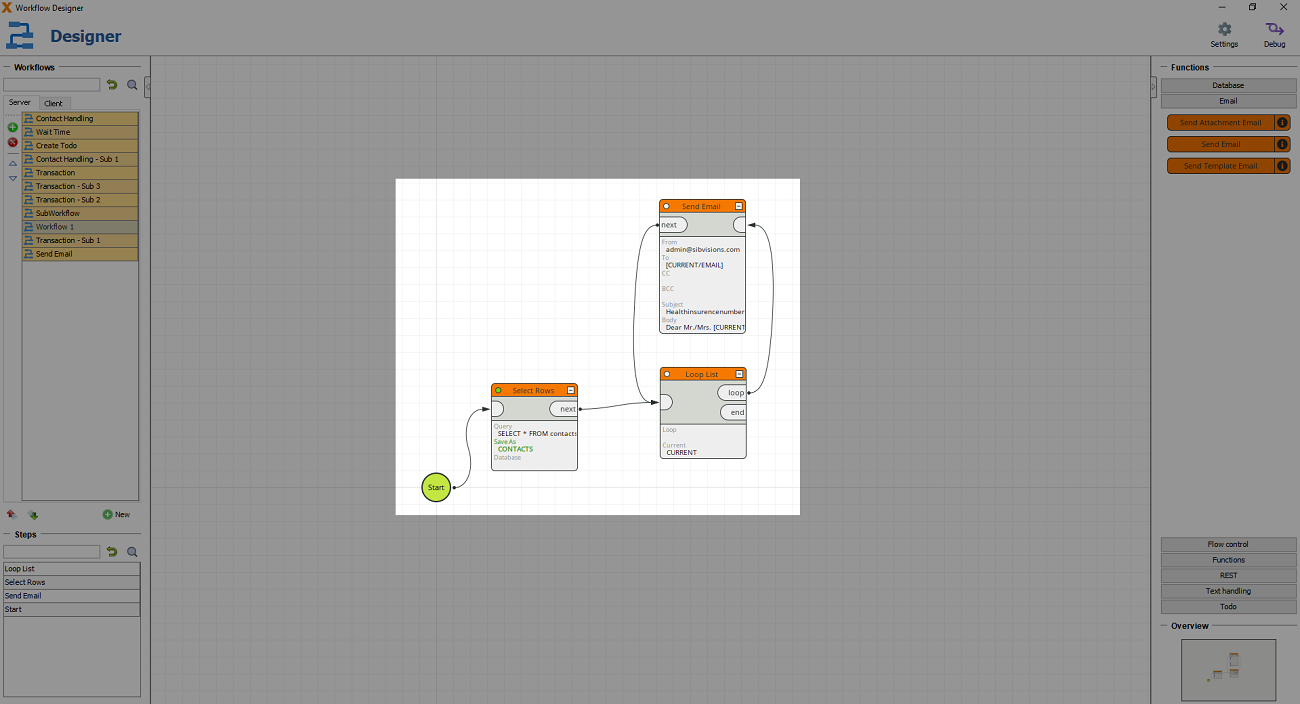
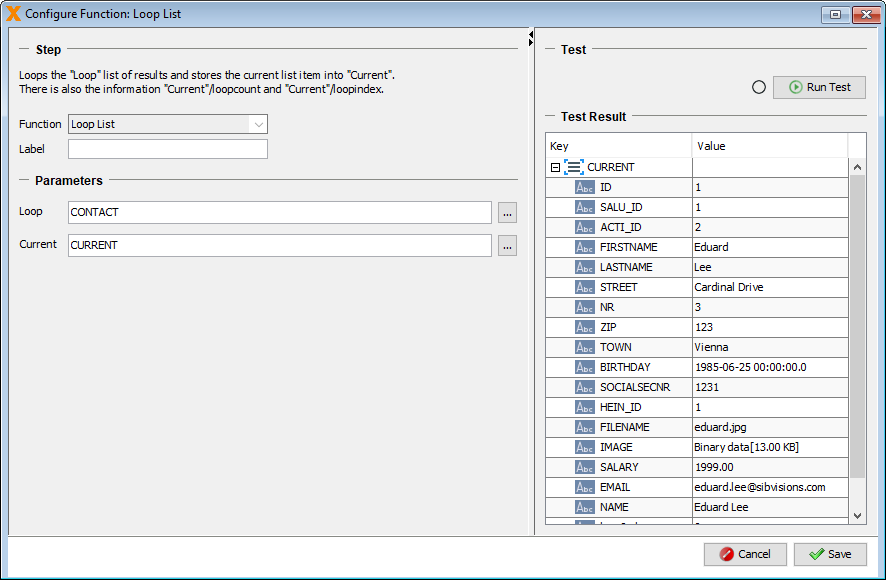
Loop List
The “Loop List” function is used to loop through all rows of a list. In this process, one row is selected in each pass, which can then be used or changed in further functions. The currently selected row of the Loop List,
is per default named CURRENT. If you like to change it, fill in the alternative name right next to “Current”.
To use a value of a column of the current selected row (=CURRENT) use the following syntax
[CURRENT/COLUMNNAME] - E.g. [CURRENT/LASTNAME].
Furthermore, you can also use the [CURRENT/loopindex] to get current index and the [CURRENT/loopcount] to get the row count in subsequent functions.
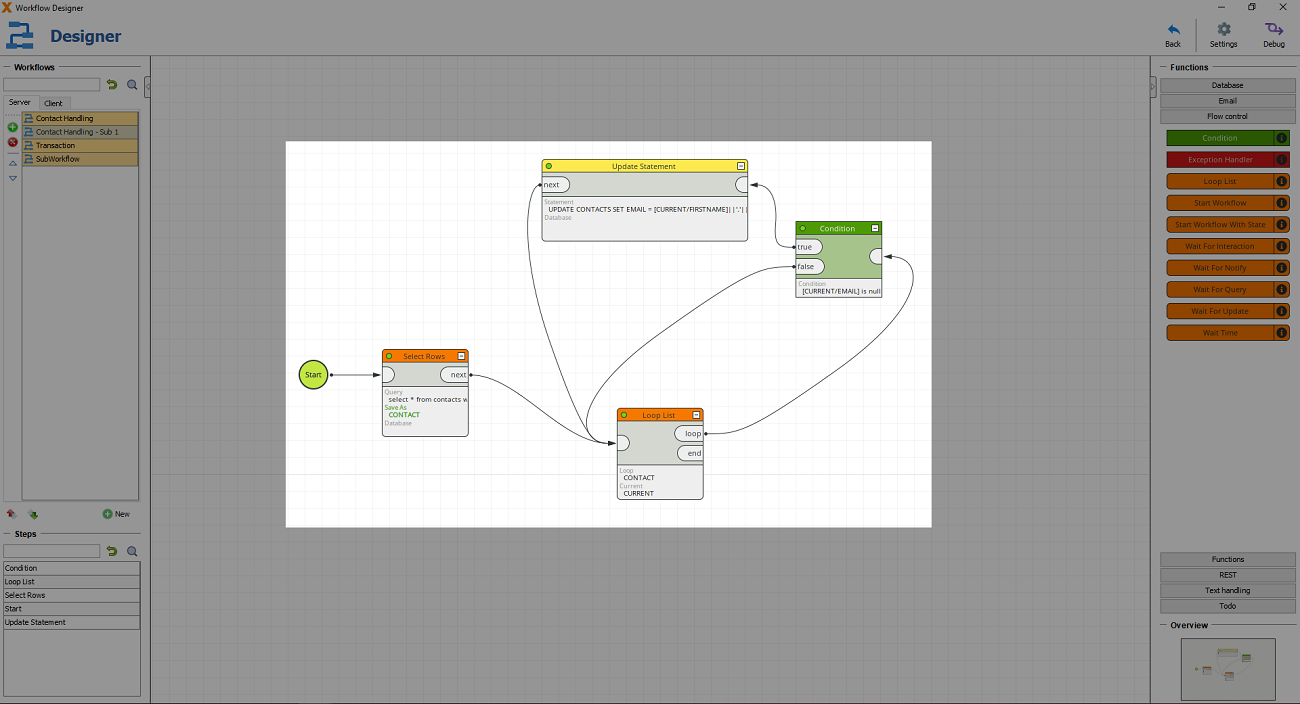
Example: The example below shows a loop that checks whether a contact list includes an email address for each entry. If the email address does not exist in the database, the first name and last name of the current data record are read in each loop pass, combined to an e-mail address via the “Update statement” function, and stored in the database.
Checking whether an email address already exists is done by a condition that continues the workflow in the “Update statement” function if there is no address or moves on to the next loop list run if an address is already saved.
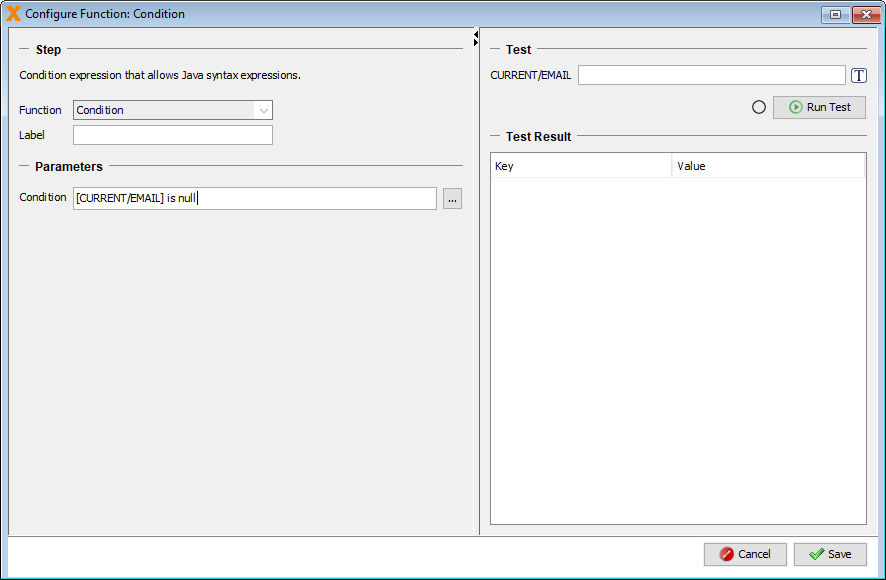
Condition
Conditions can be used to perform different fuctions depending on the result of a decision. Each condition has a true and a false output. To produce nested if-queries, we can easily combine several conditions.
Example: The screenshot below shows the configuration of the condition we used in the previous example to check whether a record contains an email address. Based on the parameter “[CURRENT/EMAIL] is null”, the condition output will be TRUE when no email address exists and FALSE when the record contains an email address.
Exception Handling
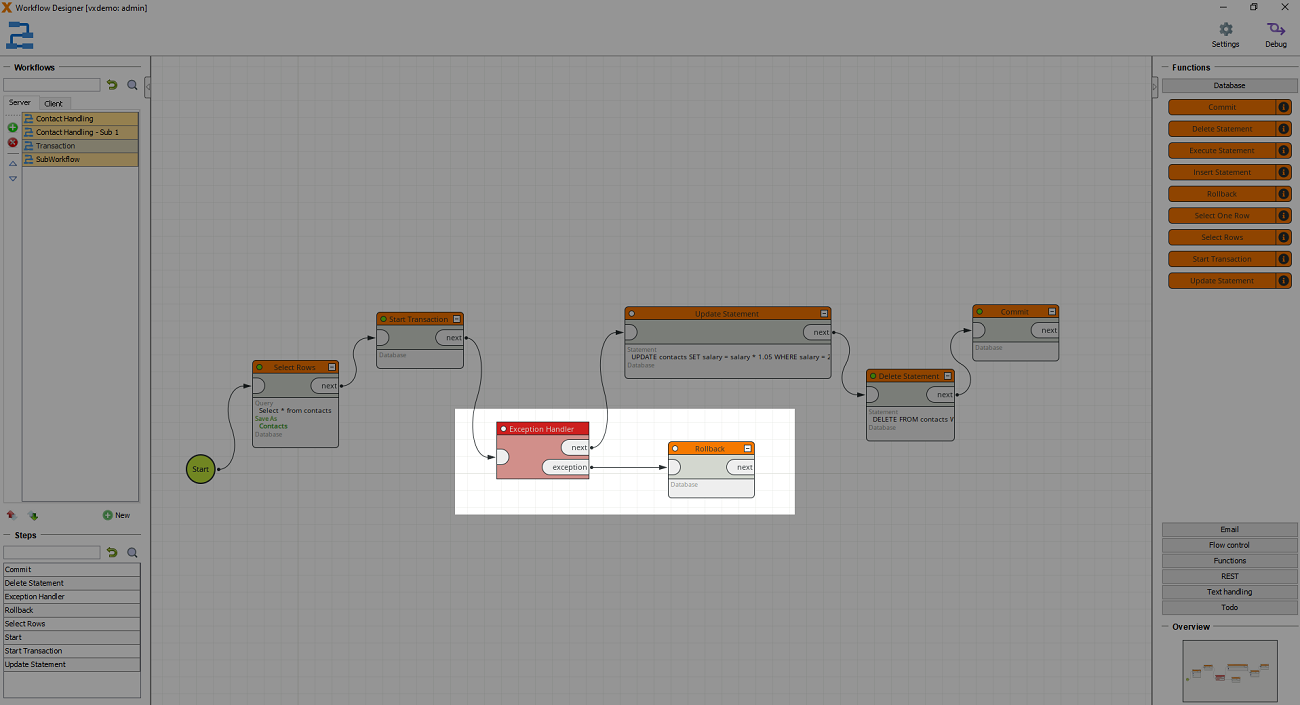
Like the condition, the exception handler also has two outputs. This function can be added to the workflow at any point and is used to enable the exception handling of error states. When an exception occurs, it is handled with the first exception handler before the error node. The workflow is now continued at the exception output of the exception handler and can be continued with any function.
Example: We start with a transaction that we connect to the exeception handler. With the next workflow step (connected to the “next” output) some SQL statements are retrieved. If an exception occurs during the execution of the functions, the workflow will now continue with the workflow step connect with the “exception” output of the exception handler and the transaction will be terminated with a rollback.
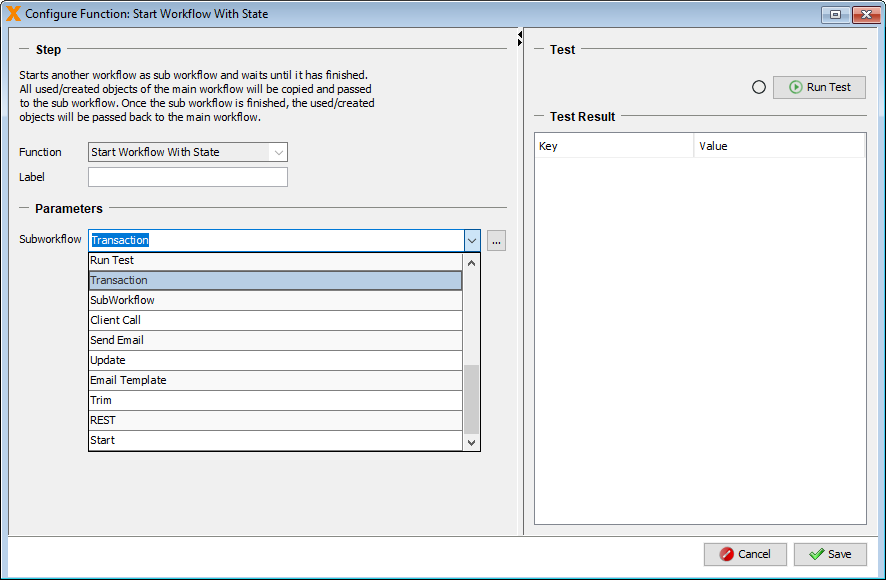
Start Workflow With State
Starts another workflow as a sub-workflow and waits until it is finished. All used/created objects of the main workflow are copied and passed to the sub-workflow. Once the sub-workflow is finished, the used/created objects are returned to the main workflow.
Start Workflow
Same function as “Start Workflow With State”, but without returning used/created objects to the main workflow.
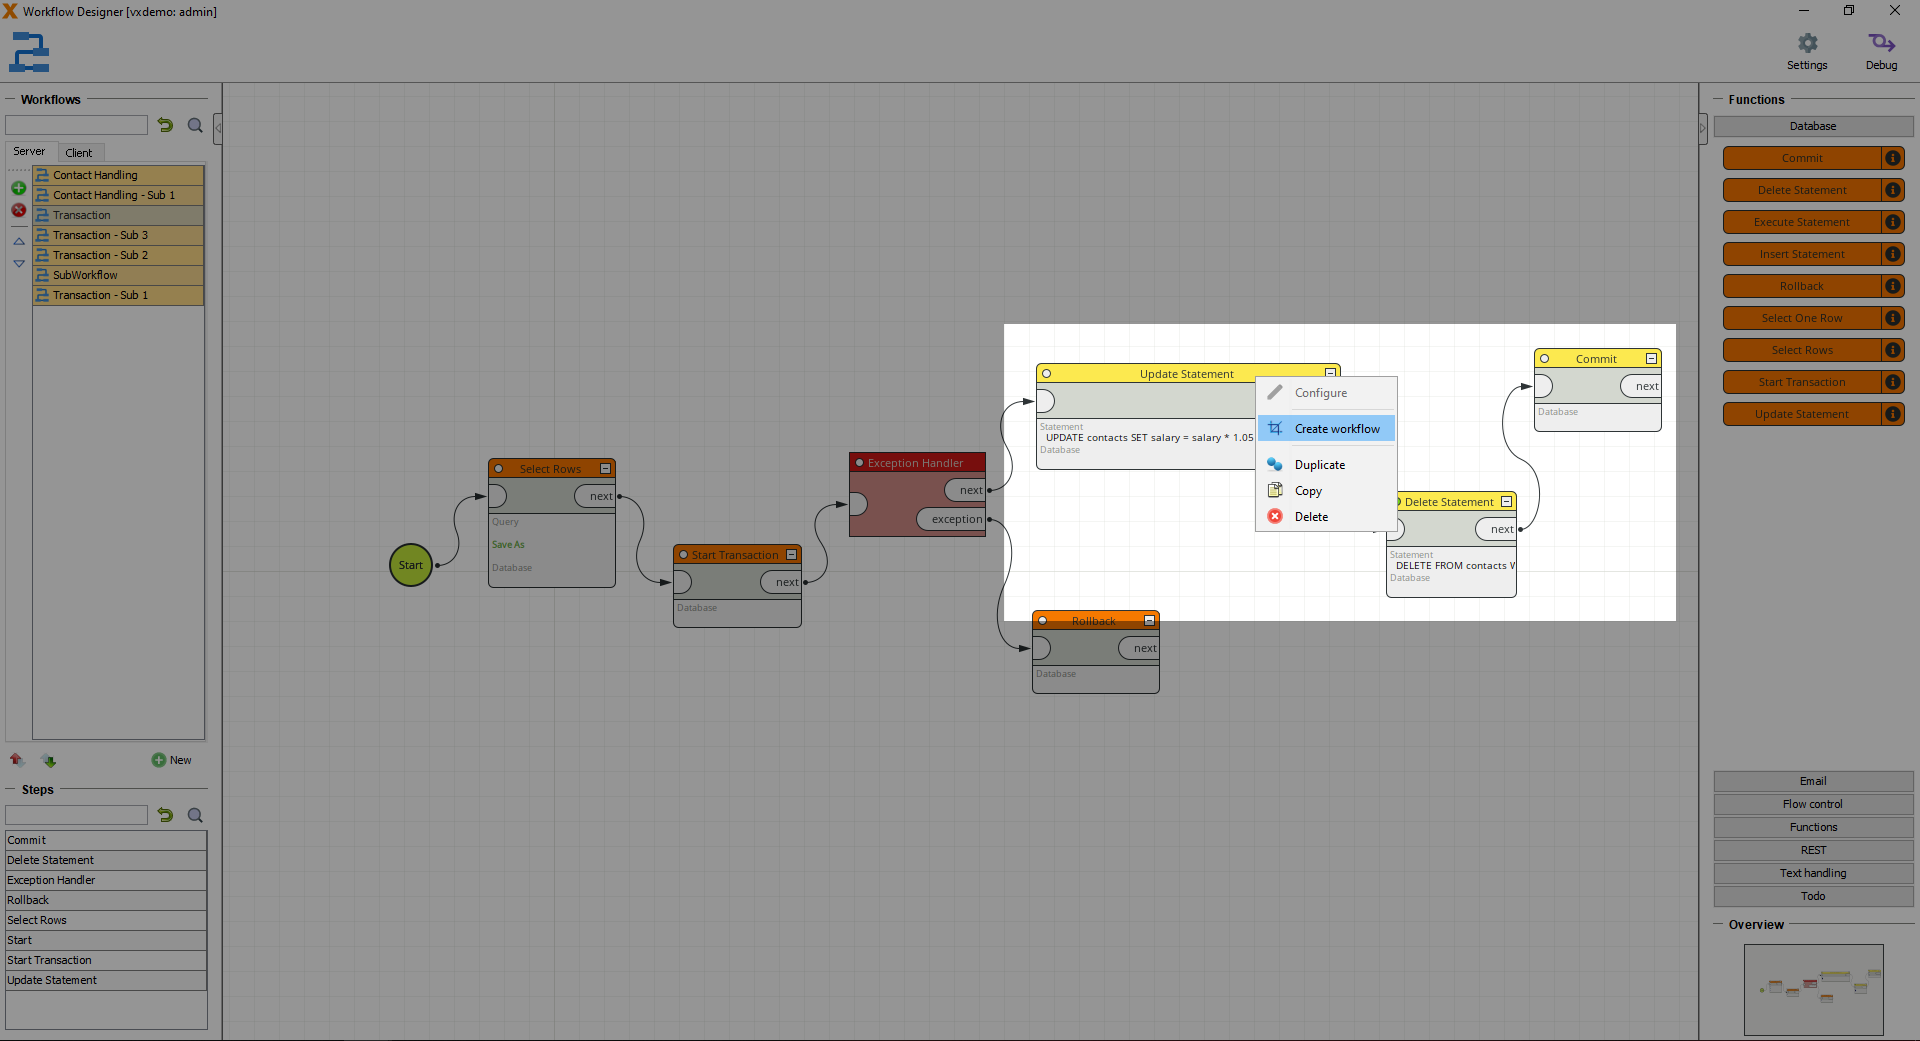
To create an independent workflow from multiple connected functions in an existing workflow, the desired functions can be selected by holding the CTRL key and left-clicking on the functions.
By right-clicking one of the selected function headers and selecting “Create Workflow”, the functions are combined to a new separate workflow and replaced with the “Start Workflow” function in the current workflow. The newly created workflow can then be selected and edited in the designer from the list on the left side of the screen.
Start Workflow No Wait
This function works like the Start Workflow function, but the main workflow does not wait for the subworkflow to finish and continues its workflow steps. Therefore, no objects are returned to the main workflow.
Wait Time
With the “Wait Time” function you can configure a wait time before the next function is called. Days, hours, minutes and seconds can be set for this function.
Wait For Query/Update/Notify/Interaction
These functions wait for a specific event before the workflow is continued. Timeouts for these functions can also be configured to continue the workflow at the timeout output after a certain time.
| Function | Description |
|---|---|
| Query | Waits until the declared query returns at least one line. |
| Update | Waits until an update statement is issued on the configured table (works only for updates to tables in VisionX applications and not for direct database updates). |
| Notify | Waits until a notification with the configured event name is sent. |
| Interaction | Interactions are freely definable and can be triggered by the user interface, e.g. by clicking on a button. In the workflow, you can wait for this “interaction” and then perform further actions in the connected workflow steps. |
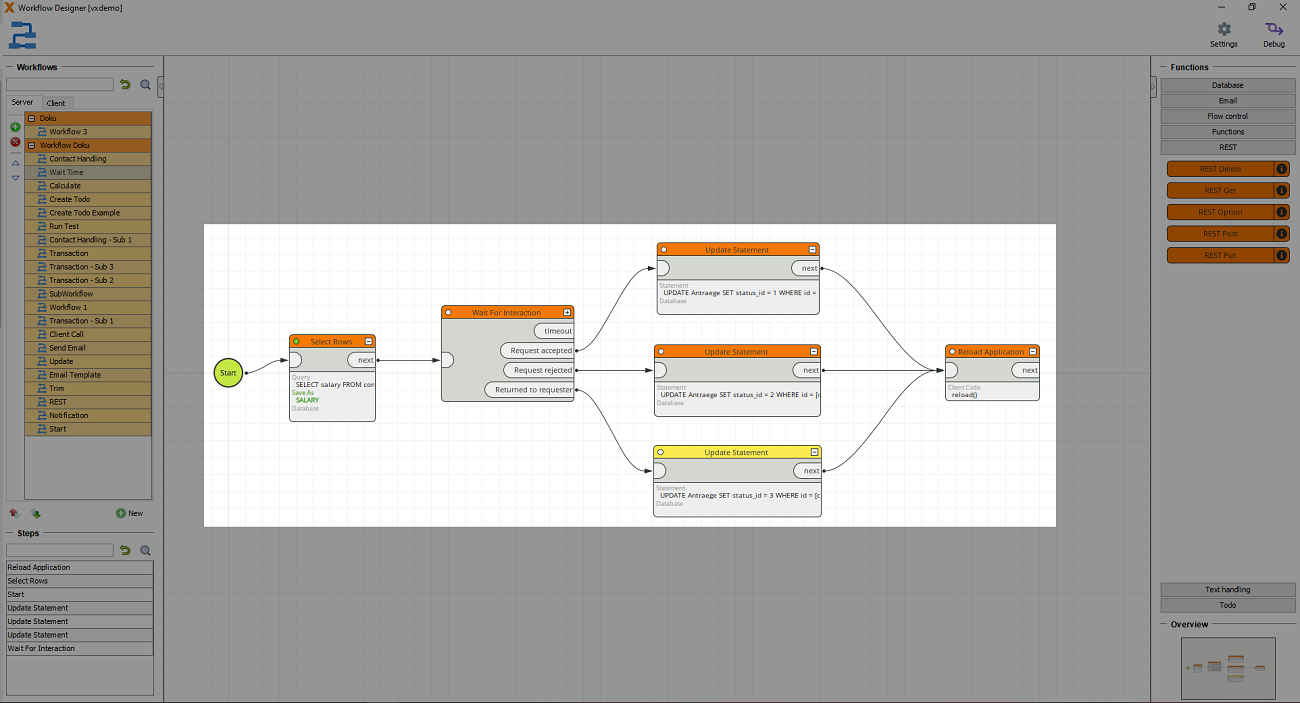
Interactions
Interactions are ideal to implement business processes e.g. an approval process.
You want to implement an approval process in your application. You create a screen for the manager to approve it. There you use the “Interactions” UI control. (palette in VisionX User Interface Designer) This shows one button per decision option. These are the “Interactions”.
In the Workflow we use to “Wait for Interaction” function to define these interactions with “Request approved”, “Request rejected”, and “Returned to requester”. Depending on the user interaction, the corresponding outputs are used in the Workflow and an “Update statement” function changes the request status in the database.
Functions
The “Functions” category contains various application functions.
Calculate
You can use the “Calculate” function to perform various calculations with the key values of your database. Mathematical calculations can also be performed.
Example: You want to calculate the sum of all salaries. > To perform this calculation, you must store a key with the value 0 in a separate “Calculate” function in order to be able to add the CURRENT/SALARY to TOTALSALARY in the loop list in each loop pass. The default value would otherwise be null and no calculations can be performed.
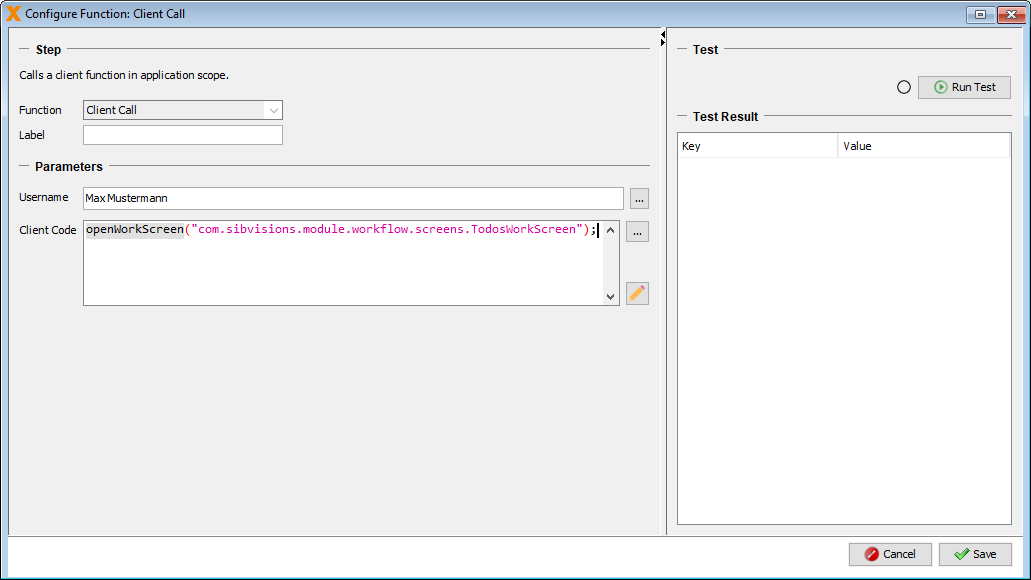
Client Call
“Client Call” is a function to call self-written source code during a workflow. This code can be executed for a specific user or, if no user is set, the call will be executed for all users.
Example: The simple example below opens the “Todo” screen for the admin user during the workflow.
Current Time
This function determines the system time at the time of execution of the function in order to use it as an output parameter.
Example: You want to store the exact time of the creation of an entry with each insert statement into a certain table.

In this “Insert statement” function the previously stored output parameter was used for the CREATED_DATE column.
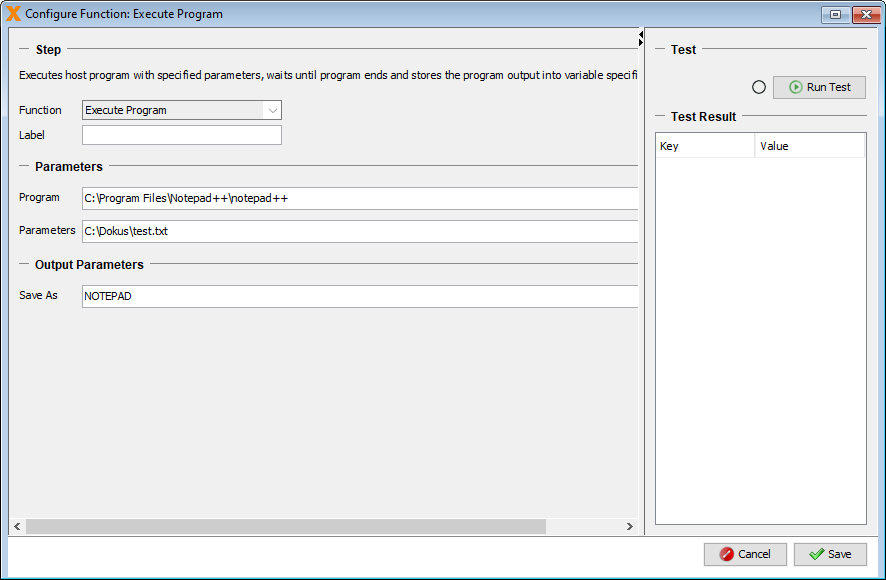
Execute Program/Execute Program No Wait
These functions execute an automatic start of a specified program. A parameter can be passed for both functions to open specific files.
While “Execute Program” waits for the program to end before the worklow is continued, “Execute Program No Wait” continues the workflow immediately. A further distinction is that with “Execute Program” an output parameter can be stored.
Example: Opening a text file with Notepad++
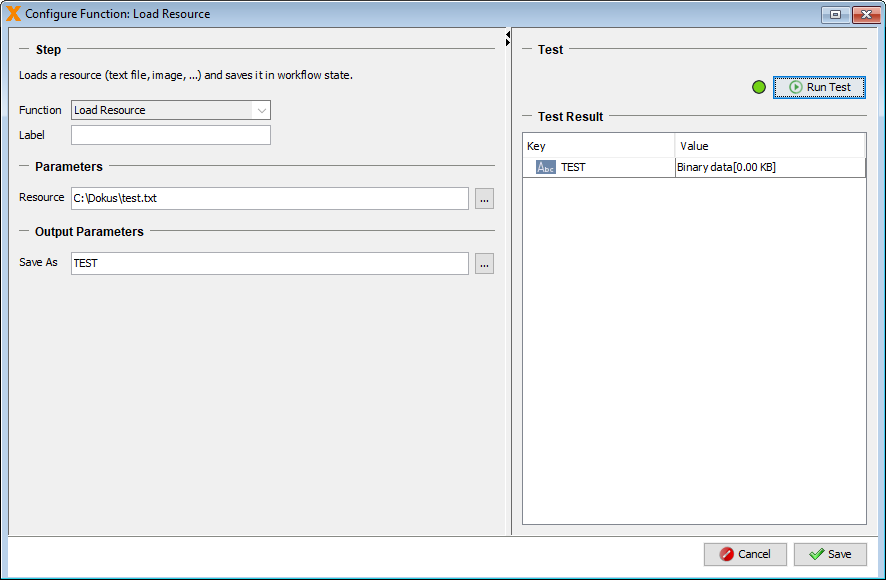
Load Resource
The “Load Resource” function is used to load text files, images, or other files, and to save them as output parameters that can be used in the remainder of the workflow.
Example: Loading a text file
Notify
Notify can be used to notify another workflow. Each notification has a unique name. In the other wokflow, “Wait for Notify” can be used to wait for it by name.
Example: You want to wait for a workflow until a certain function has been completed in another workflow. E.g.: first send invoice by e-mail, then create new invoices.
Reload Application
This function is used to reload the application data at the end of or during a running workflow, so that the updated data is visible on the screen for the user.
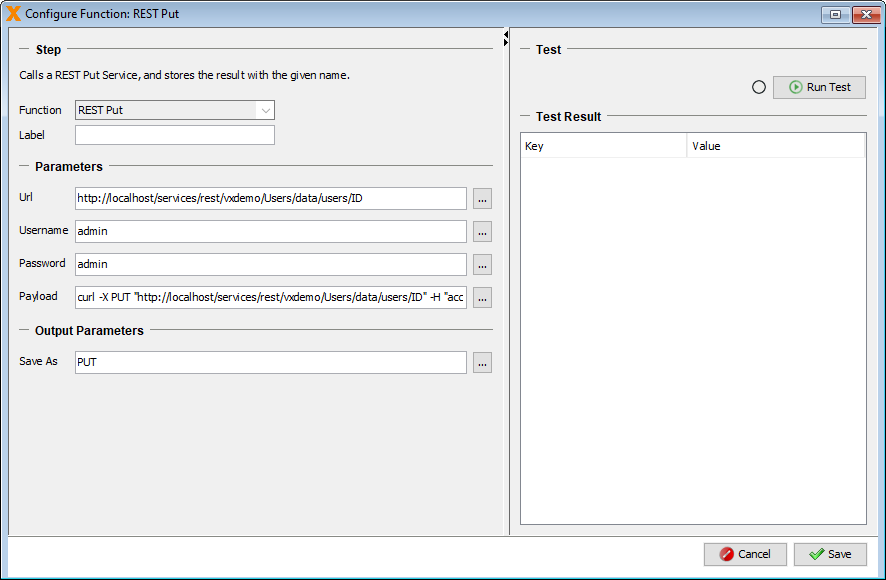
REST
With the REST functions, data from other systems can easily be read, updated or deleted, or a new entry can be created.
To use these functions more easily, you can use the VisionX REST Services Add-on to get the required parameters such as URL and payload.
Furthermore you need a username and password for the system you want to access. URL, username and password are needed for every REST service, but the payload is only needed when data is created or updated.
URL: Specifies location and name of the resource. Can be copied from the VisionX REST Services Add-on and pasted into the function configuration.
Payload: Must be written in the format of a JSON file. This can be edited with the Add-On under the point “Body” and afterwards just copy the CURL command into the text field of the payload.
| Function | Description |
|---|---|
| REST Get | Entries will be read |
| REST Post | A new entry will be created |
| REST Delete | An entry will be deleted |
| REST Put | An already existing entry will be overwritten (update) |
| REST Option | Describes the communication options for the target resource |
Text handling
Functions in the “Text handling” category contain text manipulation functions such as trim, left, right, and concatenate.
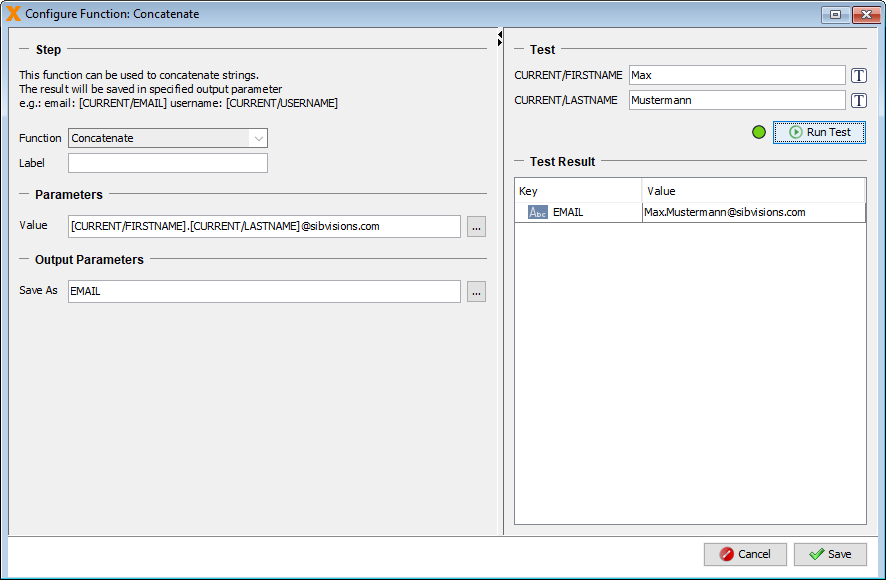
Concatenate
With this function you can concatenate different strings and save the resulting value as an output parameter.
Example: First name and last name are merged into an email address and stored in the “Email” column.
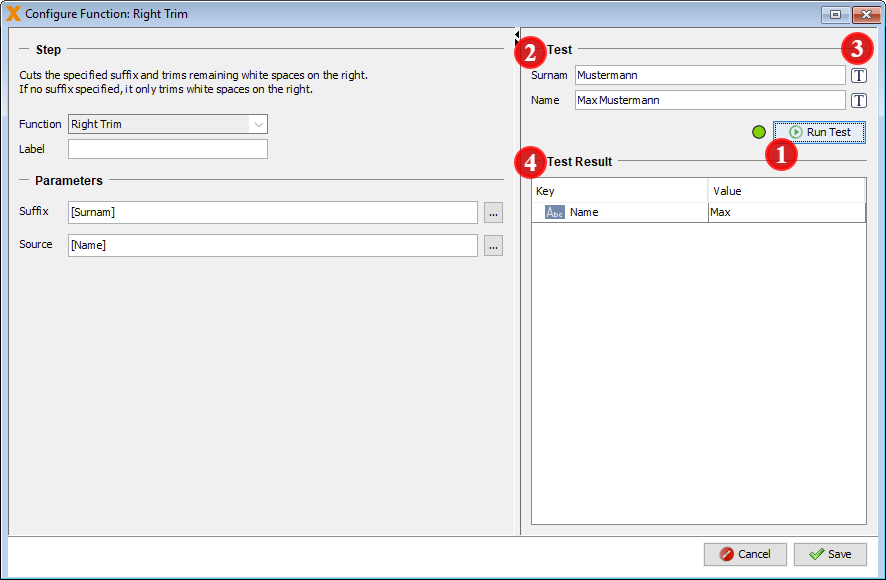
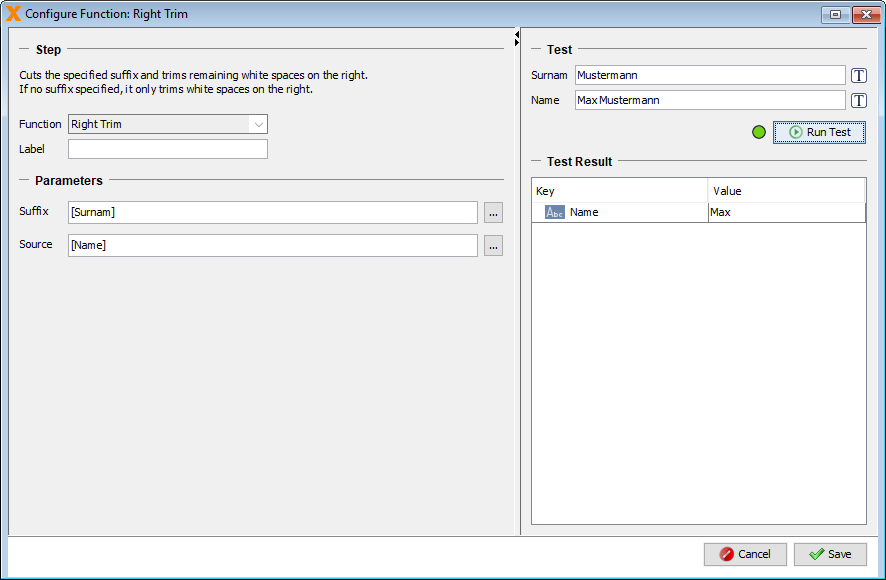
Left/Right Trim
These functions cut the specified prefix/suffix of a string and trim the remaining white spaces on the left/right side. If no prefix/suffix is specified, only the spaces on the left/right are trimmed.
Example: You have a name consisting of a first name and a surname and you want to use only the first name.
Todo
The “Todo” functions create To-do items that are immediately visible for users in the application through push notifications. The To-do management screen is fully editable in VisionX.
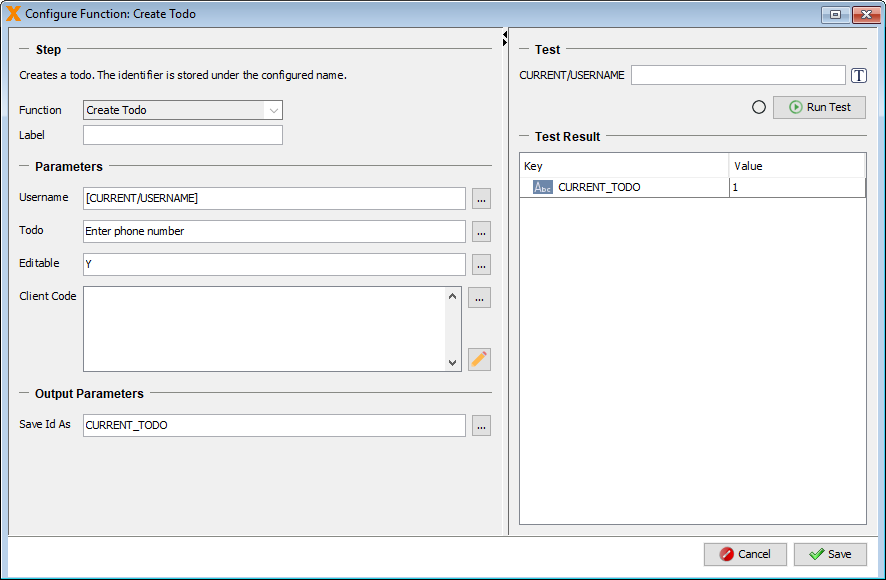
Create Todo
“Create Todo” allows you to assign repeating or individual Todo items to your users, which will be displayed in the application only to the corresponding users.
Example: You want to send a Todo item to all employees to enter their phone number in the application.
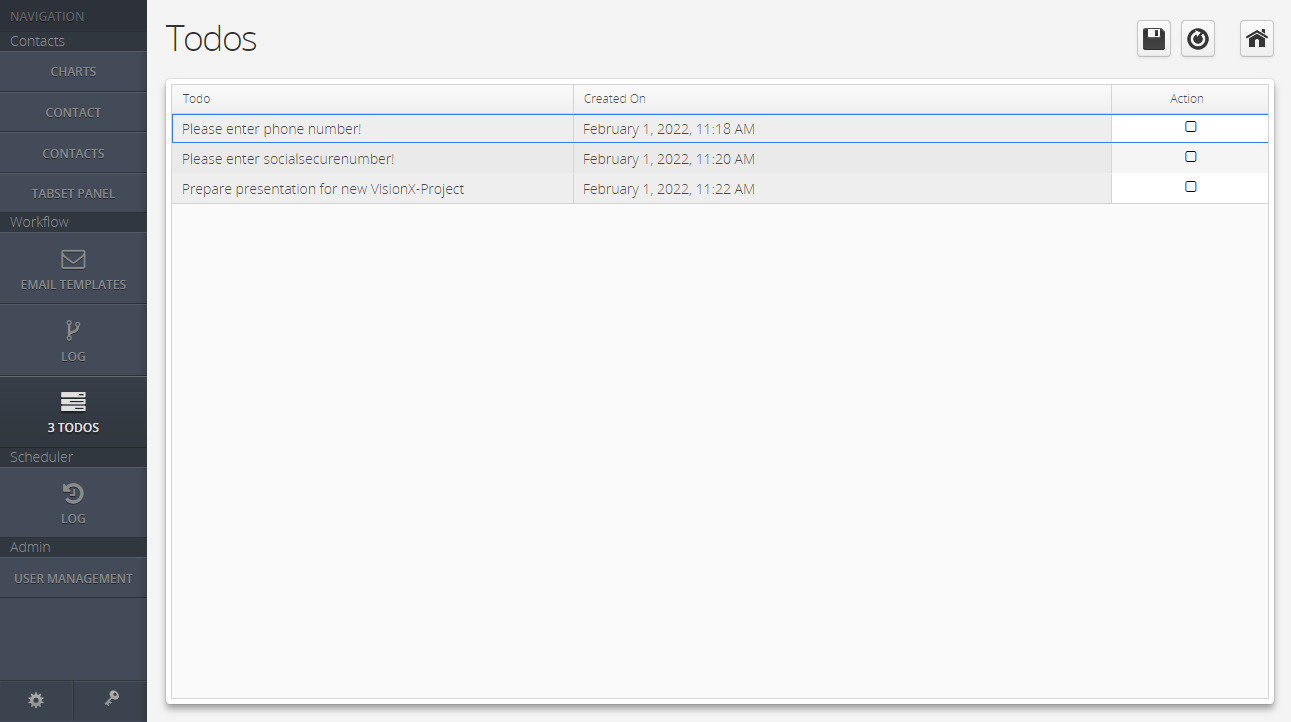
As soon as the function has been completed, the Todo icon with the number of open tasks appears in the toolbar for the respective user in the application.
Clicking on this icon opens the Todo screen and a list with the tasks to be completed opens.
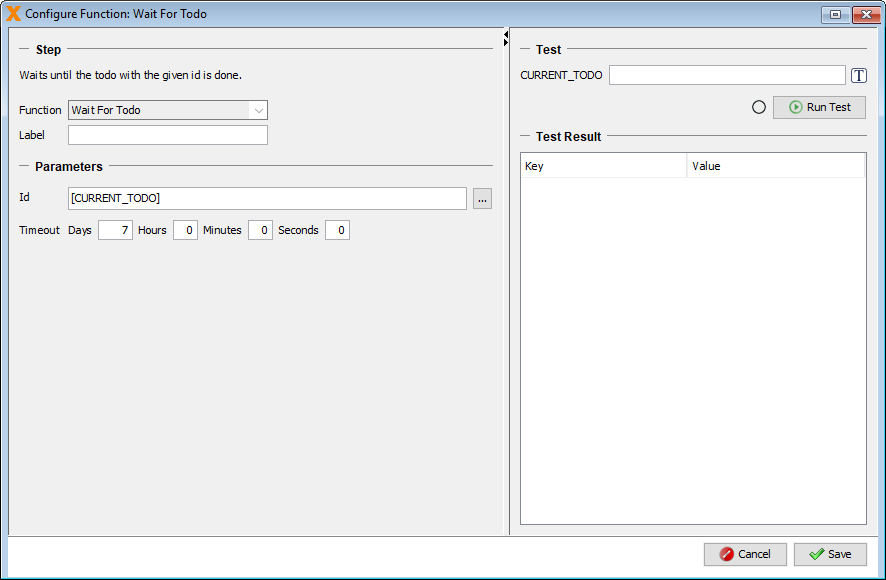
Wait For Todo
If you add a “Wait For Todo” function to your workflow, it will not continue until the spcified Todo has been completed. Here the parameter Id must be filled with the output parameter of the function Create Todo.
You can also configure a timeout to continue the workflow after a certain time at the timeout output.
Finish Todo
This function closes a Todo item, again using the corresponding Id.
Log/Monitoring
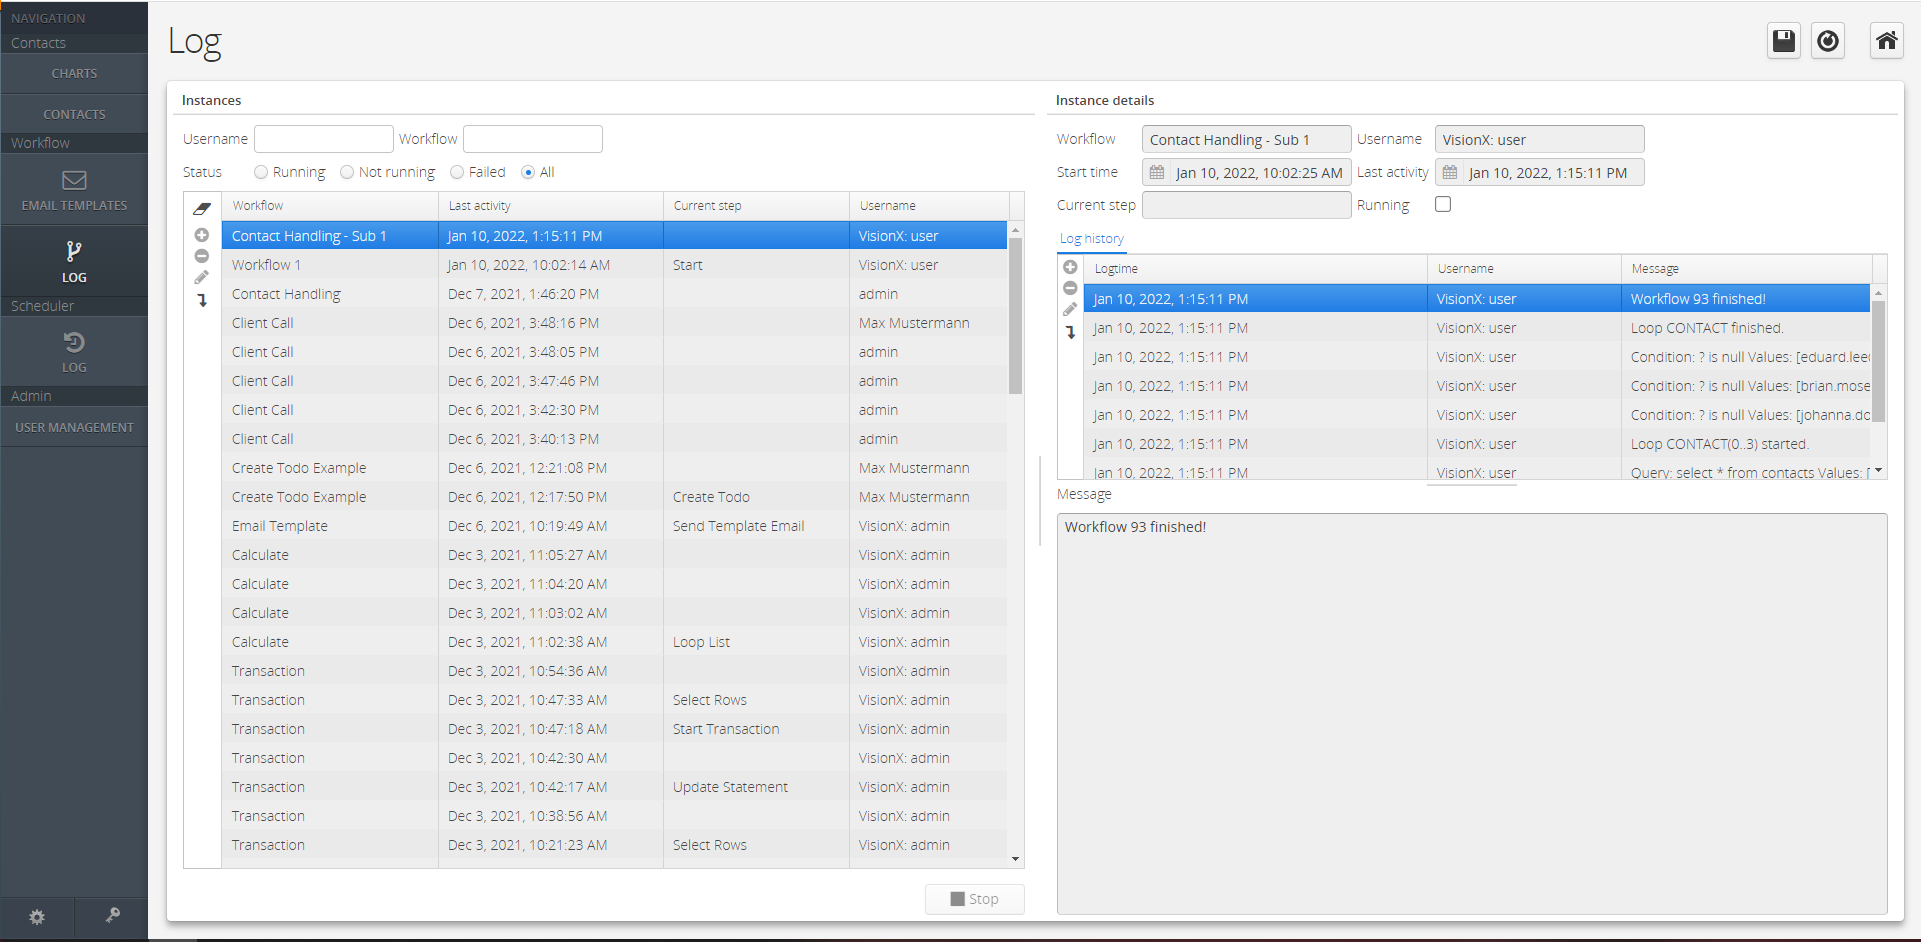
With the workflow log you can view all active, paused, and old workflows at a glance. The workflow log gives you a comprehensive view of all workflow steps, and you can even stop or debug selected workflows.
To open the logs, switch to VisionX and start a Live Preview of the application.
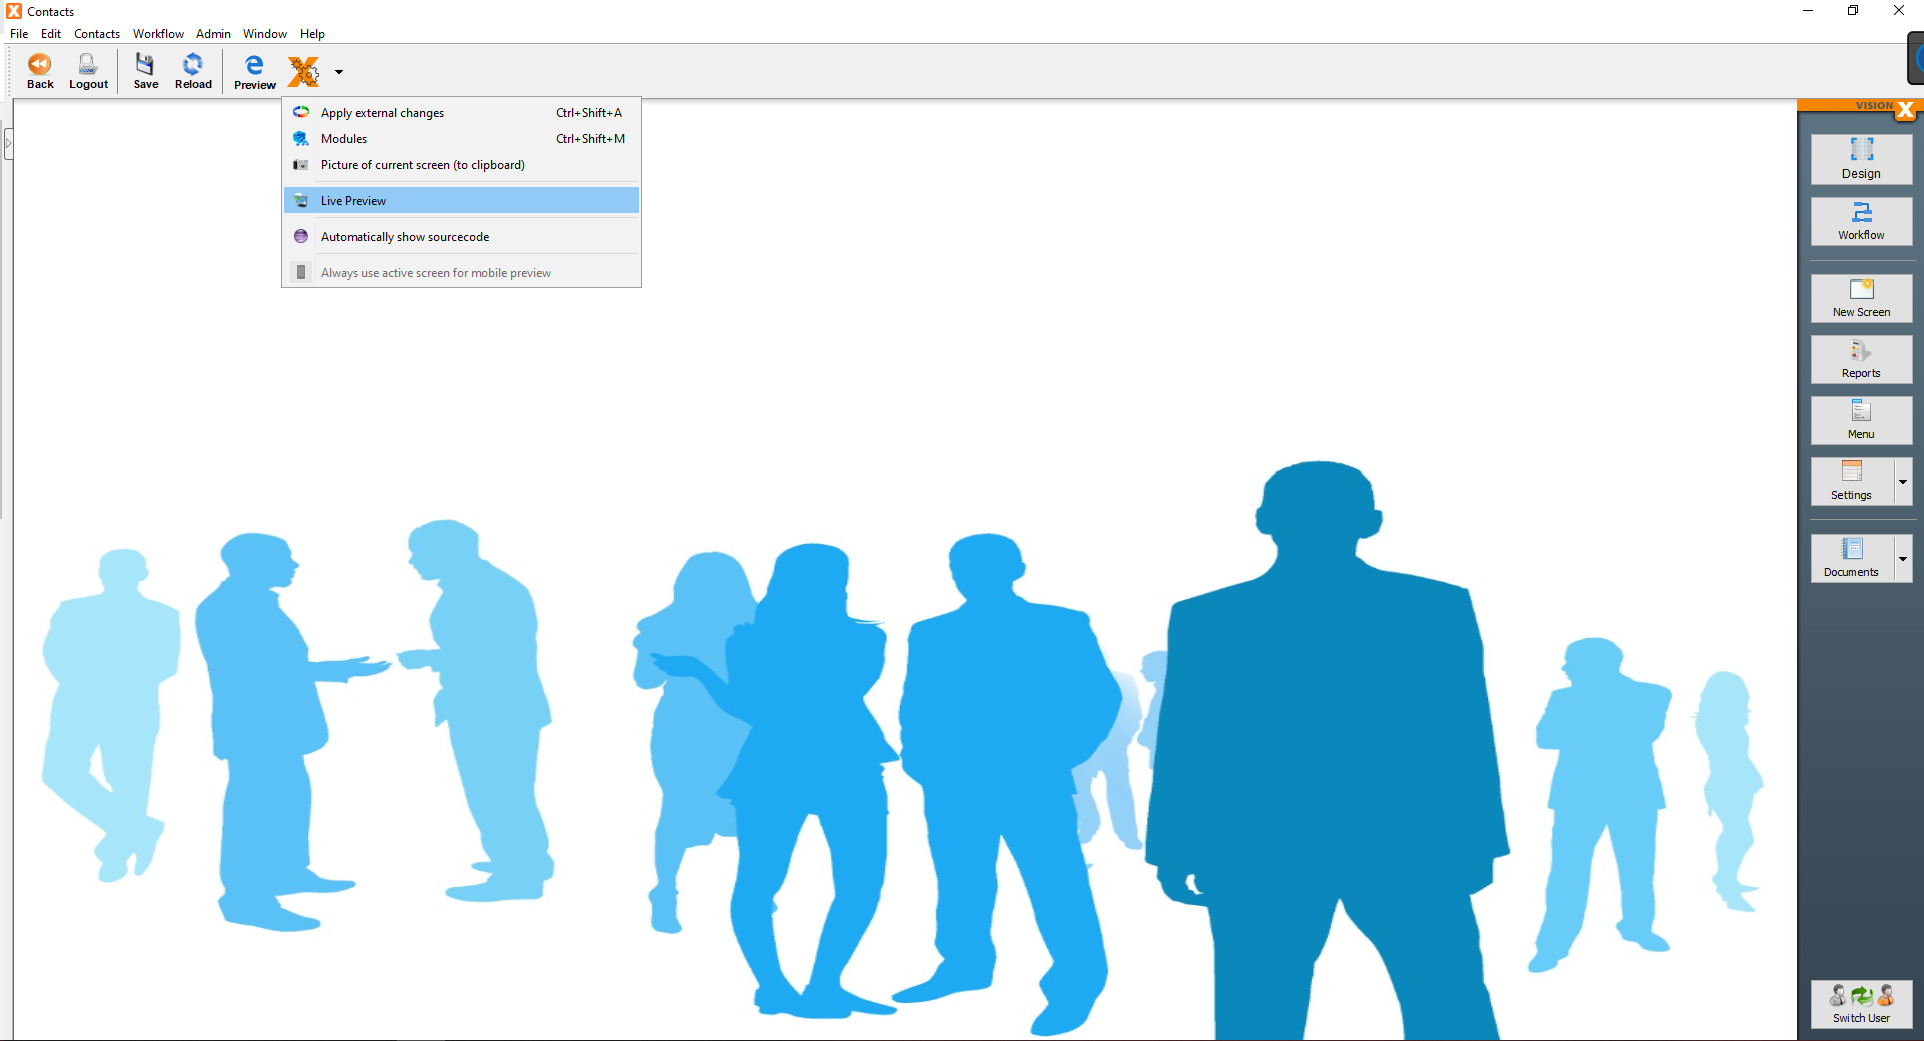
The application will open in a browser. To get to the logs, click 'Log' on the left side of the screen. In the newly opened window you will see all workflows of your application with detailed documentation. You can also continue workflows, debug them, or return to the Workflow Designer with one click.
Opening the Workflow Designer is only possible in VisionX in Designer. The feature is not available in the running VisionX application.
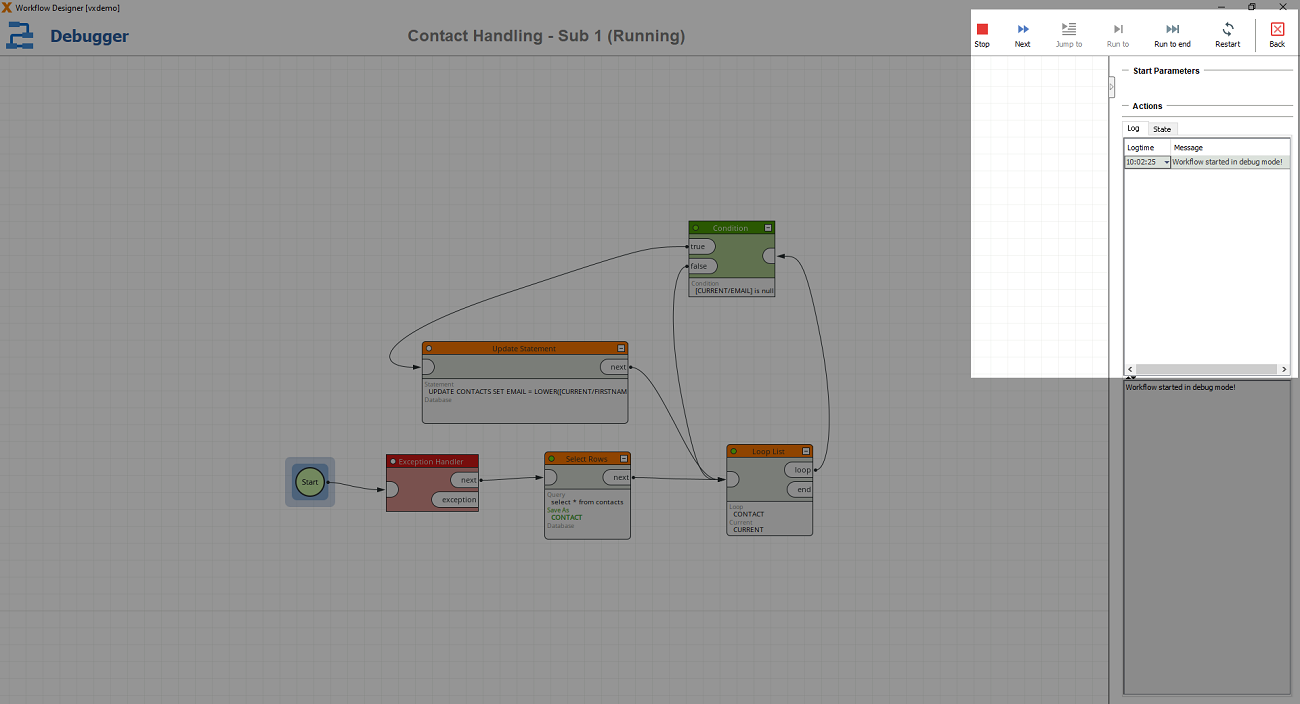
Debugger
The dubugger allows you to simulate all variants of your workflow step-by-step with real data. It gives you full transparency on whether a workflow runs successfully or not. The log output for each workflow step provides actionable insights into why something might not work yet.
To switch to debug mode, click the “Debug” button in the upper right corner of the Workflow Designer. You can now inspect your workflow step by step for errors.
| Setting | Description |
|---|---|
| Stop | Stops debugging the workflow |
| Start | Starts the debug process where it was stopped before |
| Next | Executes the next step |
| Jump to | Jumps to the marked function without executing anything |
| Run to | Runs through the workflow to the selected function |
| Run to end | Runs the workflow to the end |
| Restart | Restarts the debug process |
| Back | Switches back to design mode |
| Log | Here the execution of the functions is documented with logtime and a corresponding message. You can also see whether the function was executed successfully and at what time. |
| State | The “State” tab shows you the used and created keys including values that are used or available for the current function. |
| Exception | If a function is executed incorrectly, another tab is displayed with the name “Exception”, which contains the reason for the error message. |
To edit a function, return to the Designer by clicking the “Back” button.
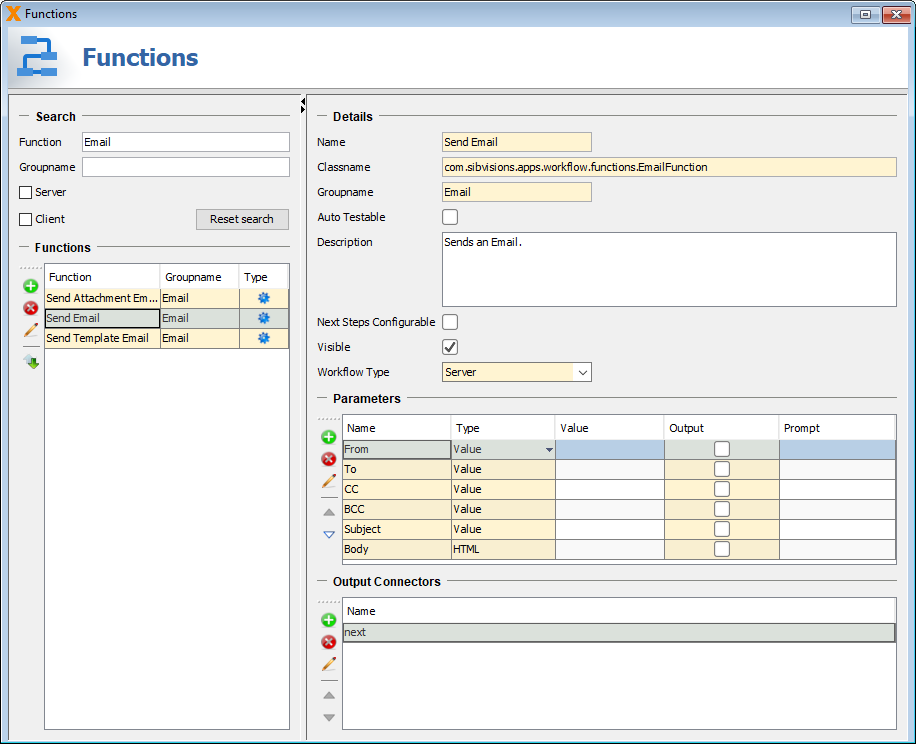
Custom Functions
You can access the settings by clicking the “Settings” button in the upper right corner of the Workflow Designer. Here you will find all available functions. After selecting a function, a short description of the function, the parameters and the output connectors are displayed on the right side of the window.
Functions can also be customized here. You can rename, edit, add or delete parameters and output connectors.
By clicking the plus icon on the left side of the window, you can also create your own functions and configure them with the desired number of parameters and output connectors.
Parameters:
Shows the data type and the number of parameters that must be passed to this function
- Name
- Type
- Datasource
- HTML
- Java
- List
- SQL-Statements
- Text
- Timeout
- Value
- Workflow
- Value
Here you can set a default value for this parameter
- Output
Selecting the checkbox sets the parameter as an output parameter. If not selected, the parameter is declared as an input parameter.
- Prompt
Here you can assign fixed values for the parameter, which can no longer be changed during the workflow configuration.
Output Connectors:
Lists all output connectors with their names. For each output of a function, you can connect another function and extend your workflow as you like.
Custom Functions:
Implement additional functions simply via Java. You can define the possible input parameters with visual editors to make the input easy for the user. Then choose the number of output connections. Just implement a method that uses the input parameter and executes the workflow function code. The function then decides which output connections should be used.
A function is the code block behind a task. It is very simple to create a new function because a function is defined as a simple Java interface:
public interface IFunction
{
    /**
     * Gets the current workflow step.
     *
     * @return the current workflow step.
     */
    public IWorkflowStep getWorkflowStep();

    /**
     * Initializes the function.
     *
     * @param pStep the current workflow step
     */
    public void init(IWorkflowStep pStep);

    /**
     * Runs the function.
     * If the function returns {@code true}, the function is fully done, and the workflow jumps to the next step.
     * In case there are more than one next step, the finish function of IWorkflowStep has to be called.
     * Otherwise, an exception will be thrown.
     * If finish is already called, it does not matter whether {@code true} or {@code false} is returned.
     *
     * @return {@code true}, if the function is done.
     * @throws Throwable if function fails.
     */
    public boolean run() throws Throwable;

    /**
     * Notifies that the workflow is cancelled.
     *
     * @throws Throwable if canceling fails.
     */
    public void cancel() throws Throwable;
}
The interface already has an abstract implementation, so it is really simple to create a new function. Our example will send an email, so it's the EmailFunction:
public class EmailFunction extends AbstractFunction
{
    @Override
    public boolean run() throws Throwable
    {
        XmlNode smtp = getApplicationZone().getConfig().getNode("/application/mail/smtp");

        if (smtp == null)
        {
            throw new IllegalArgumentException("SMTP config not found (path /application/mail/smtp)!");
        }

        String host = smtp.getNodeValue("host");
        String port = smtp.getNodeValue("port");
        String username = smtp.getNodeValue("username");
        String password = smtp.getNodeValue("password");
        boolean tlsEnabled = Boolean.parseBoolean(smtp.getNodeValue("tlsenabled"));

        String defaultsender = smtp.getNodeValue("defaultsender");

        String from = getNotNullEvaluatedParameter("From");
        String to = getNotNullEvaluatedParameter("To");
        String cC = getEvaluatedParameter("CC");
        String bCC = getEvaluatedParameter("BCC");
        String subject = getNotNullEvaluatedParameter("Subject");
        String body = getEvaluatedParameter("Body");

        log("Mailserver: " + host + ":" + port + "/" + username);

        Mail mail = new Mail(host, port, username, password);
        mail.setTLSEnabled(tlsEnabled);

        mail.send(CommonUtil.nvl(from, defaultsender), to, cC, bCC, subject, body, null, null);

        log("From: " + CommonUtil.nvl(from, defaultsender));
        log("To: " + to);
        log("Subject: " + subject);

        return true;
    }
}
The implementation is straightforward. It extends the AbstractFunction and implements the run method.
The email settings will be read from the application configuration (config.xml file).
<application> ... <mail> <smtp> <host>smtp.yourserver.com</host> <port>587</port> <username>username</username> <password>password</password> <tlsenabled>true</tlsenabled> <defaultsender>Noreply <noreply@yourserver.com></defaultsender> </smtp> </mail> </application>
Finally, the email will be sent.
Now you only have to configure the input parameters in the Workflow Designer.