
This is an old revision of the document!
Das Ziel dieses Tutorials ist die Erstellung einer Applikation mit dem Enterprise Application Framework - JVx. Dazu wird ein erster Einblick in die Möglichkeiten des Frameworks gegeben.
Die Aufgabe der Applikation ist, die Daten aus einer Datenbanktabelle darzustellen und editierbar zu machen. Die Applikation erfordert eine Authentifizierung mit Benutzername und Passwort.
Wir setzen folgende Kenntnisse und Hilfsmittel voraus:
- Eclipse IDE (>= 3.4) mit JDT (Empfohlen wird: Eclipse IDE für Java EE Entwickler)
- JDK 6.0 (1.6) or höher
- HSQLDB Bibliothek (http://www.hsqldb.org)
- Datenbank- bzw. SQL Kenntnisse
Diese Dokumentation beschreibt folgende Bereiche:
-
- Client
- Server
Verzeichnisstruktur
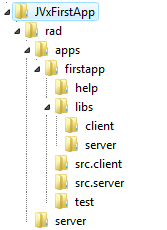
Für die Applikationsentwicklung mit JVx wird eine spezielle Ordnerstruktur empfohlen. Diese erleichtert den Build Prozess und trennt von vornherein Abhängigkeiten zwischen Client und Server. Diese Struktur ist wie folgt zu erstellen:
Auf Wunsch kann auch eine herkömmliche Strukturierung:
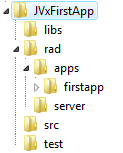
verwendet werden. Die Dokumentation bezieht sich jedoch auf die empfohlene Struktur.
| Ordner | Beschreibung |
|---|---|
| rad | Enthält Applikations- und Serverspezifische Dateien. |
| apps | Enthält alle verfügbaren Applikationen. In diesem konkreten Beispiel ist nur eine Applikation enthaltene. |
| firstapp | CEnthält die Applikation mit Projektkonfiguration, Sourcen, Bibliotheken. |
| help | Enthält den Client für die Online Hilfe und die Hilfeseiten. |
| libs | Enthält alle Bibliotheken, die sowohl am Client als auch am Server benötigt werden. |
| libs/client | Enthält alle Bibliotheken die ausschließlich am Client benötigt werden. |
| libs/server | Enthält alle Bibliotheken die ausschließlich am Server benötigt werden. |
| src.client | Enthält alle Sourcen die ausschließlich am Client benötigt werden. |
| src.server | Enthält alle Sourcen die ausschließlich am Server benötigt werden. |
| test | Enthält Unit tests für Client und Server bzw. Bibliotheken. |
Nachdem die Ordnerstruktur erstellt wurde, kopieren Sie die Bibliothek jvxclient.jar in den Ordner libs/client und die Bibliothek jvx.jar in den Ordner libs/server. Beide Bibliotheken sind im JVx Binärpaket enthalten.
Projektkonfiguration
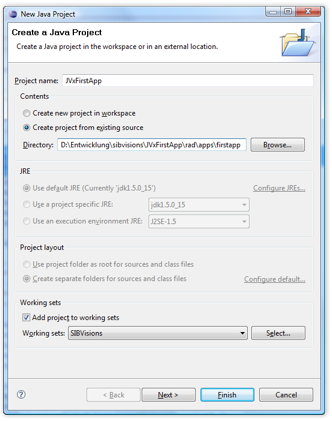
Nachdem die Konfiguration durchgeführt wurde, kann mit Eclipse ein neues Projekt erstellt werden:
- File / New / Java Project
- Zu beachten ist, dass das Projekt im Applikationsverzeichnis
firstappabgelegt wird.
- Entfernen des
srcOrdner von den Source Folders
Setzen der Ordnersrc.client,src.serverundtestals Source Folder
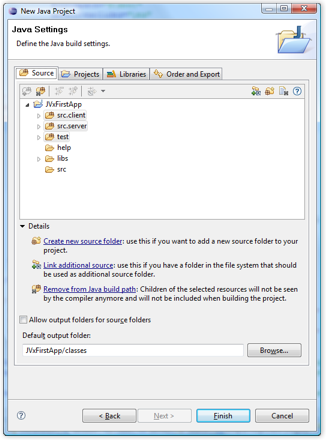
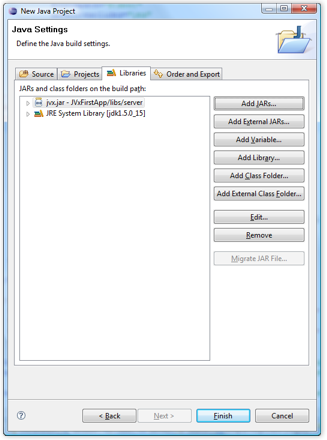
- Hinzufügen der
jvx.jarBibliothek, aus dem ProjektverzeichnisJVxFirstApp/libs/server
- Das Projekt kann nun erstellt werden
Das Projekt wird von Eclipse nun wie folgt dargestellt:
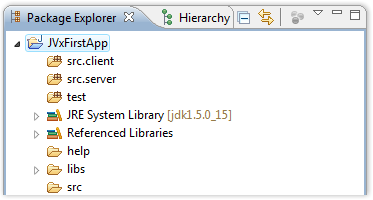
Zur Vollständigkeit kann der src Ordner gelöscht werden. Dieser wird in unserer Applikation nicht benötigt.
Applikationsentwicklung
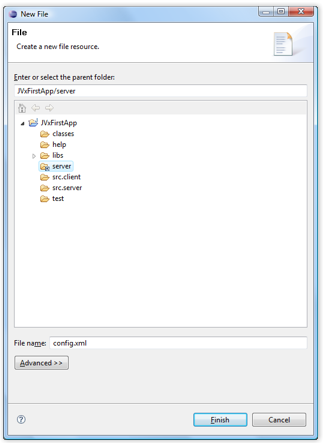
Die Applikation benötigt Serverseitig eine Konfigurationsdatei für Einstellungen die nur die Applikation betreffen. Für die Konfiguration des Servers wird zusätzlich eine Konfigurationsdatei benötigt. Zuerst erstellen wir die Datei für die Applikation:
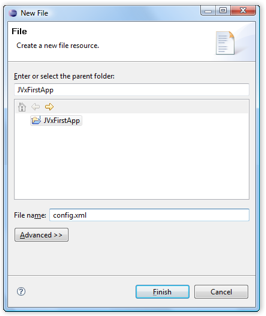
- File / New / File - config.xml
1)
 Die Datei wird wie folgt befüllt:
- config.xml
<?xml version="1.0" encoding="UTF-8"?>

<application>
  <securitymanager>
    <class>com.sibvisions.rad.server.security.XmlSecurityManager</class>
    <userfile>users.xml</userfile>
  </securitymanager>

  <!-- predefined life-cycle object names -->
  <lifecycle>
    <mastersession>apps.firstapp.Session</mastersession>
    <application>apps.firstapp.Application</application>
  </lifecycle>
</application>
| Parameter | Beschreibung |
|---|---|
| securitymanager/class | Der Sicherheitsmanager für die Überprüfung von Benutzernamen/Passwort bei der Anmeldung an die Applikation. |
| securitymanager/usersfile | Die Datei mit den erlaubten Benutzername/Passwort Kombinationen. |
| lifecycle/mastersession | Die Klassenbezeichnung des Server Objektes, das instanziert wird, wenn der Client eine Anmeldung durchführt bzw. eine neue MasterSession startet. |
| lifecycle/application | Die Klassenbezeichnung des Server Objektes das instanziert wird beim ersten Zugriff auf die Applikation. Für alle weiteren Zugriffe wird dieses Objekt wiederverwendet. |
../JVxFirstApp/rad/server abgelegt werden.
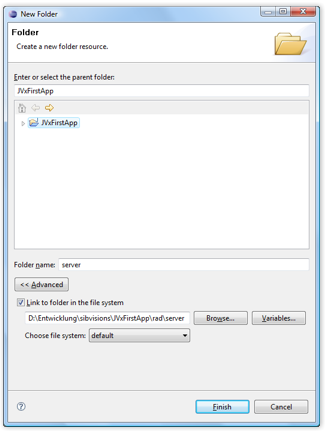
Dieses Verzeichnis scheint in unserem Eclipse Projekt jedoch nicht auf, da es sich auf einer höheren Verzeichnisebene befindet. Die Konfigurationsdatei könnte direkt im Dateisystem erstellt werden oder wir erstellen einen Verzeichnis-Link in unserem Projekt:
- File / New / Folder
- File / New / File - config.xml
- config.xml
<?xml version="1.0" encoding="UTF-8"?>

<server>
</server>
Für den Client benötigen wir nun eine Klasse die vom Typ
javax.rad.application.IApplication ist. Von JVx wird eine Standard Implementierung durch com.sibvisions.rad.application.Application implementiert. Von dieser werden wir unseren Client ableiten und erstellen somit eine Klasse, im Verzeichnis src.client, mit folgendem Source Code:
- FirstApplication.java
package apps.firstapp;

import javax.rad.application.genui.UILauncher;
import javax.rad.remote.IConnection;

import com.sibvisions.rad.application.Application;
import com.sibvisions.rad.server.DirectServerConnection;

/**
 * First application with JVx, Enterprise Application Framework.
 * <p/>
 * @author René Jahn
 */
public class FirstApplication extends Application
{
  //~~~~~~~~~~~~~~~~~~~~~~~~~~~~~~~~~~~~~~~~~~~~~~~~~~~~~~~~~~~~~~~~
  // Initialization
  //~~~~~~~~~~~~~~~~~~~~~~~~~~~~~~~~~~~~~~~~~~~~~~~~~~~~~~~~~~~~~~~~

  /**
   * Creates a new instance of <code>FirstApplication</code> with a technology
   * dependent launcher.
   * <p/>
   * @param pLauncher the technology dependent launcher
   */
  public FirstApplication(UILauncher pLauncher)
  {
    super(pLauncher);
  }

  //~~~~~~~~~~~~~~~~~~~~~~~~~~~~~~~~~~~~~~~~~~~~~~~~~~~~~~~~~~~~~~~~
  // Overwritten methods
  //~~~~~~~~~~~~~~~~~~~~~~~~~~~~~~~~~~~~~~~~~~~~~~~~~~~~~~~~~~~~~~~~

  /**
   * {@inheritDoc}
   */
  @Override
  protected IConnection createConnection() throws Exception
  {
    return new DirectServerConnection();
  }

  /**
   * {@inheritDoc}
   */
  @Override
  protected String getApplicationName()
  {
    return "firstapp";
  }

}  // FirstApplication
| Methode | Beschreibung |
|---|---|
| Konstruktor | Der Standardkonstruktor kann nicht verwendet werden, da jede Applikation mit einem Technologieabhängigen Launcher gestartet wird. Dieser Launcher wird bereits im Konstruktor an die Applikation übergeben. |
| createConnection | Das Kommunikationsprotokoll wird initialisiert. Für unsere Applikation ist eine DirectServerConnection ausreichend, da sowohl Client als auch Server in der selben VM gestartet werden. Wird jedoch ein Applikationsserver eingesetzt könnte alternativ eine HttpConnection verwendet werden. |
| getApplicationName | Legt den Applikationsnamen fest. Dieser Name wird für die Kommunikation mit dem Server benötigt, da dieser abhängig vom Applikationsnamen die passende Applikationskonfiguration verwendet. In unserem Fall muss der Applikationsname firstapp lauten, da das Arbeitsverzeichnis ../JVxFirstApp/rad/firstapp/ ebenso lautet. Der Applikationsname MUSS immer dem Verzeichnisnamen entsprechen! |
- Run / Run Configurations… / Application - New launch configuration - mit den Einstellungen:
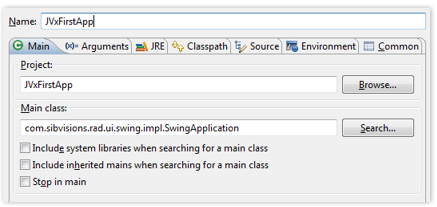
| Parameter | Beschreibung |
|---|---|
| Main class | Hier wird der Technologie Abhängige Launcher festgelegt. Wir verwenden für unsere Applikation die Technologie Swing und starten eine Swing Applikation. |
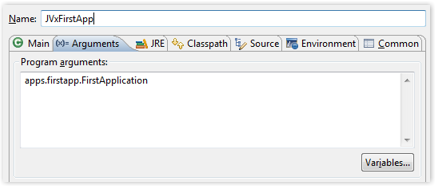
| Program arguments | Dem Launcher muss mitgeteilt werden, welche Applikation gestartet wird. Für unsere Swing Applikation können wir dafür den Mechanismus der Programm Argumente nutzen und übergeben den Klassennamen unserer Applikation. |
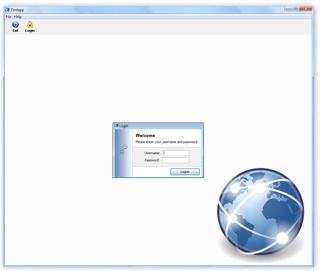 Der erste Anmeldeversuch scheitert mit dem Hinweis:
Userfile 'users.xml' does not exist!Diese Datei wurde im
config.xml der Applikation definiert, bisher jedoch noch nicht erstellt. Das holen wir an dieser Stelle nach:- File / New / File - users.xml
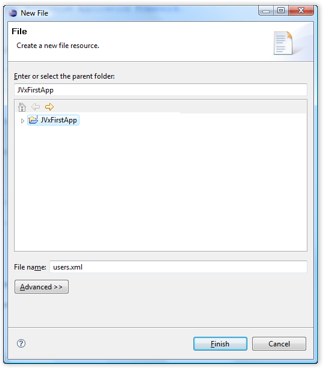
- users.xml
<?xml version="1.0" encoding="UTF-8"?>

<users>
  <user name="admin" password="admin"/>
</users>
user Zeilen eingetragen werden!
Nun ist die Anmeldung an die Applikation ohne Probleme möglich. Zur Erfüllung unserer Aufgabenstellung fehlt jedoch noch die Möglichkeit eine Datenbanktabelle anzuzeigen bzw. zu editieren. Diesem Teil der Aufgabe widmen wir uns jetzt.
== Erstellen eines WorkScreens ==
Bevor wir den WorkScreen erstellen, bereiten wir die Applikation für die Anzeige des WorkScreens vor. Dazu erweitern wir unsere FirstApplication Klasse wie folgt:
- FirstApplication.java
package apps.firstapp;

import javax.rad.application.genui.UILauncher;
import javax.rad.genui.UIImage;
import javax.rad.genui.component.UIButton;
import javax.rad.genui.container.UIToolBar;
import javax.rad.genui.menu.UIMenu;
import javax.rad.genui.menu.UIMenuItem;
import javax.rad.remote.IConnection;

import com.sibvisions.rad.application.Application;
import com.sibvisions.rad.server.DirectServerConnection;

/**
 * First application with JVx, Enterprise Application Framework.
 * <p/>
 * @author René Jahn
 */
public class FirstApplication extends Application
{
  //~~~~~~~~~~~~~~~~~~~~~~~~~~~~~~~~~~~~~~~~~~~~~~~~~~~~~~~~~~~~~~~~
  // Initialization
  //~~~~~~~~~~~~~~~~~~~~~~~~~~~~~~~~~~~~~~~~~~~~~~~~~~~~~~~~~~~~~~~~

  /**
   * Creates a new instance of <code>FirstApplication</code> with a technology
   * dependent launcher.
   * <p/>
   * @param pLauncher the technology dependent launcher
   */
  public FirstApplication(UILauncher pLauncher)
  {
    super(pLauncher);
  }

  //~~~~~~~~~~~~~~~~~~~~~~~~~~~~~~~~~~~~~~~~~~~~~~~~~~~~~~~~~~~~~~~~
  // Overwritten methods
  //~~~~~~~~~~~~~~~~~~~~~~~~~~~~~~~~~~~~~~~~~~~~~~~~~~~~~~~~~~~~~~~~

  /**
   * {@inheritDoc}
   */
  @Override
  protected IConnection createConnection() throws Exception
  {
    return new DirectServerConnection();
  }

  /**
   * {@inheritDoc}
   */
  @Override
  protected String getApplicationName()
  {
    return "firstapp";
  }

  /**
  * {@inheritDoc}
  */
  @Override
  protected void afterLogin()
  {
    super.afterLogin();

    //configure MenuBar

    UIMenu menuMasterData = new UIMenu();
    menuMasterData.setText("Master data");

    UIMenuItem miDBEdit = createMenuItem
                          ("doOpenDBEdit", null, "DB Edit",
                           UIImage.getImage(UIImage.SEARCH_LARGE));

    menuMasterData.add(miDBEdit);

    //insert before Help
    getMenuBar().add(menuMasterData, 1);

    //configure ToolBar

    UIToolBar tbMasterData = new UIToolBar();

    UIButton butDBEdit = createToolBarButton
                         ("doOpenDBEdit", null, "DB Edit",
                          UIImage.getImage(UIImage.SEARCH_LARGE));

    tbMasterData.add(butDBEdit);

    getLauncher().addToolBar(tbMasterData);
  }

  //~~~~~~~~~~~~~~~~~~~~~~~~~~~~~~~~~~~~~~~~~~~~~~~~~~~~~~~~~~~~~~~~
  // Actions
  //~~~~~~~~~~~~~~~~~~~~~~~~~~~~~~~~~~~~~~~~~~~~~~~~~~~~~~~~~~~~~~~~

  /**
   * Opens the edit screen.
   */
  public void doOpenDBEdit()
  {
    //TODO open the workscreen
  }

}  // FirstApplication
| Methode | Beschreibung |
|---|---|
| afterLogin | Diese Methode wird von der Superklasse aufgerufen nachdem eine erfolgreiche Anmeldung durchgeführt wurde. Wir verwenden diese Methode um unser Menü und unsere ToolBar zu erweitern. Es ist nicht nötig nach der Abmeldung die Änderungen rückgängig zu machen, da dies von der Superklasse übernommen wird. |
| doOpenDBEdit | Diese Methode wird aufgefufen wenn das Menü oder der ToolBar Button gedrückt werden. |
| createMenuItem | Wird von der Superklasse bereitgestellt um Menü Einträge zu erstellen. Der erste Parameter enthält die Bezeichnung der Methode die aufgerufen werden soll wenn der Menü Eintrag gedrückt wird. Der zweite Parameter enthält den Befehl (ActionCommand) der in unserem Fall keine Rolle spielt. Im dritten Parameter ist der Text des Menü Eintrags zu definieren und abschließend wird das Bild für den Eintrag übergeben. |
| createToolBarButton | Ähnlich wie createMenuItem nur wird hierbei ein Button erzeugt, der sich dem Layout der ToolBar anpasst. |
| UIImage.getImage | Liefert ein vordefiniertes Bild aus der Bild Bibliothek von JVx Wir verwenden zwecks Komfort ein vordefiniertes Bild. |
- File / New / Class
src.client,apps.firstapp.frames.DBEditFrame
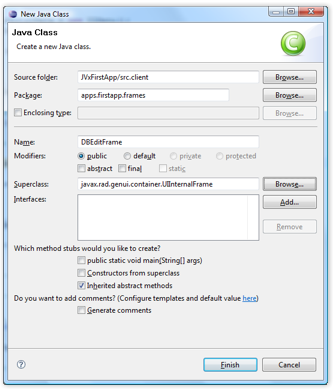
- DBEditFrame.java
package apps.firstapp.frames;

import javax.rad.genui.container.UIGroupPanel;
import javax.rad.genui.container.UIInternalFrame;
import javax.rad.genui.control.UITable;
import javax.rad.genui.layout.UIBorderLayout;
import javax.rad.remote.AbstractConnection;
import javax.rad.remote.MasterConnection;

import com.sibvisions.rad.application.Application;
import com.sibvisions.rad.model.remote.RemoteDataBook;
import com.sibvisions.rad.model.remote.RemoteDataSource;

/**
 * A simple database table editor.
 * <p/>
 * @author René Jahn
 */
public class DBEditFrame extends UIInternalFrame
{
  //~~~~~~~~~~~~~~~~~~~~~~~~~~~~~~~~~~~~~~~~~~~~~~~~~~~~~~~~~~~~~~~~
  // Class members
  //~~~~~~~~~~~~~~~~~~~~~~~~~~~~~~~~~~~~~~~~~~~~~~~~~~~~~~~~~~~~~~~~

  /** the application. */
  private Application application;

  /** the communication connection to the server. */
  private AbstractConnection connection;

  /** the DataSource for fetching table data. */
  private RemoteDataSource dataSource = new RemoteDataSource();

  /** the contacts tabl. */
  private RemoteDataBook rdbContacts = new RemoteDataBook();

  //~~~~~~~~~~~~~~~~~~~~~~~~~~~~~~~~~~~~~~~~~~~~~~~~~~~~~~~~~~~~~~~~
  // Initialization
  //~~~~~~~~~~~~~~~~~~~~~~~~~~~~~~~~~~~~~~~~~~~~~~~~~~~~~~~~~~~~~~~~

  /**
   * Creates a new instance of DBEditFrame for a specific application.
   * <p/>
   * @param pApp the application
   * @throws Throwable if the remote access fails
   */
  public DBEditFrame(Application pApp) throws Throwable
  {
    super(pApp.getDesktopPane());

    application = pApp;

    initializeModel();
    initializeUI();
  }

  /**
   * Initializes the model.
   * <p/>
   * @throws Throwable if the initialization throws an error
   */
  private void initializeModel() throws Throwable
  {
    //we use a new "session" for the screen
    connection = ((MasterConnection)application.getConnection()).
    createSubConnection("apps.firstapp.frames.DBEdit");
    connection.open();

    //data connection
    dataSource.setConnection(connection);
    dataSource.open();

    //table
    rdbContacts.setDataSource(dataSource);
    rdbContacts.setName("contacts");
    rdbContacts.open();
  }

  /**
   * Initializes the UI.
   * <p/>
   * @throws Exception if the initialization throws an error
   */
  private void initializeUI() throws Exception
  {
    UIGroupPanel group = new UIGroupPanel();
    group.setText("Available Contacts");

    UITable table = new UITable();
    table.setDataBook(rdbContacts);

    group.setLayout(new UIBorderLayout());
    group.add(table);

    //same behaviour as centered component in BorderLayout
    setLayout(new UIBorderLayout());
    add(group);

    setTitle("Contacts");
    setSize(new UIDimension(400, 500));
  }

  //~~~~~~~~~~~~~~~~~~~~~~~~~~~~~~~~~~~~~~~~~~~~~~~~~~~~~~~~~~~~~~~~
  // Overwritten methods
  //~~~~~~~~~~~~~~~~~~~~~~~~~~~~~~~~~~~~~~~~~~~~~~~~~~~~~~~~~~~~~~~~

  /**
   * Closes the communication connection and disposes the frame.
   */
  @Override
  public void dispose()
  {
    try
    {
      connection.close();
    }
    catch (Throwable th)
    {
      //nothing to be done
    }
    finally
    {
      super.dispose();
    }
  }

} // DBEditFrame
| Methode | Beschreibung |
|---|---|
| initializeModel | Instanziert die Objekte für den Zugriff auf den Server bzw. die Daten. |
| InitializeUI | Layouting des WorkScreen. |
| dispose |
| createSubConnection | Wir erstellen eine eigene Verbindung zum Server. Das hat den Vorteil, dass am Server ein eigenes Lifecycle Objekt verwendet wird. Dieses Objekt hält alle Objekte, die vom WorkScreen benötigt werden. Nachdem der WorkScreen geschlossen wird, wird auch der benutzte Speicher wieder freigeben. Weiters kann jede Verbindung spezielle Parameter und Timeouts haben. Das gewünschte Lifecycle Objekt wird mit der Klassenbezeichnung definitert: apps.firstapp.frames.DBEdit. Die Klasse erstellen wir im Anschluß. |
| Member | Description |
|---|---|
| connection | The connection to the server, especially for the WorkScreen. A special communication protocol is used in the background. In our case, it is represented by the class DirectServerConnection. |
| dataSource | The DataSource is independent of the communication protocol and takes care of the data transfer between client and server. The connection defines under which name the server-side object is to be found in the lifecycle object. |
| rdbContacts | The model and the controller for data display. The name contacts defines under which name the server-side business object can be found. |
| table | The view for data display. |
- FirstApplication.java
public class FirstApplication extends Application
{
  ...
  ...
  ...

  /**
   * Opens the edit screen.
   * <p/>
   * @throws Throwable if the edit frame can not be opened
   */
  public void doOpenDBEdit() throws Throwable
  {
    DBEditFrame frame = new DBEditFrame(this);

    configureFrame(frame);

    frame.setVisible(true);
  }

}  // FirstApplication
| Method | Description |
|---|---|
| doOpenDBEdit | The method can easily throw a Throwable. All application errors are caught by the application and shown in an information dialogue. |
| configureFrame | This method is provided by the super class and ensures that all frames have a similar look. This also includes the menu icon. |
- File / New / Class
src.server,apps.firstapp.Application
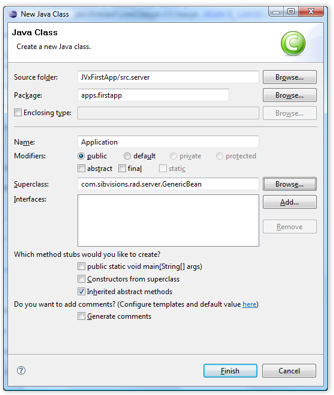
- Application.java
package apps.firstapp;

import com.sibvisions.rad.server.GenericBean;

/**
 * The LCO for the application.
 * <p/>
 * @author René Jahn
 */
public class Application extends GenericBean
{

}  // Application
| Description |
|---|
| The class represents the lifecycle object for an application. There is exactly one instance of this class for each application, thereby enabling the use of session-wide objects. |
- File / New / Class
src.server,apps.firstapp.Session
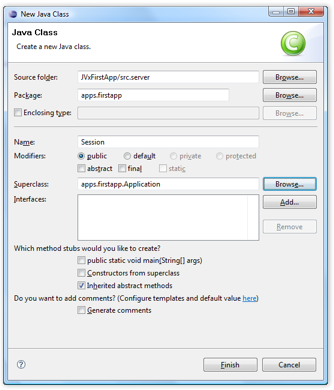
- Session.java
package apps.firstapp;

import com.sibvisions.rad.persist.jdbc.DBAccess;
import com.sibvisions.rad.persist.jdbc.IDBAccess

/**
 * The LCO for the session.
 * <p/>
 * @author René Jahn
 */
public class Session extends Application
{
  //~~~~~~~~~~~~~~~~~~~~~~~~~~~~~~~~~~~~~~~~~~~~~~~~~~~~~~~~~~~~~~~~
  // User-defined methods
  //~~~~~~~~~~~~~~~~~~~~~~~~~~~~~~~~~~~~~~~~~~~~~~~~~~~~~~~~~~~~~~~~

  /**
   * Returns access to the database.
   *
   * @return the database access
   * @throws Exception if a connection error occurs
   */
  public IDBAccess getDBAccess() throws Exception
  {
    DBAccess dba = (DBAccess)get("dBAccess");

    if (dba == null)
    {
      dba = new HSQLDBAccess();

      dba.setUrl("jdbc:hsqldb:hsql://localhost/firstappdb");
      dba.setUsername("sa");
      dba.setPassword("");
      dba.open();

      put("dBAccess", dba);
    }

    return dba;
  }

}  // Session
| Description |
|---|
| The class represents a lifecycle object for a session. In our case, a session begins with the login to the application and ends with the logout. There is exactly one instance of this object for each session. This allows objects to be used for the full duration of the login. Thanks to the inheritance of apps.firstapp.Application it is very easy to use even application objects. |
| Method | Description |
|---|---|
| getDBAccess | Opens a new connection to a HyperSQL database, if this has not already happened. The Exception Handling is taken over by the server. |
- File / New / Class
src.server,apps.firstapp.frames.DBEdit
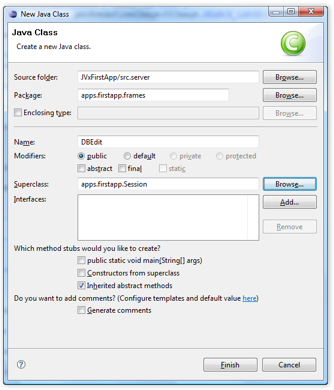
- DBEdit.java
package apps.firstapp.frames;

import javax.rad.persist.IStorage;

import com.sibvisions.rad.persist.jdbc.DBStorage;

import apps.firstapp.Session;

/**
 * The LCO for the DBEdit WorkScreen.
 * <p/>
 * @author René Jahn
 */
public class DBEdit extends Session
{
  //~~~~~~~~~~~~~~~~~~~~~~~~~~~~~~~~~~~~~~~~~~~~~~~~~~~~~~~~~~~~~~~~
  // User-defined methods
  //~~~~~~~~~~~~~~~~~~~~~~~~~~~~~~~~~~~~~~~~~~~~~~~~~~~~~~~~~~~~~~~~

  /**
   * Returns the contacts storage.
   *
   * @return the contacts storage
   * @throws Exception if the initialization throws an error
   */
  public IStorage getContacts() throws Exception
  {
    DBStorage dbsContacts = (DBStorage)get("contacts");

    if (dbsContacts == null)
    {
      dbsContacts = new DBStorage();
      dbsContacts.setDBAccess(getDBAccess());
      dbsContacts.setFromClause("CONTACTS");
      dbsContacts.setWritebackTable("CONTACTS");
      dbsContacts.open();

      put("contacts", dbsContacts);
    }

    return dbsContacts;
  }

}  // DBEdit
| Description |
|---|
| The class represents the lifecycle object for the DBEditFrame work screen. The objects can only be accessed via the SubConnection of the work screen. Thanks to the inheritance of apps.firstapp.Session it is very easy to access all Session and Application objects. |
| Method | Description |
|---|---|
| getContacts | Enables the access to the database table CONTACTS. The method name must match the object name of the RemoteDataBook: contacts ⇒ getContacts. The Exception Handling is taken over by the Server. |
CONTACTS table which we want to access. The configuration of HyperSQL DB is not described in detail in this document, as the examples on the project page are detailed and suffice. In the next chapter, you will find a short summary of the necessary steps.
== Create database ==
The following steps should take place to create and start a HyperSQL DB.
- Copy the HyperSQL JDBC-Driver (hsqldb.jar) to the directory
''../JVxFirstApp/libs/server/' - Add the JDBC-Driver to the CLASSPATH of the JVxFirstApp Project
- Create a database with the alias firstappdb and the following table:
CREATE TABLE CONTACTS
(
  ID            INTEGER IDENTITY,
  FIRSTNAME     VARCHAR(200) NOT NULL,
  LASTNAME      VARCHAR(200) NOT NULL,
  BIRTHDAY      DATE,
  STREET        VARCHAR(200),
  NR            VARCHAR(200),
  ZIP           VARCHAR(4),
  TOWN          VARCHAR(200)
)
- Start the database, e.g.:
java -cp ../libs/server/hsqldb.jar org.hsqldb.Server -database.0
     file:firstappdb -dbname.0 firstappdb
 The Source Code and the Eclipse project can be found in the Download section.