Table of Contents
Version: 5.0 / 2019-07-01
Introduction
The VisionX reports module allows the user to create reports in the following formats: Word RTF (documents), Excel (spreadsheets), XML, and PDF. Reports are used to provide selected data for the user to download. For certain report types, this data can then be edited locally and uploaded back into the application.
The report templates can easily be edited to adjust content or graphics and modified to match the user's corporate design.
The following chapters provide a detailed description of the creation and integration of the different report types as well as examples of their use.
Basics
Reports are created, edited, added to workscreens, and deleted in the application's menu. As mentioned above, there are four different types of reports:
- Documents (Word RTF Format)
- Spreadsheets (Excel XLS Format)
- XML
- PDF (Documents and spreadsheets)
When a report is created, a template is automatically generated in the respective format. This template can be downloaded, edited, and then uploaded as a modified template. The modified template is then used to create the respective report and is filled with data from the selected tables or records.
The templates use tags as tags for the actual data. These tags can be placed anywhere in the document and can be deleted and later added again. This allows for easy and quick generation of reports from any of the application's tables. Reports are conveniently displayed through the use of actions, such as the click of a button.
Requirements
To generate a report, a workscreen first has to be created that contains the required database tables. These tables are then used to populate the report. If the data shown in the report is to be restricted by certain filter criteria, those criteria have to be defined in the workscreen. For example, the filter criteria could be one of the following:
- Only display data for the current year
- Only display data for the specified user, etc.
Detailed information regarding workscreens and filter can be found in the VisionX documentation.
Step-by-Step "Create/Edit Report"
Once all the requirements have been met, we can begin generating the report. The Reports Wizard in the application's menu is used to create new or edit existing reports.
Since reports are managed by workscreen, the first step in the wizard is the selection of a workscreen.
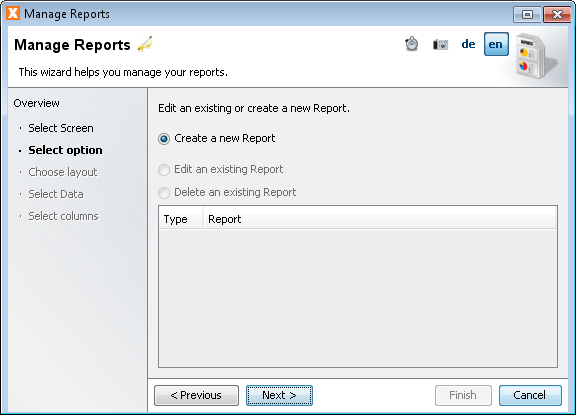
In the second step, creating a new report or editing an existing report can be chosen.
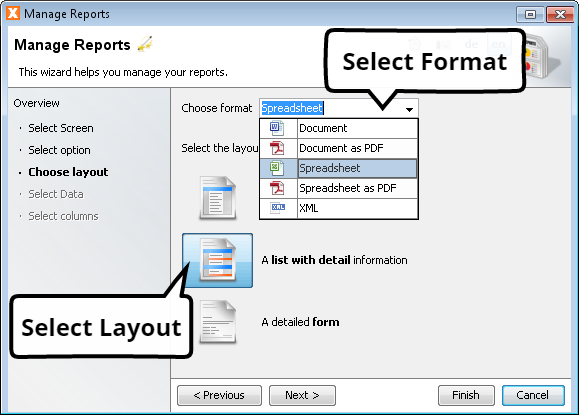
One of the following report formats is selected in step three:
- Document (=Word RTF Format)
- Spreadsheet (=Excel XLS Format)
- XML
- PDF (Documents and spreadsheets)
Depending on the VisionX license, certain formats may not be accessible or additional formats may be available.
In addition, one of the following report layouts can be chosen:
Simple List
A table is displayed as a simple list. The current data filter is applied.
List With Details
A table is displayed as a list in which for each master record a list of all detail records is shown. The current data filter is applied.
Form (With Details)
The currently selected master record is displayed as a form, below which detail tables can be shown.
In the next step, the master table (highest level table in the report) can be selected.
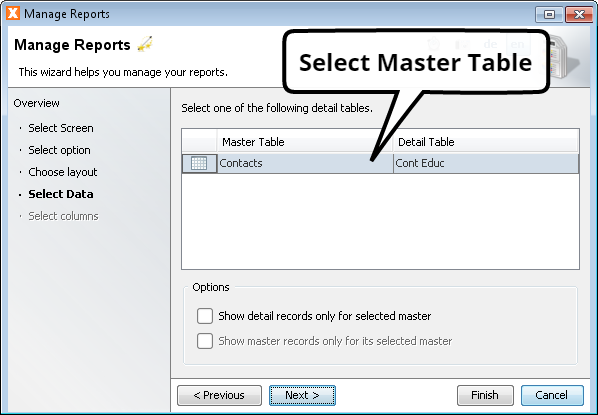
Depending on the layout, a number of options can be selected. This is particularly relevant for the “List With Details” format. The following options are available:
Checkbox “Show records only for selected master”
If this option is checked, only the selected master record and the respective detail records are displayed in the report.
Checkbox “Show master records only for its selected master”
If this options is checked, all detail records are displayed for all visible master records.
None of the two options are checked
If there is another level above the master record, no restrictions apply to this additional level.
Example: For the report, “State” (master) and “City” (detail) are selected; the table state has a master table “Country”. In this case, the report shows all states (for all countries!) and every city for each state
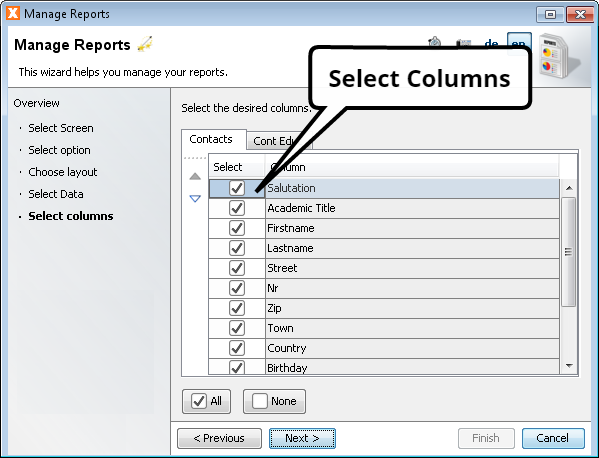
In the last step, the columns that are to be displayed in the report can be chosen for each table.
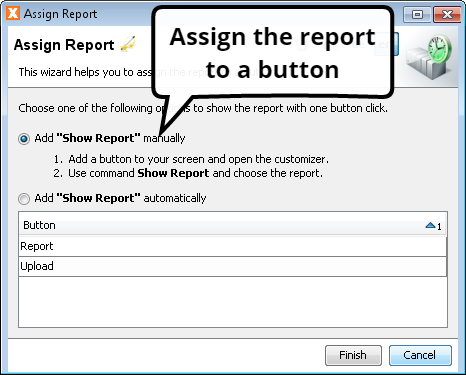
In this step, the newly created report can be assigned to a button. An action is automatically created, or an existing action is edited, to show the report.
The Reports Wizard can also be used to edit existing reports.
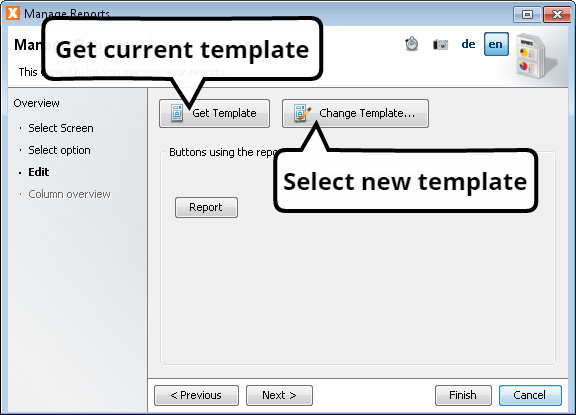
To edit an existing report, the report template is downloaded and edited using Microsoft Word, Excel, XML, or any other suitable editor and then uploaded back to the application. The templates are based on tags, which are populated with data from the database tables when the report is created.
Manage Reports
All examples used on the following pages are based on the sample application “Contacts”, which is included with VisionX. The Report Wizard is started by selecting “Report” in the application's menu.
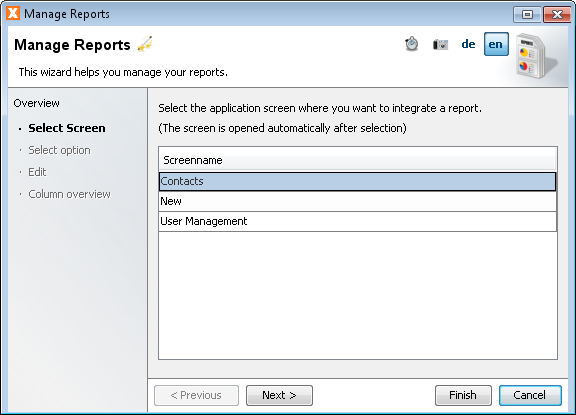
Select Workscreen
As mentioned previously, every report is based on an existing workscreen which has to be selected when the report is created. The report can then be made available for down- and upload.
Select Option
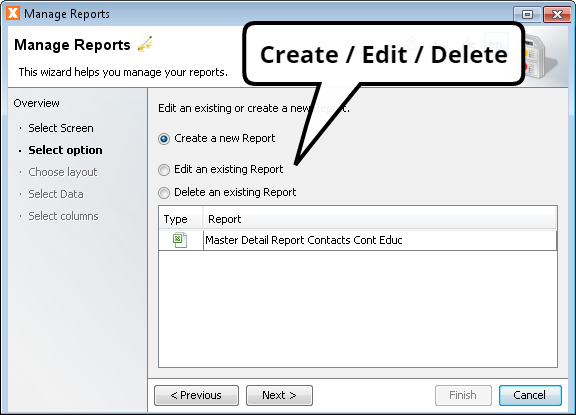
In the next step, the following choices are available under “Select Option”:
- Create a new report
- Edit an existing report
- Edit the template of an existing report.
- Review the list of buttons that use the report in their actions. These can also be edited directly. *Overview of all columns used in the report and their respective tags.
- Delete an existing report (all links to buttons are deleted)
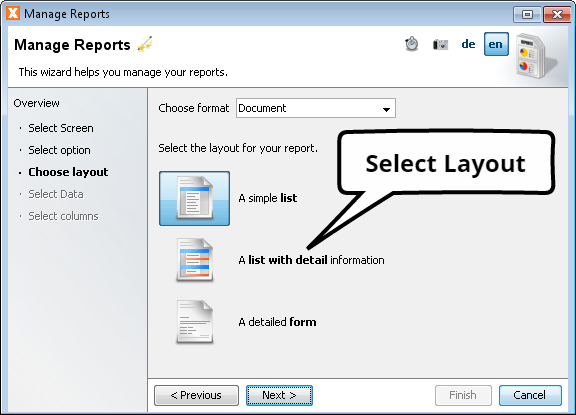
Select Layout
When a new report is created, the format and a standard layout can be selected. The following formats are available:
- Document (= Word RTF Format)
- Document as PDF
- Spreadsheet (= Excel XLS Format)
- Spreadsheet as PDF
- XML
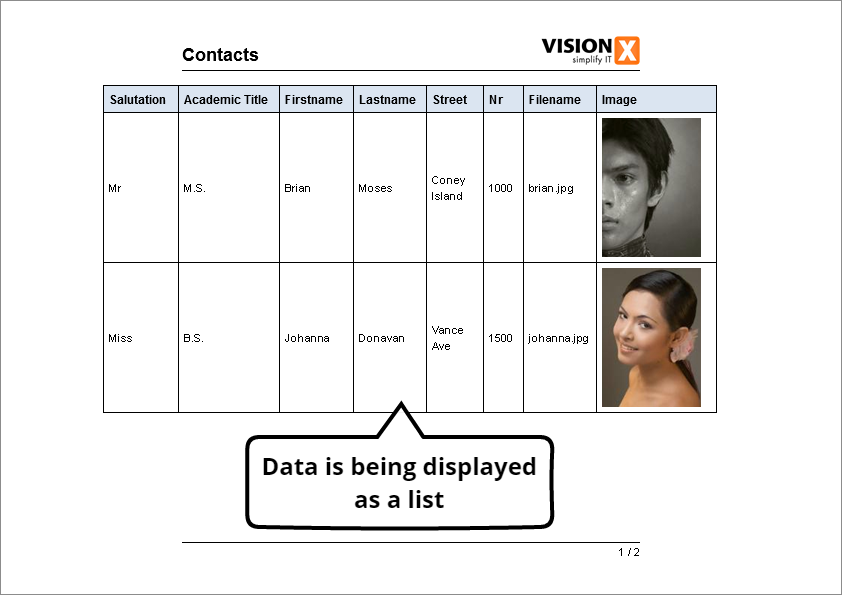
Simple List
A “simple list” displays the data from a table in list form. Example:
- Workscreen: Contacts
- Type: Document
- Layout: Simple List
- Table: Contacts
- Columns: Salutation, Academic Title, Firstname, Lastname, Street, Filename, Image
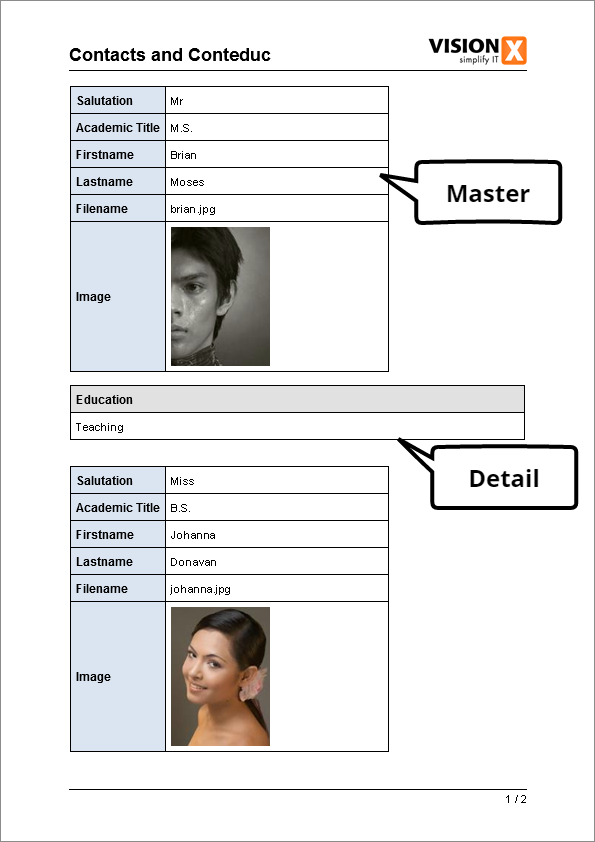
List With Detail Information
A report of the type “List with Detail Information” displays a master table with exactly one detail table in list form. Example:
- Workscreen: Contacts
- Type: Document
- Layout: List with Detail Information
- Table: Contacts and Conteduc
- Columns: Salutation, Academic Title, Firstname, Lastname, Filename, Image
- Option “Show detail records only for selected master”: not selected
- Option “Start a new page for every master record”: not selected
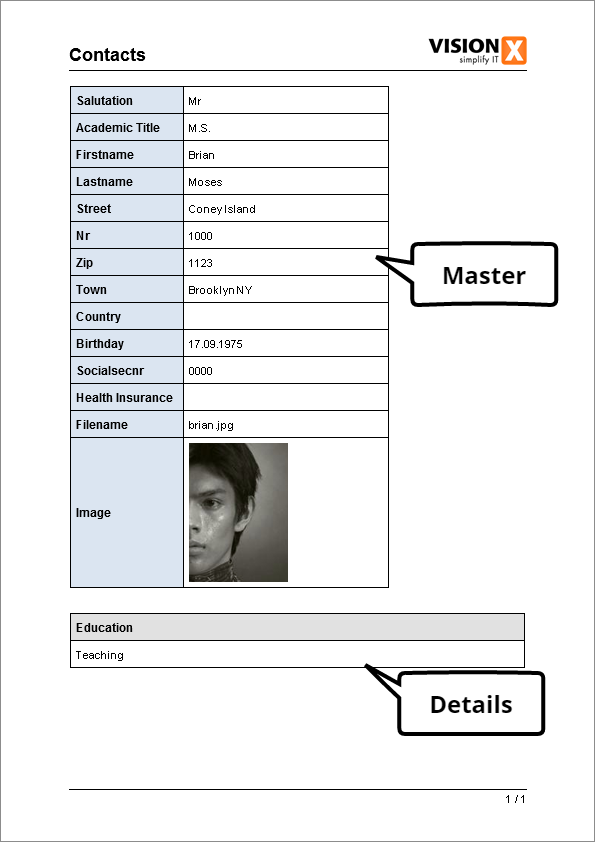
Detailed Form
A report of the type “Detailed Form” allows for the display of a master table as a form, with or without one or more detail tables. In the Report Wizard, the master table is selected first. Then, the detail tables can be selected, if required. In the final step, the columns that are displayed in the report are specified.
Select Data
Depending on the report type, a varying number of tables can be selected.
Simple List
Exactly one table can be selected.
List With Detail Information
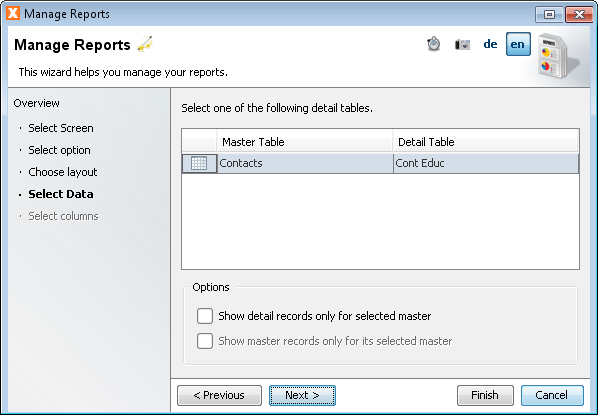
Exactly one master table with a exactly one detail table can be selected.

Detailed Form
For a detailed form report, a master table can be selected, as well as any number of detail tables. The master table is chosen in the first step:

In the next step, the detail tables are selected:
Select Columns
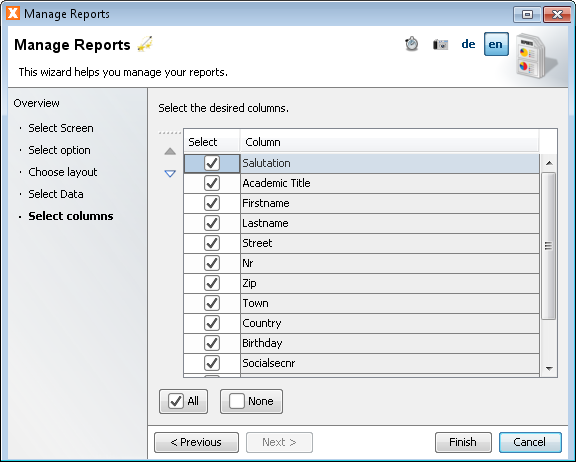
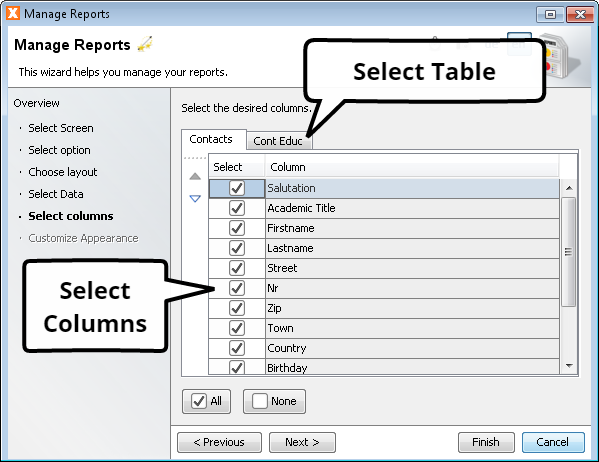
The following step determines which columns are displayed in the report. Columns can be selected for the master table and for all selected detail tables. There is an additional column for the detail tables that is not selected by default. This column represents a reference to the master table; selecting it is optional.
Customize Appearance
The final option is related to the placement of the master records. If this option is selected, each master record is placed on a new page (for documents) or on a new sheet (for spreadsheets). The option is not selected by default, in which case the master records are placed sequentially on the same page.

Edit Report (Template)
After a report has been created, it can be edited at any time. To do this, “Reports” is selected in the application's menu. After the workscreen for which the report was created is chosen, “Edit an existing Report” is selected as well as the report that is to be edited.
After the selection, the following actions can be taken:
- Download template: to download the report template in the respective format (.rtf, .xls, .xml)
- Change template…: to upload a modified template
- Buttons using the report: the respective action (show report, download report …) can be edited by clicking on one of the buttons used by the report
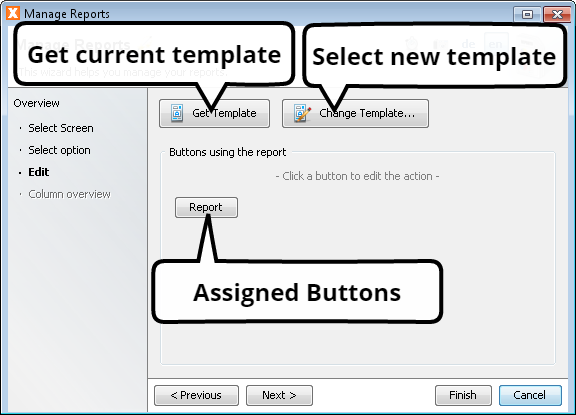
To change a template, it is downloaded and saved locally. It is then opened in the respective program (Word, Excel, etc.) for editing.
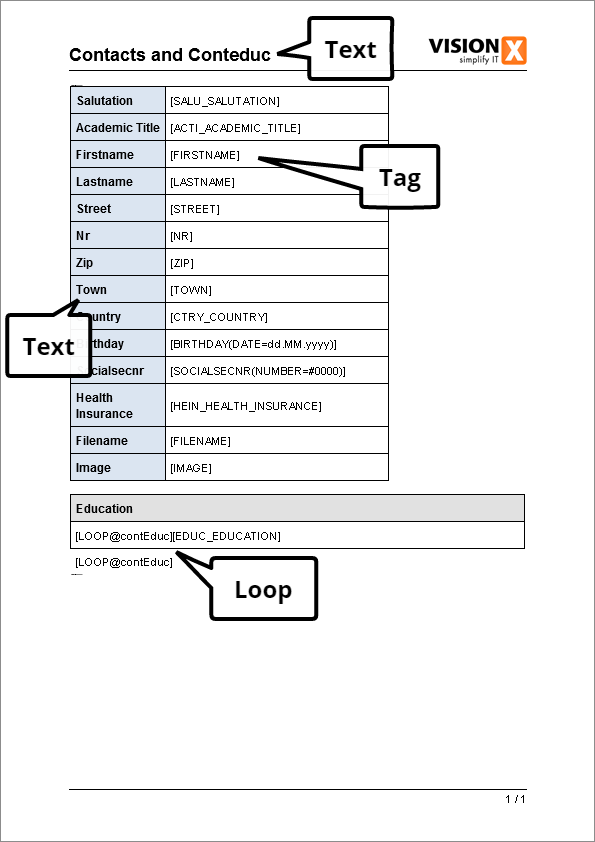
Existing text, such as column labels, can be edited and reformatted in the template. In addition, additional text or pictures can be added to the template and the overall formatting (font, etc.) can be modified.
Tags are replaced by data when the report is created. Columns can be deleted and added again. For detailed information regarding tags please see Tags.
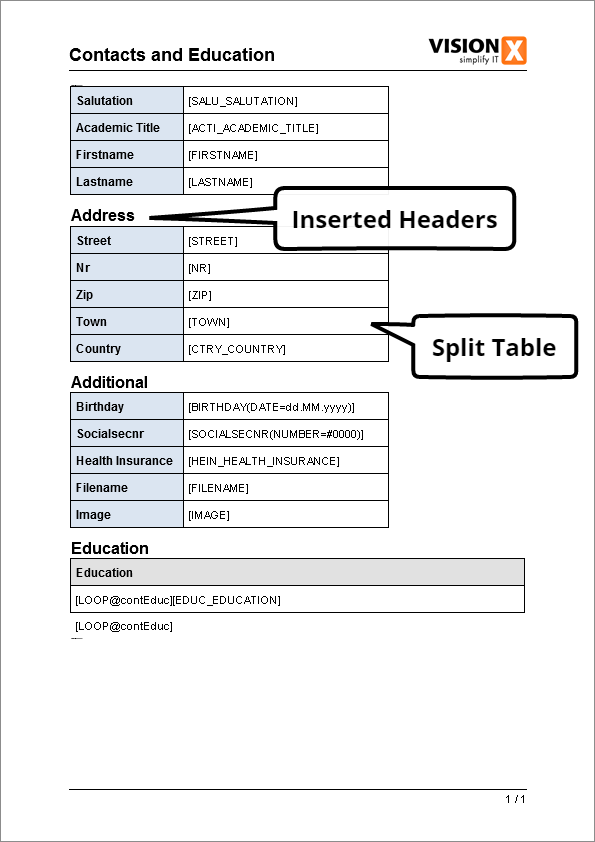
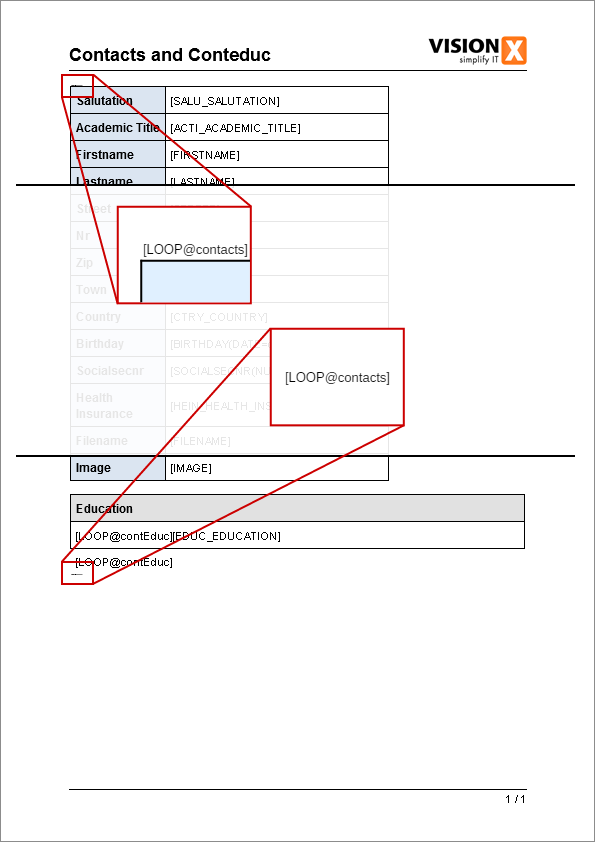
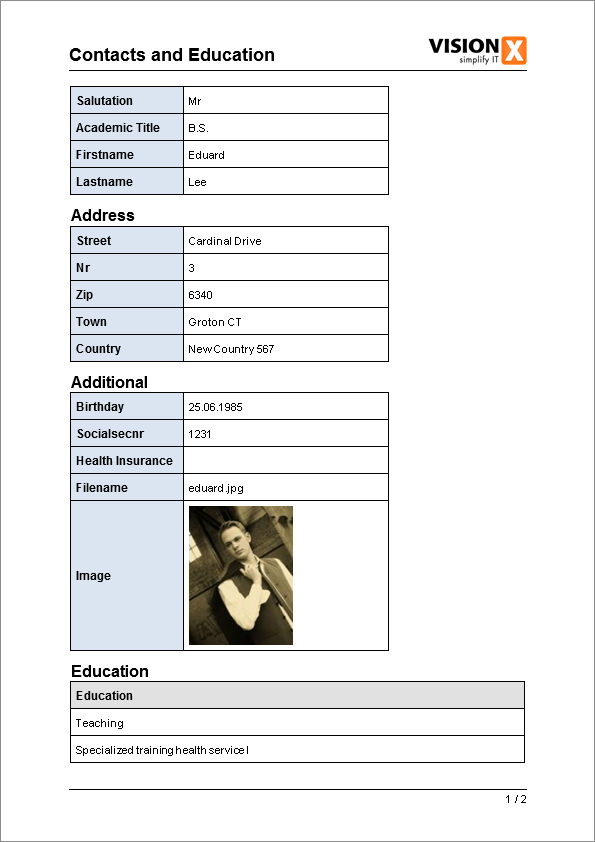
After the template has been edited, it is uploaded back into the application using the “Change Template…” button. It is important to note that the master record with its corresponding detail record is also located within a loop tag, which cannot be deleted.
In the example above, the loop tag is placed in the template using font size 1. If the font size is increased, the loop tag is displayed above and below the master record.
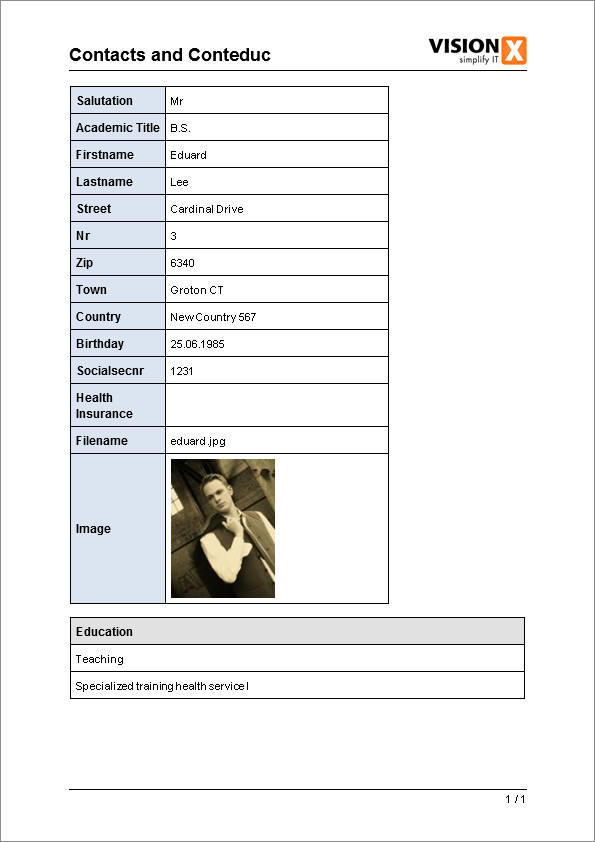
Example:
- Workscreen: Contacts
- Type: Document
- Layout: List with Detail Information
- Tables: Contacts and Conteduc
- Columns: All columns were selected
- Option “Show records only for selected master”: selected
- Option “Start a new page for every master record”: not selected
Column Overview
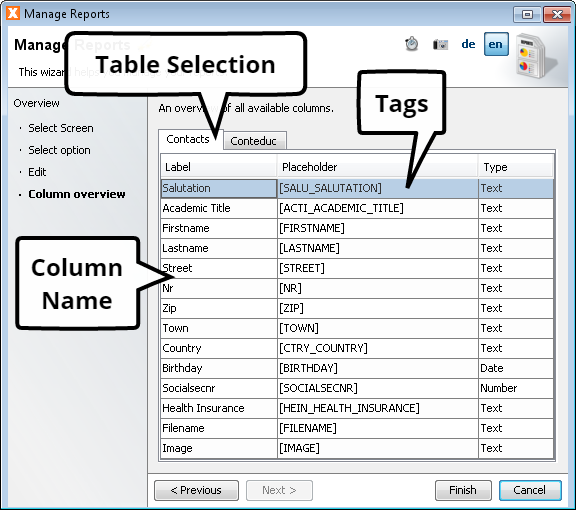
If a column that was deleted from the report is to be added back at a later time, the respective tag tag can be found in the column overview. This overview is displayed after selecting “Edit an existing Report”. All columns of the tables used in the report are shown.
Tags
Any column can be added to the report using the defined tags. A tag consists of the column name in [ ] brackets. The predefined tag can be found in the previously discussed column overview.
Formatting
Depending on the column type (number, date, etc.), the output value can be formatted automatically. The format is defined in the tag as follows:
[COLUMNNAME(TYPE=FORMAT)]Example:
[SOCIALSECNR(NUMBER=0000)]This results in the display of a four digit number, where unused digits are populated with zeros. For example, the number “1” is shown in the report as “0001”.
The following types/formats are available:
-
[COLUMNNAME(CHECKBOX)] -
[COLUMNNAME(CHECKBOX=Yes,No)] [COLUMNNAME(DATE=d. MMMM yyyy)]Additional information regarding the format can be found here: http://docs.oracle.com/javase/6/docs/api/java/text/SimpleDateFormat.html
[COLUMNNAME(NUMBER=#,##0.00)]Additional information regarding the format can be found here: http://docs.oracle.com/javase/6/docs/api/java/text/DecimalFormat.html
Important:
For spreadsheet reports, the format should NOT be specified in the tag, since it would be interpreted as text. The format for the cell should be set in the template.
Loops
For list type reports (simple list, list with detail information), all columns that are displayed in the report have to be defined within a loop tag. This loop tag has the following format for the beginning and end of the loop:
[LOOP@tablename]E.g.:
[LOOP@contacts]
A complete loop for a table would be defined as follows:
[LOOP@contacts] [SALU_SALUTATION] [FIRSTNAME] [LASTNAME] [LOOP@contacts]
Between the beginning and end of the loop, additional text, formatting, etc. can be added which will then be inserted at the specified location for each record.
The following should be noted:
- The master table's loop tag always has to be opened first
- The master table's loop tag always has to be closed after the detail loops
A loop tag for the master record is not required for reports of the type “detailed form”. Columns in the master table can be accessed directly:
[tablename!COLUMNNAME]E.g.
[contacts!FIRSTNAME]
In addition, it is possible to individually access specific row numbers. This makes it easier to display individual detail records. Also, the reference remains within the spreadsheet.
The following format is used to access individual row numbers:
[LOOP@tablename#rownumber]E.g.
[LOOP@contacts#1][FIRSTNAME][LASTNAME][LOOP@contacts#1]
If only one value in the table is required, the following abbreviated form can be used:
[tablename#rownumber!COLUMNNAME]E.g.
[contacts#0!FIRSTNAME]
Spreadsheet Example
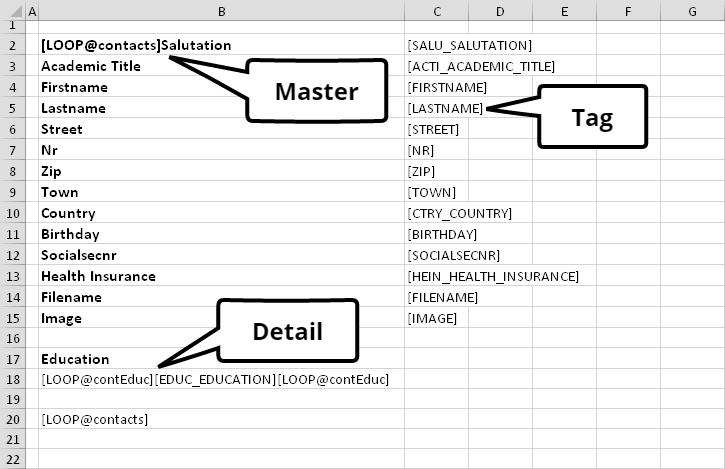
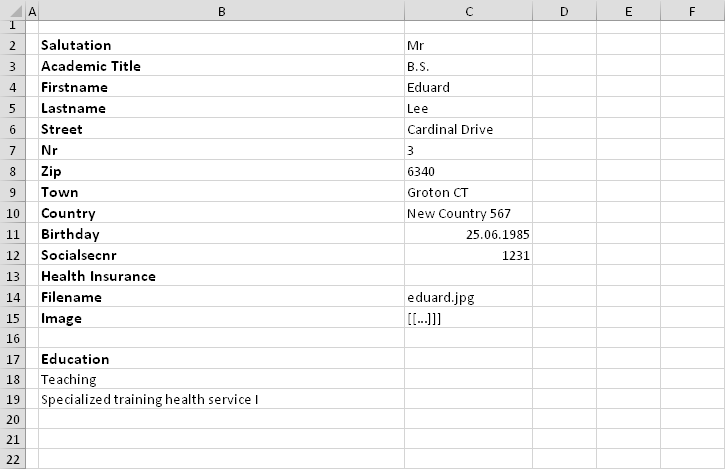
The report will then be displayed as follows:
XML Example
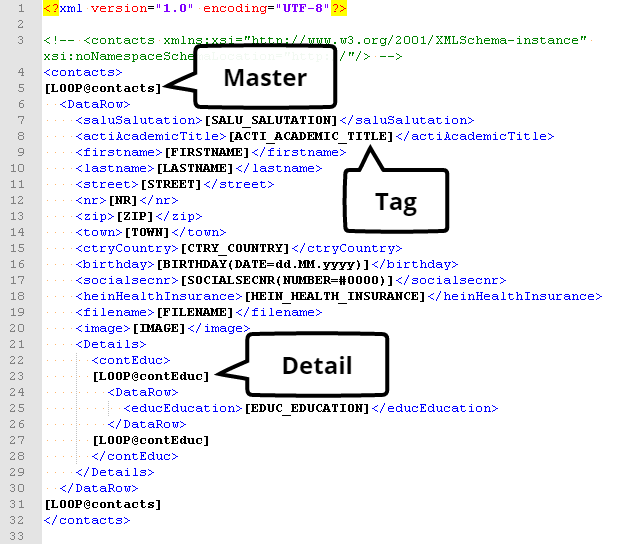
The report will then be displayed as follows:
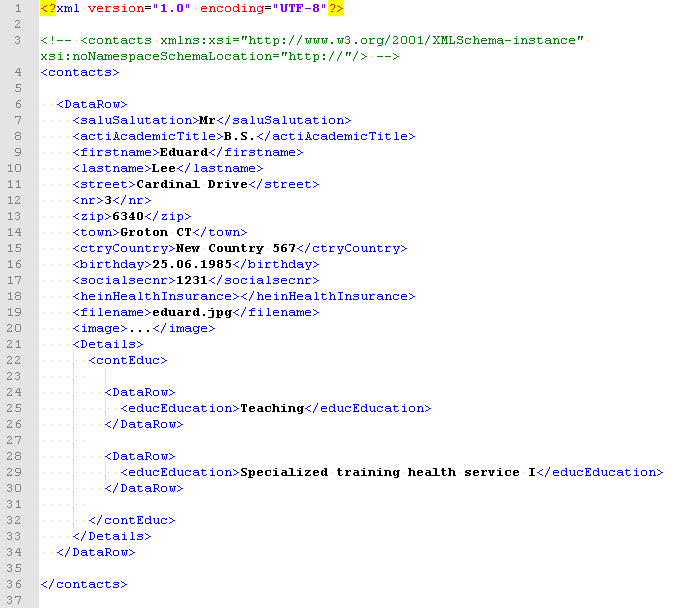
Actions
To display a report, it has to be associated with an action in the respective workscreen. For example, the report can be displayed at the click of a button or upon the selection of a specified filter criteria.
The following actions are available:
Show Report
The specified report is displayed, either in a browser or using the related program (e.g. Word, Excel), depending on how the PC is configured.
Parameters: [List of all reports of the workscreen]
Example: Show Report | Form Report Contacts
Download Report
The specified report is downloaded. It can then be saved to the local hard drive and opened from there.
Parameters: [List of all reports of the workscreen]
Example: Download Report | Form Report Contacts
Save Report
The specified report is saved in a table. The save location is determined by two parameters: The report's file name is saved in a text column of the table; the file itself is saved in the current row of a table column of the type Image or File.
Parameters: [File name: List of all columns of all tables in the workscreen], [File: List of all columns of all tables in the workscreen] | [List of all reports in the workscreen]
Example: Save Report | [Contacts.Filename] | [Contacts.Image] | Form Report Contacts
Hint: This function can be used to save reports that are created by the application in a table. Example: lists, proposals and other business reports.
Import Report (Merge)
The specified report is imported. All of the report's data is transferred to the respected rows and fields of the workscreen. If the “Merge” option is selected, only modified, deleted, or new information is imported. Data that already exists is not added separately. If the “Insert” option is selected, all data rows, including existing rows (tested for similarity) are transferred. This functionality is only available for XLSX (Excel) and XML reports that were created using VisionX. Of course, the report templates can be edited. This command is used to import offline forms into the application.
Parameters: [List of all commands of the workscreen]
Example: Show Report| Import Report (merge) | Form Report Contacts (xls)
Import Report (Insert)
See “Import Report (Merge)” above.
Upload
In general, only reports of the type spreadsheet and XML can be uploaded back into a workscreen after they have been modified locally. Requirements for successful upload include:
XML
- Valid XML is required, since otherwise it cannot be read/parsed.
Spreadsheet
- An empty row is required after each end loop tag. This empty row also has to be added for rows that were filled in or expanded. If it is not added, the end of the table is not recognized.
- Only field containing values can be changed. If, for example, a label or the document style is modified, the uploaded file will no longer match the template and will generate an error message.
Differences Between the Report Types
Document and XML
Formatting
If a particular format is required for an output value, it has to be specified separately. See Formatting.
Spreadsheet
Problems With File Contents
File contents (both files and images) cannot be displayed in a spreadsheet and result in an error message. The respective columns should be removed from a spreadsheet report, either during the creation of the report or by subsequent editing of the template.
PDF Reports
The creation of PDF reports is a little more involved compared to the creation of document or spreadsheet reports. A PDF report is created like a document or spreadsheet report but is afterwards converted into a PDF by using a PDF conversion service.
This has the advantage that the report templates are easily editable with Word or Excel. With the conversion an “immutable” document is created which can be easily archived and is better suited for being sent as information to clients.
The conversion itself is carried out by a PDF conversion service. This service must be provided by the customer and requires a Windows (server) system in combination with a conversion software. This software is offered in combination with VisionX depending on the chosen license.
The PDF conversion service must be configured once in VisionX. This can be done in the VisionX preferences.
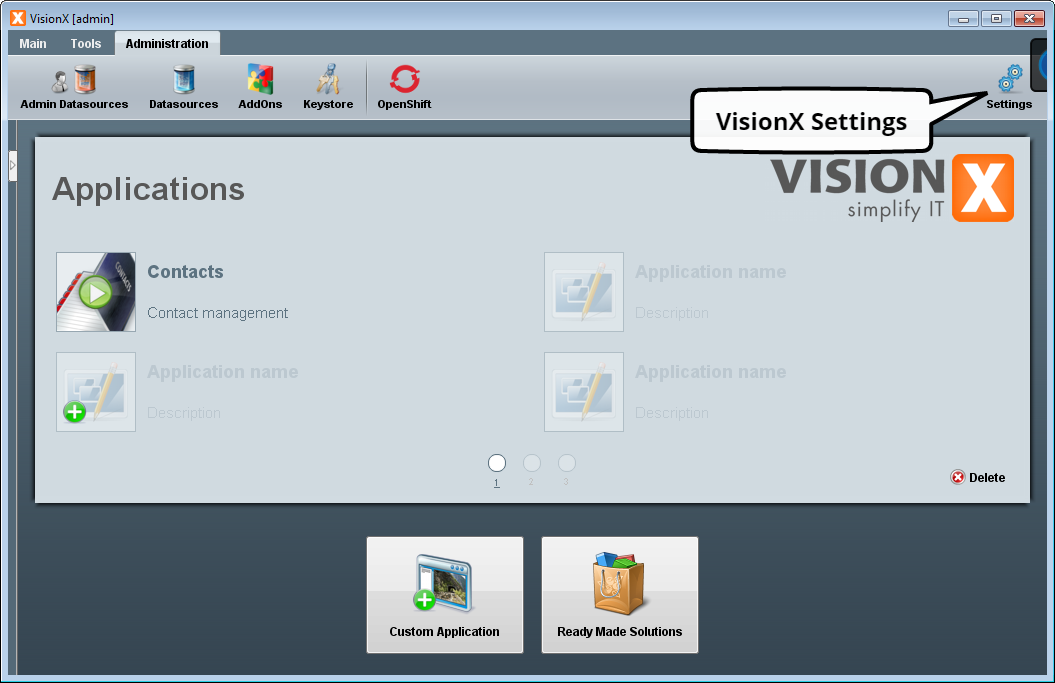
Just the name and the address of the server are required for completing the configuration.
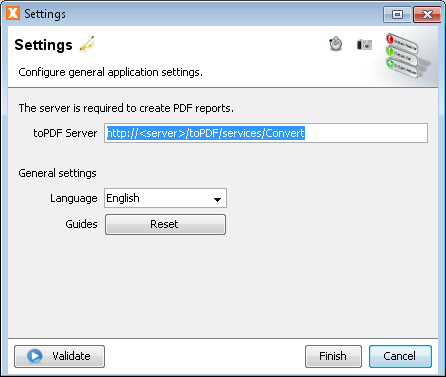
After the PDF conversion service has been configured, the PDF options become available when creating new reports.
Create Specification
The application's menu contains the “Specification” option, which can be used to create the database documentation or the specification for the workscreens.
For further information on how to create specifications, see the the VisionX documentation.
The specification template uses the same mechanism as all the other reports. It can therefore be edited easily.